...I am still here. Also, yes, graduate school is going well. Down to my last semester and the fiery whirlwind that is student teaching: five days a week in the classroom of an experienced Japanese teacher who, to her great credit, has already demonstrated saintly patience by consenting to take me on in the first place*. I offer my advance apologies and well-wishes to both H-sensei and her classes; this will be a profound learning experience for me, and I sincerely beg for your forgiveness when the inevitable mistakes arise. Yoroshiku onegai itashimasu. m(-_-)m
No, I am not entirely done with blogging forever. I am deeply enamored with Weebly for future online publications, however, and I'll be sure to let folks know when I start producing said publications again. (Hint: not likely until May.)
In the meantime, I wish you all a fortuitous beginning to 2014! Akemashite omedetou gozaimasu! May all of your own endeavors be successful and deeply satisfying, and your understanding of the universe only ever increase in wonder.
*... as have my two previous IMTs, although they only had to contend with my silliness one day of each week, which should technically have been 80% more manageable. Watakushi no sensei-tachi no mina-sama, itsumo o sewa ni narimashita yo! Made ganbatteimasu! ;_;

Showing posts with label Japanese. Show all posts
Showing posts with label Japanese. Show all posts
Saturday, January 11, 2014


Monday, April 18, 2011
5:29
The tsunami in Miyagi prefecture, as viewed from Shidzukawa high school. Public schools are commonly built atop hills in Japan, especially in the Tohoku region, specifically to become safe zones in the case of tsunami. The public is instructed from childhood to gather at schools in case of any disaster or emergency.
In 5 minutes and 29 seconds, the entire town of Minamisanriku is destroyed.
In 5 minutes and 29 seconds, the entire town of Minamisanriku is destroyed.
This is the last post I'll make for a while regarding the tragedies in Japan, but please don't forget that the suffering continues every day, in millions of ways great and small. Your generosity can make all the difference. If you haven't already, please consider making a donation of your time or resources to help Japan.
Besides the American Red Cross, the International Rescue Committee and CARE are two highly-rated charities currently working to provide relief and aid in Japan. There are many others. Check with your favorite charity.
Thank you very much; a million hearts rely upon your kindness.
たいへんどうもありがとうございました;お世話になりました。
Thursday, March 17, 2011
"Don't Panic."
Happy St. Patrick's Day to you all; hopefully you have some corned beef and beer (or at least beer) to get you through the evening.
If you or anyone close to you happens to be contemplating the purchase of potassium iodine in the near future, may I strongly recommend that you do not add to the uneducated, panic-driven run on such capsules unless you are living in the eastern half of Japan or intend to join the relief effort there within the next six weeks. No, there is no nuclear cloud coming to California. Hawaii is absolutely safe (watch out for that Kilauea, though).
This crap:


...is exactly that; crap. A lulzy hoax born on 4chan. So many idiots have been trolled by these images and other hype that now there is a shortage of potassium iodine for the people who actually need it in Japan.

There are several hundred technicians and engineers being cycled in and out of the nuclear plant in Fukushima right now, 24 hours a day, working tirelessly to stop the reactors from going into full meltdown. They are the only ones in the world thus far exposed to any levels of radiation that could be deemed dangerous by modern medicine. Many of these men and women have lost their homes and their families to the quake and subsequent tsunami, but they are still volunteering to go into harm's way to avert a third disaster, doing all that they can to save their fellow citizens. The least we can do is not buy up all the pills they need to protect themselves from thyroid cancer.
Please spread the word. Tell people to cut this crap out. If you have iodine pills, contact your local branch of the Red Cross for a way to donate them. Thank you very, very much.
If you or anyone close to you happens to be contemplating the purchase of potassium iodine in the near future, may I strongly recommend that you do not add to the uneducated, panic-driven run on such capsules unless you are living in the eastern half of Japan or intend to join the relief effort there within the next six weeks. No, there is no nuclear cloud coming to California. Hawaii is absolutely safe (watch out for that Kilauea, though).
This crap:
...is exactly that; crap. A lulzy hoax born on 4chan. So many idiots have been trolled by these images and other hype that now there is a shortage of potassium iodine for the people who actually need it in Japan.

There are several hundred technicians and engineers being cycled in and out of the nuclear plant in Fukushima right now, 24 hours a day, working tirelessly to stop the reactors from going into full meltdown. They are the only ones in the world thus far exposed to any levels of radiation that could be deemed dangerous by modern medicine. Many of these men and women have lost their homes and their families to the quake and subsequent tsunami, but they are still volunteering to go into harm's way to avert a third disaster, doing all that they can to save their fellow citizens. The least we can do is not buy up all the pills they need to protect themselves from thyroid cancer.
Please spread the word. Tell people to cut this crap out. If you have iodine pills, contact your local branch of the Red Cross for a way to donate them. Thank you very, very much.
Monday, March 14, 2011
3.14 - Pi Day
It's Pi Day again; hope you've all had your slice today. The radiation situation is getting pretty serious in Fukushima. What kind of wicked misfortune is it that the only nation in the world to have been struck with nuclear weapons is now facing what could be the simultaneous meltdown of three nuclear reactors? Honestly. これがまんできなさそう。
Even though Japan is a modern, first-world country with some of the best disaster preparation possible, the scope of the damage done is truly epic. Please consider making a donation to your favorite international charity to ease the suffering of the displaced and wounded in this immediate aftermath. Please by donating now to the Red Cross.
NHK World channel, live in English:
Even though Japan is a modern, first-world country with some of the best disaster preparation possible, the scope of the damage done is truly epic. Please consider making a donation to your favorite international charity to ease the suffering of the displaced and wounded in this immediate aftermath. Please
by donating now to the Red Cross.NHK World channel, live in English:
Friday, March 11, 2011
8.9


She lives here:

This is Kamaishi, at the end of the trainline I rode into town every weekend.

This is Kamaishi now:

Live feed of Japanese news:
日本にいる皆さん、私とこの世界は君様のために祈っています。気をつけてお大事にします。
Tuesday, November 16, 2010
富士山:ふじさん, Mount Fuji
Woah, a softie pattern? Really?

I've been sitting on this "mountain" idea for a long time, trying to figure out how to make it more mountainous. The original small version looked like crap:
 Pfft, first try.
Then I tried to make a really big, fluffy one out of some fleece material, like a wumphy-fumphy pillow, but it also ended up looking like crap:
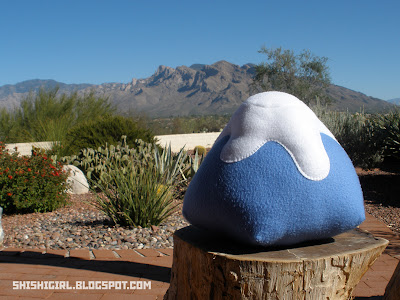
...and then I discovered that somebody else had already made a much nicer soft Fuji:
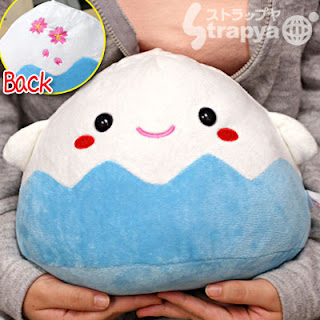
...so fark that. Here's an Eyjafjoell, or Merapi, if you prefer.
 Okay, not quite as bad.

Yep! :D
I've been sitting on this "mountain" idea for a long time, trying to figure out how to make it more mountainous. The original small version looked like crap:


...especially when compared to real mountains.
...and then I discovered that somebody else had already made a much nicer soft Fuji:

damnit

平和な場所と見えるけど、実は、富士山も活火山です。Despite it's peaceful visage in modern times, it is important to note that Fuji-san is also still an active volcano.
(She could blow any minute - save the tea!!!)
And, if you're interested, the word for volcano in Japanese is kazan, written with two very basic kanji: "fire" and "mountain".
火 = fire
山 = mountain
火山 = volcano
Pretty easy, right? This is actually the way most Japanese words are formed. Even single kanji, since they began as ideograms (shorthand pictures meant to illustrate the thing they were describing), can be built out of simpler kanji stuck together:
木 = tree森 = forest
日 = sun月 = moon明 = bright
Hey, you just learned some kanji. :D 楽しみしてね!
Saturday, November 13, 2010
Postality II
Hells yeah, Postcrossing is awesome. Successfully sent cards to Finland, France, and Canada; the USPS is still working on a pair to Russia and the Netherlands. Best of all, Finland and Croatia each sent me one back! ♡
Here is my gallery of cards received~ ♪♫
Now, on a different issue, can anyone out there catch the Japanese unicode symbols I use all the time on this blog? Here's a test:

Here is my gallery of cards received~ ♪♫
Now, on a different issue, can anyone out there catch the Japanese unicode symbols I use all the time on this blog? Here's a test:
〠
Do you see a strange little face symbol? That's the Japanese post's Nanba-kun (ナンバ君、"Mr. Number") character, essentially the J-version of Mr. Zip.
If you do not see the strange little face (you might get a little box instead), would you kindly let me know what browser you're using in the comments section? Thank you very much~♡
Saturday, July 24, 2010
A List
A bilingual list of (some of) the stuff I need to make into softies:
郵便車 (yuubinsha, a post truck)
郵便箱 (yuubinbako, a post box)
ラジオ (rajio, a radio; which can also be 無線, musen)
せみ (semi, a cicada)
サボテン (saboten, a cactus)
ヒトデ (hitode, a sea star)
ベタ (beta, a fighting fish)
ホットドッグ (hotto-doggu, a hot dog, for some silly reason)
小さな蟹 (chiisana kani, a tiny crab)
太っている鯣 (futotteiru surume, a fat cuttlefish)
鮫 (same, a shark, because SereneSky asked for one)
Any suggestions to add to the list? :3
"You're on my list, Birdman!"
Monday, July 12, 2010
ゆびぬき:yubinuki, Japanese thimbles
Once again, I have been side-tracked into another J-craft. I officially cannot resist pretty things. Not even a little bit.
These are seriously awesome, though.

The word yubinuki simply means "thimble" in Japanese. It can refer to the bucket thimbles we're accustomed to in the west, leather cuff thimbles, metal pad thimbles, or any one of several "thing that goes on your finger when you are sewing" accessories.


What we've specifically got here are kaga yubinuki (加賀指ぬき). They are padded fabric rings decorated with silk thread. The origin of this style of thimble is credited to the Kaga region of old Japan, modern day Ishikawa prefecture, hence the term kaga yubinuki. When the term "yubinuki" is used in English, it is almost always in reference to this unique type of embroidered thimble.
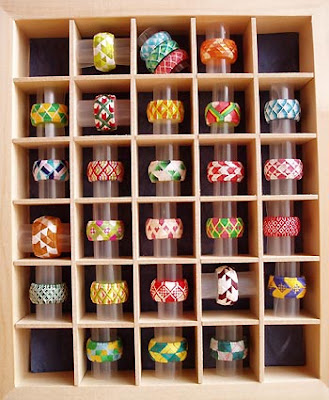
I discovered yubinuki by way of a related craft called temari (てまり), a topic upon which I really, really hope to do a tutorial soon. The two are related in that they both apply colorful geometric patterns of silk thread to a padded, curved surface. Yubinuki, however, are easier in my humble opinion: there are fewer divisions to keep track of, only one stitch to remember, and they are generally much smaller.
The materials to make a yubinuki are fantastically simple. You need only a small piece of fabric, a needle, some thread in a few colors, some strips of paper, and a little padding. The Japanese use loose-fiber silk padding, but for those stitching in the west, I find that a bit of an unrolled cotton ball works just as well. (Polyfil does NOT work very well, as it is very springy and hard to wrap around the ring base without bits of it sticking out everywhere.)
もし日本語が読めれば、こちらには簡単な how-to があります。:D
If you can read Japanese, here is a simple tutorial all on one page. A more complete tutorial and the pattern to make the double yabane (arrow-tail) pattern can be found here. Even if you don't read Japanese, it's worth a look at just the pictures in each tutorial -- you'll quickly get the feel for what is being done.
Yubinuki instructions in English are a little harder to come by. Fortunately, there is Chloe Patricia and her blog, Ma Mercerie. Madam Patricia gives excellent tutorials for building a thimble base, stitching, making and using patterns, and more, all in English. パツリシア様、大変お世話になりました!
Once you're comfortable with building a ring base, all you need to do is learn the knot to start a new thread on the ring:

...and the single stitch used to make all the various patterns:

What allows for the variety of patterns is the number of divisions you mark on the ring (how many zig-zags of each thread), and in what order the different colors of threads reach across each other. After you get used to the basic stitch, you'll likely be able to mentally de-construct a finished yubinuki and understand the pattern used to make it. I'll be posting the basic ones as I finish graphing them out. :D
Until then:
Tutorials
Base-making tutorial: excellent pictures, Japanese text - also shows how to divide strips without measuring, using a line set or graph (from てんとう虫がやって来た)
Base and stitch tutorial: in Japanese (from Fujix Ltd. publishing)
Base and double yabane pattern tutorial: in Japanese, click each link in order from top to bottom to get a breakdown of materials, base making, divisions, stitch method, and pattern (from Thimble Japan)
Galleries
From 茶飲み話: works from 2006, 2007, 2008, and 2009 (all separate links)
From Zuccaさん: handmade yubinuki gallery
From Quilt-Yui: handmade yubinuki divided by design type (click the various links beneath the words 店主のギャラリー, the fourth menu item down in the left-hand frame)
From 人鳥官: yubinuki and quilting, link goes directly to yubinuki section
Blogs
Small pieces (category 加賀指ぬき)
Amerika tsukuri (full of yubinuki, temari, and miniatures of both)
...and there are a ton more. Try copy-pasting the Japanese term 加賀ゆびぬき (kaga yubinuki) into a GIS. Or, you know, just click here. :D
All actual pictures of kaga yubinuki in this post have been blatantly stolen from the Internet; I wanted to credit them, but I lost the links to the sites from which I saved them, 'cause I'm an idiot. -_-; すばらしい加賀指ぬきの写真は無断に盗まれてしまいました。もしかして、あなた様の写真がこちらに見つけて、おしえてください。大変申し訳ありません。
I'll be back soon with a step-by-step of some patterns~
These are seriously awesome, though.

the above images are all yubinuki,and all blatantly stolen from the Internet
What we've specifically got here are kaga yubinuki (加賀指ぬき). They are padded fabric rings decorated with silk thread. The origin of this style of thimble is credited to the Kaga region of old Japan, modern day Ishikawa prefecture, hence the term kaga yubinuki. When the term "yubinuki" is used in English, it is almost always in reference to this unique type of embroidered thimble.

I discovered yubinuki by way of a related craft called temari (てまり), a topic upon which I really, really hope to do a tutorial soon. The two are related in that they both apply colorful geometric patterns of silk thread to a padded, curved surface. Yubinuki, however, are easier in my humble opinion: there are fewer divisions to keep track of, only one stitch to remember, and they are generally much smaller.
The materials to make a yubinuki are fantastically simple. You need only a small piece of fabric, a needle, some thread in a few colors, some strips of paper, and a little padding. The Japanese use loose-fiber silk padding, but for those stitching in the west, I find that a bit of an unrolled cotton ball works just as well. (Polyfil does NOT work very well, as it is very springy and hard to wrap around the ring base without bits of it sticking out everywhere.)
もし日本語が読めれば、こちらには簡単な how-to があります。:D
If you can read Japanese, here is a simple tutorial all on one page. A more complete tutorial and the pattern to make the double yabane (arrow-tail) pattern can be found here. Even if you don't read Japanese, it's worth a look at just the pictures in each tutorial -- you'll quickly get the feel for what is being done.
Yubinuki instructions in English are a little harder to come by. Fortunately, there is Chloe Patricia and her blog, Ma Mercerie. Madam Patricia gives excellent tutorials for building a thimble base, stitching, making and using patterns, and more, all in English. パツリシア様、大変お世話になりました!
Once you're comfortable with building a ring base, all you need to do is learn the knot to start a new thread on the ring:

...and the single stitch used to make all the various patterns:

What allows for the variety of patterns is the number of divisions you mark on the ring (how many zig-zags of each thread), and in what order the different colors of threads reach across each other. After you get used to the basic stitch, you'll likely be able to mentally de-construct a finished yubinuki and understand the pattern used to make it. I'll be posting the basic ones as I finish graphing them out. :D
Until then:
Tutorials
Base-making tutorial: excellent pictures, Japanese text - also shows how to divide strips without measuring, using a line set or graph (from てんとう虫がやって来た)
Base and stitch tutorial: in Japanese (from Fujix Ltd. publishing)
Base and double yabane pattern tutorial: in Japanese, click each link in order from top to bottom to get a breakdown of materials, base making, divisions, stitch method, and pattern (from Thimble Japan)
Galleries
From 茶飲み話: works from 2006, 2007, 2008, and 2009 (all separate links)
From Zuccaさん: handmade yubinuki gallery
From Quilt-Yui: handmade yubinuki divided by design type (click the various links beneath the words 店主のギャラリー, the fourth menu item down in the left-hand frame)
From 人鳥官: yubinuki and quilting, link goes directly to yubinuki section
Blogs
Small pieces (category 加賀指ぬき)
Amerika tsukuri (full of yubinuki, temari, and miniatures of both)
...and there are a ton more. Try copy-pasting the Japanese term 加賀ゆびぬき (kaga yubinuki) into a GIS. Or, you know, just click here. :D
All actual pictures of kaga yubinuki in this post have been blatantly stolen from the Internet; I wanted to credit them, but I lost the links to the sites from which I saved them, 'cause I'm an idiot. -_-; すばらしい加賀指ぬきの写真は無断に盗まれてしまいました。もしかして、あなた様の写真がこちらに見つけて、おしえてください。大変申し訳ありません。
I'll be back soon with a step-by-step of some patterns~
Thursday, July 8, 2010
まだ生きているよ!
それは "I am still alive!" と言う意味です。And now I've missed the entire month of June, too. -_-;
I seriously, honestly intend to post tonight, and later in the week, about Japanese thimbles (yubinuki), which have kinda captured my heart for a few weeks.

Also, I am backdating this post to July 8th, which was Quex Day. ^x^
I seriously, honestly intend to post tonight, and later in the week, about Japanese thimbles (yubinuki), which have kinda captured my heart for a few weeks.
Aren't they pretty? (click image to visit creator's site)
Friday, February 26, 2010
家紋:kamon, meaning "family crest"
I have been wanting to write about these forever. :D
家紋:かもん、kamon, meaning "house" (家) + "crest" or "coat of arms" (紋)
Alternative terms include:
紋章:もんしょう、monshou, "coat of arms badge"
紋所:もんどころ、"coat of arms place" (?)
...or simply mon in conversation.
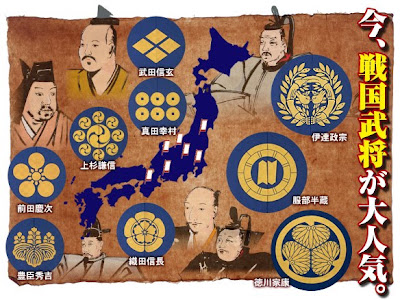
If you have any sustained interest in Japan, you've likely seen kamon symbols somewhere before. They are embroidered or dyed on the chest of formal kimono, on the eaves of traditional roofing, printed on noren curtains, on flags of temples and shrines, and can generally be spotted in many other places.
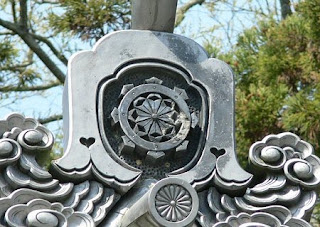 on a roof peak


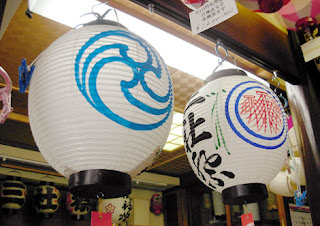


Kamon symbols, much like the lions and eagles of heraldry, are powerful graphic elements. Unlike western heraldry, however, kamon are uncomplicated and geometric. They were originally simplified by the constraints under which they were designed, used, and cataloged.
All traditional kamon are plain black and white, with no intermediate tones or shading. This two-tone limit makes them much easier to reproduce in a variety of media, as well as bold enough to be seen clearly on flags across the ancient battlefield. Most kamon are also round, and thus all the easier to fit on variously-shaped surfaces and items. Lastly, the vast majority of kamon have one or more axes of symmetry, sometimes as many as 14 or 16.

Common motifs found in traditional kamon include flowers, leaves, birds, turtles, butterflies, kanji, or representational abstract shapes, but there are always exceptions.
Likewise, many kamon rely on the same popular icon, but present it in markedly different ways to distinguish each from the other. Closely related kamon may (but do not always) belong to offspring of a famous family or separate families who established themselves in similar professions.
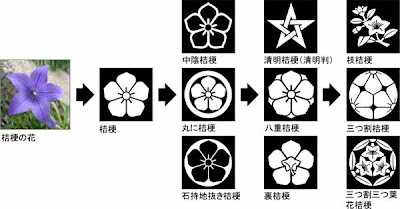
If you have a traditional Japanese name, there are books and websites whereby you can look up your family's kamon symbol. Some people even design an original kamon to represent their own family in modern times. I had a student who made his own stamp of a kamon with a Super Famicom controller ringed by its cord... he used it on his homework. :3
If you like history, this article on Epoch Times gives a brief overview of the origins of the kamon system. There are also a few modern, for-fun Kamon Generators by Ayataka beverage group - you give your name and birthdate, and they assign you an original kamon (you'll need Japanese text enabled on your machine to use the input form).

Here are some sites that provide a catalogue of the traditional kamon:
Kamon Shijou (Kamon Marketplace by BBPlus)
You can search by keyword, browse by subject, or browse alphabetically (hiraganically?) by kamon name. (You can also order stickers, keychains, pins, and other goods with any kamon you like... if you know how to navigate in Japanese.)
Japanese Clip Art
An English site with a selection of the more famous kamon (and other images) for free download. Yay!
Kamon Japan
A site that offers display plaques and castings with the kamon of famous rulers... has adorable little illustrations of those rulers, too. XD
楽しみして、ね! ^_^
家紋:かもん、kamon, meaning "house" (家) + "crest" or "coat of arms" (紋)
Alternative terms include:
紋章:もんしょう、monshou, "coat of arms badge"
紋所:もんどころ、"coat of arms place" (?)
...or simply mon in conversation.

some famous rulers and their family crests; the bottom right crest is that of the Tokugawa family
If you have any sustained interest in Japan, you've likely seen kamon symbols somewhere before. They are embroidered or dyed on the chest of formal kimono, on the eaves of traditional roofing, printed on noren curtains, on flags of temples and shrines, and can generally be spotted in many other places.


on formal kimono

this curtain at a jinja (Shinto shrine) displays the kamon of two families

the "dove" mon at Morooka Kumano Jinja (師岡熊野神社)

lanterns painted with kamon

shirts decorated with kamon are a popular item with the younger generations: which family's kamon they display is not necessarily important...

...while keychains with one's family mon are popular among the middle generations; many services exist in Japan that will personalize lighters, cellphones, portable game systems, etc. with any mon you like

a kamon on a public building, in this case a community meeting center

a chrysanthemum kamon appears on the Japanese passport; the 16-petal chrysanthemum crest is a symbol of Japan as a sovereign nation
Kamon symbols, much like the lions and eagles of heraldry, are powerful graphic elements. Unlike western heraldry, however, kamon are uncomplicated and geometric. They were originally simplified by the constraints under which they were designed, used, and cataloged.
All traditional kamon are plain black and white, with no intermediate tones or shading. This two-tone limit makes them much easier to reproduce in a variety of media, as well as bold enough to be seen clearly on flags across the ancient battlefield. Most kamon are also round, and thus all the easier to fit on variously-shaped surfaces and items. Lastly, the vast majority of kamon have one or more axes of symmetry, sometimes as many as 14 or 16.

the kamon of the Imperial Family of Japan 十六弁八重表菊紋, or jyuurokuben-yae-hyou-kiku-mon, "16-petal double layer displayed chrysanthemum crest"
Common motifs found in traditional kamon include flowers, leaves, birds, turtles, butterflies, kanji, or representational abstract shapes, but there are always exceptions.
Likewise, many kamon rely on the same popular icon, but present it in markedly different ways to distinguish each from the other. Closely related kamon may (but do not always) belong to offspring of a famous family or separate families who established themselves in similar professions.
selected kamon variations on the kikyou (Chinese bellflower)
If you have a traditional Japanese name, there are books and websites whereby you can look up your family's kamon symbol. Some people even design an original kamon to represent their own family in modern times. I had a student who made his own stamp of a kamon with a Super Famicom controller ringed by its cord... he used it on his homework. :3
If you like history, this article on Epoch Times gives a brief overview of the origins of the kamon system. There are also a few modern, for-fun Kamon Generators by Ayataka beverage group - you give your name and birthdate, and they assign you an original kamon (you'll need Japanese text enabled on your machine to use the input form).

a modern kamon design, appropriate for Arizona :3
Here are some sites that provide a catalogue of the traditional kamon:
Kamon Shijou (Kamon Marketplace by BBPlus)
You can search by keyword, browse by subject, or browse alphabetically (hiraganically?) by kamon name. (You can also order stickers, keychains, pins, and other goods with any kamon you like... if you know how to navigate in Japanese.)
Japanese Clip Art
An English site with a selection of the more famous kamon (and other images) for free download. Yay!
Kamon Japan
A site that offers display plaques and castings with the kamon of famous rulers... has adorable little illustrations of those rulers, too. XD
楽しみして、ね! ^_^
Monday, February 15, 2010
Rawr. (a day late)
Okay, NOW it's 2010. Happy Chinese New Year of the Tiger. :D

Finally, a new pattern. I've been away from playing with felt for a while (largely because I still can't find where the movers packed it), but by the awesomeness of Nikki-the-Great, I had some special Japanese felt in reserve. (Just enough orange for a tiger -- Taihen doumo, Nikki!)
Also, process pictures. :3 Don't forget: right side of fabric means side that will be facing out when the whole thing is done; wrong side means the side that will be hidden facing the stuffing.

ONE: sew tummy and tail tips onto the right sides of fabric

TWO: make the tail
This involves little more than putting the two tail panels right-sides-together and sewing around, remembering to leave the base of the tail open. Turn the tail right-side out, stuff it with fluff, and maybe add the applique stripes now, because it's harder to add them once the tail is attached to the body.

THREE: attach the tail
The "top" of the tail, that being the inside of the curve, should be facing the right side of the back panel. You can pin or baste it into place, whatever works for you.

FOUR: attach the bottom+sides piece
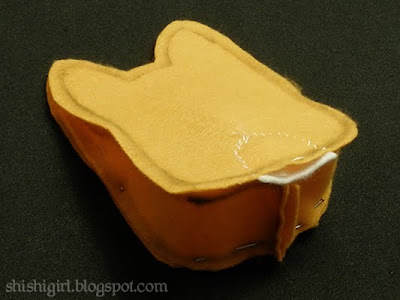
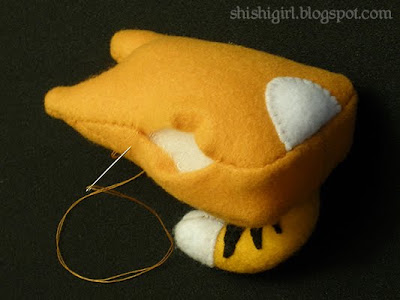


That long pointy piece provides both the bottom and the sides for this type of softie... it's built on the premise of a lunch bag "wedge" shape. Again, pin or baste it into place, making sure that it's relatively centered and even on both sides. (Ignore the seam in the middle of the piece I used here... I needed to improvise a longer piece from a tinier shape.)

FIVE: attach the front (face) piece
Just a reminder, all these pieces are facing wrong side out, right side in, with the tail hidden in the middle. Sew everything up, and remember to leave a hole of roughly 3cm unsewn somewhere, so you can invert your tiger and stuff it. (Ha, that sounds like a poorly-translated insult... "hey buddy, you can go invert your tiger and stuff it for all I care!")

SIX: invert and stuff
If you did everything right, you should now have this: white tummy on the front, tail attached at the bottom of the back. Now we get to stuff it up. If you want to make it more stable when it's sitting up (a good idea with this design, cause the bottom is so narrow), put something a little heavier in the bottom. I like to tape 10 pennies together and set them in as a weight, or make a little sack of rice out of some scrap fabric and put that in there.

SEVEN: applique like crazy
I like this part... usually. Small pieces can be fussy sometimes. Using thread the same color as the piece you are attaching, applique the first layer of pieces onto the face and back of your form. I say the first layer because some of the pieces go on top of others. There is no special stitch to use: blanket stitch gives a nice edge if you have shiny thread or embroidery cotton, or you can just tack the pieces on with even stitches like I did. (Don't pull the thread too tight, else you'll get a wiggly scalloped edge on the applied pieces.)

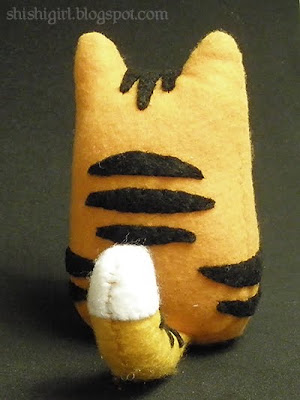
EIGHT: back view
Once the stripes are on the back of your tiger, you're done there. (Note that the two stripes on either side go all the way around to the front.) As for the face...

NINE: 出来上がり - done!
Add the muzzle, eyebrows, and nose -- you now have a funny-looking Sack-o'-Tiger™ of your very own. おめでとう、congratulations! :D
So anyway, I hope to be around more often now. My sincere thanks to everyone who's been stopping by the blog, even while I wasn't posting anything new. You guys really cheer me up. m(-_-)m
Thursday, September 10, 2009
Son of Ramen Cake: Sushi Cake
Please note this post has been delayed by several months because of the move this summer. Sorry. -_-;
My sister's birthday is the season of weird cakes. Last year, it was a bowl of ramen. This year, we tried a piece of sushi.
私の妹の誕生日は毎年面白いケーキを作ってみる。。。が、「面白い」って、実はとても変です。享年のテーマはラーメンでした。今年はお寿司でした。マジですよ。寿司見たいケーキを作ってみました。

お寿司ケーキ...かな...?
The result was... eh, lacking something in the department of realism. However, I remain convinced that the concept and design are solid enough that this cake could be, in the hands of an experienced sugarcrafter, a really slick show.
Coincidentally, I imagine many of you fall into the "experienced sugarcrafter" category. *hint hint*
Here's the original process developed in this first, experimental instance of... Sushi Cake.
STEP ZERO
Make some round cakes and stack 'em up. Three 8-inch rounds were used here, the domed tops of each cut off (to level the cake, but you probably already knew that), and a layer of frosting spread between the layers (to make the layers stick together, but I'm pretty sure you knew about that too). Flavor is entirely arbitrary; per my sister's desires, I used strawberry and chocolate cake mix, marbled together.

STEP ONE
Spread white or off-white frosting all over the top the cake. Again, flavor is arbitrary, constrained only by the fact that it needs to be of a whitish color. We used cream cheese frosting (again, sister's choice) from a can. And not the "whipped" kind, because I hate it.
STEP TWO
Now you need sprinkles. Lots of Sprinkles. Sprinkles that look like rice, or as close to rice as you can possibly find them. I believe they call this shape of sprinkle "jimmies", or at least that's what they were labeled when I finally found them in Missouri. Incredibly, I could not actually find plain white jimmies, but the local Hobby Lobby was able to come up with these cool pearlized off-white ones for me, which actually look even more like cooked rice than I was originally hoping for.

寿司ご飯のように :D
Sprinkle the sprinkles (hurray for immediate noun-verb congruity in a sentence!), all around the top of the cake, leaving a round area in the middle of the cake with only frosting. This will be the "core" of the sushi, where the key ingredients would be rolled up if the sushi were real. You might want to make an indentation in the frosting to mark out this part. The wide ring of sprinkles, meanwhile, is the thick layer of rice. It looks more rice-like as you get a heavier coating of sprinkles on there... try to completely hide the underlying frosting.
STEP THREE
Now we need a substitute for the seaweed wrap (焼き海苔:やきのり: yakinori, literally "cooked seaweed") that goes around a roll of sushi. You could, of course, actually use yakinori... or you could find/make the darkest, blue-green-brown frosting that you possibly can. If you know how to make frosting and have access to powerful sugary secrets, you can probably do this very well. In my case, I had a can of lemon frosting (yes, sister wanted lemon), and several vials of food coloring. This is the lemon frosting after about two little bottles of blue, two of green, a few drops of yellow and a hit of red:

やきのり色(か?)アイシング
...not very nori-colored, but the base frosting was starting to get watered down with all the food coloring, so... meh. Spread your seaweed-colored frosting all around the sides of the cake, keeping the surface smooth and even so it looks at least a little like a wrap around sushi, and not like bizarre green frosting on a cake.

Your cake should now look something like this. Actually, your cake should look better than this.
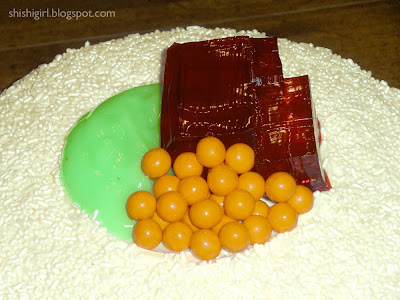
出来上がり...さああ。ケーキの味はいちごとチョコ、アイシングの味はクリームチーズとレモン。そして、実は、おいしかったよ。o_o' 本当に。
OKAY, so here's our chocolate+strawberry cake with cream cheese+lemon frostings,* topped with pudding, jello, and little chocolate candies, that is intended to look like a roll of sushi. In retrospect, I think my ratio of width-of-rice-band to sushi core was pretty off. A real roll of sushi has a thinner rice band and a wider core. Also, the pistachio pudding was way off the color of real avocado, and the wrong consistency. I think if I'd used a chunk of mint fudge or something, it'd have lent the right kind of shape and color to the whole thing.
Then again, there would likely have been a fight over who got the lump of fudge. -_-;
*And, would you believe, it actually tasted awesome. o_o'
My sister's birthday is the season of weird cakes. Last year, it was a bowl of ramen. This year, we tried a piece of sushi.
私の妹の誕生日は毎年面白いケーキを作ってみる。。。が、「面白い」って、実はとても変です。享年のテーマはラーメンでした。今年はお寿司でした。マジですよ。寿司見たいケーキを作ってみました。

お寿司ケーキ...かな...?
The result was... eh, lacking something in the department of realism. However, I remain convinced that the concept and design are solid enough that this cake could be, in the hands of an experienced sugarcrafter, a really slick show.
Coincidentally, I imagine many of you fall into the "experienced sugarcrafter" category. *hint hint*
Here's the original process developed in this first, experimental instance of... Sushi Cake.
STEP ZERO
Make some round cakes and stack 'em up. Three 8-inch rounds were used here, the domed tops of each cut off (to level the cake, but you probably already knew that), and a layer of frosting spread between the layers (to make the layers stick together, but I'm pretty sure you knew about that too). Flavor is entirely arbitrary; per my sister's desires, I used strawberry and chocolate cake mix, marbled together.

STEP ONE
Spread white or off-white frosting all over the top the cake. Again, flavor is arbitrary, constrained only by the fact that it needs to be of a whitish color. We used cream cheese frosting (again, sister's choice) from a can. And not the "whipped" kind, because I hate it.
STEP TWO
Now you need sprinkles. Lots of Sprinkles. Sprinkles that look like rice, or as close to rice as you can possibly find them. I believe they call this shape of sprinkle "jimmies", or at least that's what they were labeled when I finally found them in Missouri. Incredibly, I could not actually find plain white jimmies, but the local Hobby Lobby was able to come up with these cool pearlized off-white ones for me, which actually look even more like cooked rice than I was originally hoping for.

寿司ご飯のように :D
STEP THREE
Now we need a substitute for the seaweed wrap (焼き海苔:やきのり: yakinori, literally "cooked seaweed") that goes around a roll of sushi. You could, of course, actually use yakinori... or you could find/make the darkest, blue-green-brown frosting that you possibly can. If you know how to make frosting and have access to powerful sugary secrets, you can probably do this very well. In my case, I had a can of lemon frosting (yes, sister wanted lemon), and several vials of food coloring. This is the lemon frosting after about two little bottles of blue, two of green, a few drops of yellow and a hit of red:

やきのり色(か?)アイシング

Your cake should now look something like this. Actually, your cake should look better than this.
STEP FOUR
Now you add the core of the roll; that is, you put things that look like a sushi core in that bare spot in the middle of the cake. Sushi allows for almost anything to be rolled up at its core, usually in sets of three to five ingredients. Because not all of these ingredients are easily imitable in a sweet format, I tried to mimic three of the more common ones:

Now you add the core of the roll; that is, you put things that look like a sushi core in that bare spot in the middle of the cake. Sushi allows for almost anything to be rolled up at its core, usually in sets of three to five ingredients. Because not all of these ingredients are easily imitable in a sweet format, I tried to mimic three of the more common ones:
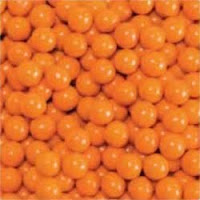
オレンジ色チョコ飴、orange Sixlets = いくら、ikura, salmon roe (fish eggs)
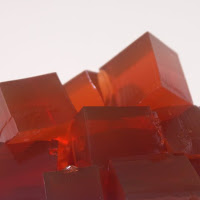

赤ゼラチン、 cherry Jello (super thick "Jigglers" recipe) = まぐろ、maguro, raw tuna

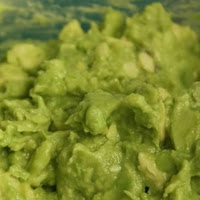
ピスタチオプディング、 pistachio pudding = アボカド、 avocado
赤ゼラチン、 cherry Jello (super thick "Jigglers" recipe) = まぐろ、maguro, raw tuna
ピスタチオプディング、 pistachio pudding = アボカド、 avocado

出来上がり...さああ。ケーキの味はいちごとチョコ、アイシングの味はクリームチーズとレモン。そして、実は、おいしかったよ。o_o' 本当に。
OKAY, so here's our chocolate+strawberry cake with cream cheese+lemon frostings,* topped with pudding, jello, and little chocolate candies, that is intended to look like a roll of sushi. In retrospect, I think my ratio of width-of-rice-band to sushi core was pretty off. A real roll of sushi has a thinner rice band and a wider core. Also, the pistachio pudding was way off the color of real avocado, and the wrong consistency. I think if I'd used a chunk of mint fudge or something, it'd have lent the right kind of shape and color to the whole thing.
Then again, there would likely have been a fight over who got the lump of fudge. -_-;
*And, would you believe, it actually tasted awesome. o_o'
Subscribe to:
Posts (Atom)