Showing posts with label Reconstruction. Show all posts

Thursday, June 09, 2016

Finished Raised Bed

Before we left The Aerie for Long Grove, IL, I finished up the raised bed putting in a pair of gates and then installing rabbit fencing all around. Then I put in the tomatoes and peppers and herbs Terry had bought/saved from the old bed.


I think it turned out pretty good. Virtually everything was recycled except the cedar used for the gates. The hinges came from cabinets from our home in Dover (many, many years ago), the rabbit fence was left over from a separate project, and the wood was redwood decking from Morristown. At least things are getting used that I've saved--and moved--from house to house.

Since we left last Sunday, there's been plenty of rain so my only concern is that things may be too damp.

Wednesday, June 01, 2016

Rebuilding a raised bed garden (Part 3)

I was able to get out at 8 AM sharp and go to Lowes for the extra soil and pebbles that I needed. When I got home, I immediately went to work dumping the soil in the bed and then pouring the stone atop the weed guard along the edges of the bed. The latter will keep the weeds at bay (I hope!) and provide an open area to walk around the bed to work on the soil.

Finished bed being inspected by a chipmunk.

Nice and smooth. I like the concrete edging so much I may use it in several other projects.

River pebble and flat stone path along the back.

River pebbles line the front to keep the grass back. Yeah, the "lawn" needs some repair from the use of the backhoe.

River pebbles along the east side and weed guard at teh base of the lilac. I'm going to have to get some more river pebbles.
I also put some landscaper's cloth (the weed guard) around the two lilac bushes to control weeds under them. Those were held down with some of the flat stones I got out of the garden bed. I'll add some river pebbles one of these days to help smother the heck out of the weeds.

Finally, I took the rototiller to the soil in the bed, broke it up really fine and mixed it with the peat moss and preexisting soil to a depth of about eight inches. Then I raked it all nice and smooth and as level as I could.

Now it's all set for some plants! Terry will be picking up some tomato and pepper plants tomorrow while I contemplate how to put some fencing up to keep the critters at bay. They've never eaten the tomatoes but the peppers have had their struggle with ground hogs before.

Speaking of ground hogs, the family that was living under the shed (at least six little ones with a big momma) have apparently vacated the premises. I haven't seen them since I was talking about the merits of a .22 or 9 mm hollow point. Of course my constantly going up to the garage to sit in the shade every hour or so and going into the shed to get tools and such may have discouraged them. It was an easy live while we were away for two plus weeks, but I guess they don't like the company.

******

Then Terry and I made a run over to the dump. We had five bags of trash--a lot of it plastic bags from the garden soil and river pebbles, some recycling stuff, an old suitcase, an old toilet seat, and some other stuff that was just laying around we wanted to get rid of. At $3.00 a bag, it would have cost us a bundle to get rid of it all. As it was, because the clerk at the dump said our "load" was under 50 pound it would only cost us, well, $3.00. A bargain!

******

I mixed together a sprayer full of Round-Up and sprayed the plants that were growing in the other vegetable garden bed. Some of those "weeds" were gorgeous and I hated to do it to the daisies but the growth was too luxuriant to let stand. I hope to reclaim at least two of the beds before long. I may just cover them with weed barrier rather than plant anything there.

The other large bed needs to be completely replaced as it too was constructed of landscape timbers and they have rotted away. Currently it is one large 8' x 16' bed with a very steep drop--approximately 24"--on the downhill side. I'm thinking of making it into two beds 3' x 14' with a path between them. Sort of a terraced garden, if you will. This one may have to wait for August, however. There are trips to Chicago (1 week), Quebec (1 week), and Nova Scotia (3 weeks) between now and then. Besides, I need the time to get over my aches and muscle cramps.

Tuesday, May 31, 2016

Rebuilding a raised bed garden (Part 2)

Couldn't get out there early today as I had a dental appointment over in Wellsboro at 8:30 AM. That was a shame as the temps were int he 60s at that hour and I'm pretty sure I would have enjoyed working then rather than the 75-85 degrees between 10 AM and 5 PM. Oh well, such is life.

Stopped at Lowes on the way back from the dentist and picked up 12 bags of Miracle Gro Garden Soil and two small bales of peat moss. Then went to work:
redistributing/leveling the existing soil
laying the keystone edging along the front...oops! You mean there are two types of block so that they dovetail together better? I didn't notice that until I was part way through the process.
Ended up having to go back to Lowes to get the missing complimentary blocks. And another 12 bags of garden soil and three bags of river pebbles.
laid landscape cloth/weed barrier--that Terry cut while I was doing the back and forth thing with Lowes--along the front back and sides of garden bed and began covering it with stone
Finally got all the keystone edging in place and began to distribute the peat moss and then the garden soil in the bed. I'll let that "dry" over night before raking it out--right after I go get eight more bags of garden soil and four more bags of river pebbles.

Any way, I'm nearly finished. See!

Nearly Finished
I even put in a redwood barrier to keep the oregano and eumonymous in place. And, yes, the keystone edging is lower on the left than on the right. That's the way things are around here. Nothing outside the house is level or flat for any definition of the words "level" or "flat." Everything slopes one way or another. Here, the difference is just 3-1/2 inches on a run of 14 feet. It looks a little strange because that back wall IS level. Otherwise, I think it's just conforming to the curvature of the Earth.

Monday, May 30, 2016

Rebuilding a raised bed garden

Since we came back from Florida (and other points south) I've been busy rebuilding the raised bed directly in front of the cabin. The nine year-old landscape timbers were rotted through and grumbling so it needed to be done. Plus, the redbud tree we had planted and which occupied a 2.5 foot square in the middle of the garden had given up the ghost after a couple of harsh winters and some storm damage back in 2010.

I tore the old timbers apart using a crowbar, brute force and shear stupidity. It took two days to get it apart as I had used spikes to hold it together. But, get it apart I did; salvaged most of the (slightly bent) spikes, too. As a bonus, when I used the tractor to haul the timbers to the back of beyond, I came across some morels! There's some right fine eating in them things!

The tractor and it's backhoe attachment came in handy to uproot the stump of the redbud but that took some doing. That little nine year-old tree had one heck of a root system. And for being completely dead, it was also surprisingly flexible. But, out it did come. Along with some pretty big stones--what else is new?

Then it was time to start rebuilding. I had decided to go with pressure treated 4"x4" timbers instead of straight stone or landscape timbers. I'm hoping they will outlast me at this point. After a false start or two, I decided that the down hill side would be mostly 4" thick solid concrete block with standard cinder block atop that and then the three layers of 4"x4" on top of them. The timbers would be held together with hex head lag screws and would simply rest on the cinder blocks. The weight of the timbers would hold then blocks in place and themselves as well.

Like most places around these parts it's difficult to find flat, level surfaces. The bed I was rebuilding slopes from a high point in the south east corner to a deep hole some 20" lower on the northwest corner. This is the area where the landscape timbers had sagged over the years so there may have been some slumping going on.

A butterfly bush on the left and the lilac on the right were crowding the old 16' by 8' bed. I reduced the size to about 14' 4" so they both get a little more room.
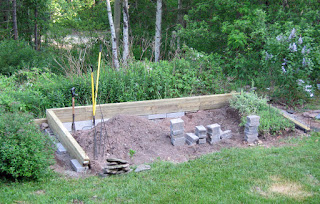
Raised bed under reconstruction.
 With the solid concrete block and cinder block in place , the timbers were laid out three high on top.
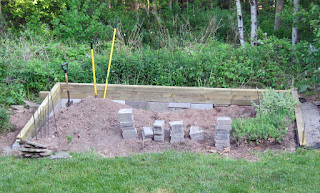
Terry wanted to save some of her oregano and the eumonymous on the right.
Euonymus

Read more at: http://classygroundcovers.com/product/cat?catID=EUONYMUS-fortunei&affl=overture-euronymous
Classy Groundcovers offers free shipping on quality groundcovers.
 I originally toyed with the idea of using some of the many flat stones we have laying around to prop the walls of the bed up. But, after I had constructed a couple of piers using stone, they seemed too flimsy to withstand the pressure of soil from the inside. So I went with concrete blocs and cinder blocks.
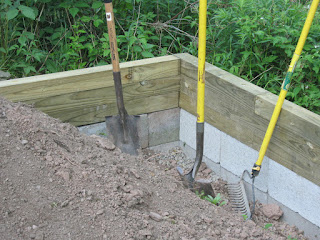
Deepest corner with solid block, cinder block, and three timbers from bottom to top.

Timbers joined with lag screws and held in place with rebar at the corners.
 Once all the walls were in place, I tacked up some landscape cloth along the rear and west wall where it was deepest. Then I began to refill the hole left by the tree removal. This is going to take some additional garden soil. Lots of additional garden soil.

Dirt (mostly) redistributed. Front support board in place for the concrete edger.
 I built a backer-board for the front edger to be placed against out of redwood decking from our previous home in Morristown. I had replaced that deck in the summer of 1994 right after I retired. The wood was stored up in the Bolt Hole's barn and then relocated here. So it's not only aged, it's well traveled, too!

Al that's left over from the materials I purchased. One bag of river pebbles--which will get used--one solid concrete block, four cinder blocks. And the cinder blocks are left over only because I used four that had been sitting beside the shed for ten years.

Left overs.
 The concrete blocks to be used for edging along the front are shaped like keystones and are interlocking.
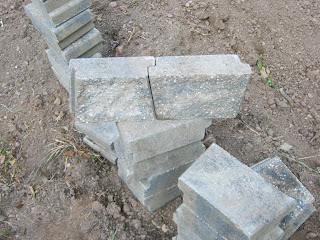
Edging blocks

Well, that's where it stands today, Monday. I'll probably get that edging stone in place tomorrow and then get some additional river pebbles so as to build a weed-free walkway on both sides and along the downhill wall. I've enough flat rocks to put on a bed of pebbles to make it almost like pavement.

Just a thought: This would be so much easier on a flat surface!


Thursday, September 17, 2009

Bolt Hole Report, September 17, 2009

Well, I got 'er done.

Finished Porch

The weather shields are in place and I even managed to attach the old steps as a temporary access to the porch. They will definitely have to be worked on since they now slope away from the house just a tad and are not level. Then again, nothing in this old house seems to be square or level except for the new porch. I found that out when trying to attach the weather shields to the facia boards and roof beam that run off the old house. The screened porch was square and level when I built it more than five years ago but it too has gone oblique.
The West end of the porch.

The East end of the porch.

I will say that the Tuftex PolyCarb is great stuff to work with. Cuts like butter with a pair of tin snips and you can predrill the holes with out a problem. It doesn't shatter the way plexiglass does at times.


Constructing the frames for the weather shields was a snap, too. Especially since I made liberal use of metal T-braces to create the corners. I also used T-braces to attache the shields to the facia board. and beam, and used L-brackets to connect the frames to the rail of the porch. It will take one heck of a wind to rattle those babies! I didn't enclose the entire front porch because of the need during the summer for some ventilation from that quarter.

T-braces used on corners and to attach frames to facia and beams.

L-brackets to attach frames to porch rail.

The screened porch was even easier to protect. I installed a couple of furring strips as braces across the screen and then simply screwed two sheets of the PolyCarb to the screen's frame, the braces and the porch's end joist. That should keep the water from splashing onto the porch from the first floor roof.
The Screened Porch corner.


The splash maker. Water off the top roof hits
the corner of the lower roof.


******

When I finished with the porch, I grabbed a sandwich and then went to do battle with the lawn. First I had to get the lawn mower started. Damn ethanol! I had filled the gas tank the last time I was here about a month ago. At that time the mower had been working just fine. Today it didn't want to start. Or if it started, it ran for a few seconds and then died. I checked the fuel line and guess what I found...oh, you peeked! Yeah, water. Rather than try to drain just the water, I drained the whole thing. I have to tell you that what came out of that tank didn't even smell like gasoline. Heck, it didn't even taste like gasoline.

Luckily, Mark had left that can of real gasoline (the non-ethanol kind), so I refilled the mower with that and started priming and pulling the cord. It took a while to get the water out of the carburetor, but it eventually caught and continued to run. Then it was time for me and the mower to walk...and walk...and walk. One snake and one toad later I had finished the west side, the east side and part of the north side when the tank ran dry and I decided to quit. I refiled the tank to the brim with the good stuff and put it in my shed where it seems to fare much better than the garage.

******

The day started out looking rather gloomy. It appeared it wanted to rain at any moment but just couldn't make up its mind as to how much or when if at all. The overcast all disappeared by 2 PM and the sun was shining brightly as I took the mower for its walk about the yard. The temperature never got much above 60 though the brisk walking did cause me to perspire a bit. The light breeze that is blowing is coming from the west northwest so I expect it to get pretty chilly tonight if the clouds stay away.

Tomorrow I'll do a little more clean-up, pack the truck, hitch up the utility trailer, steal my log splitter back from Mark and head home to the Aerie.

Tonight, I'll light a couple of fires in the wood stoves (because it will be getting pretty damn cold, okay) pour myself a couple of fingers of Dewar's (because it's all I've got up here, okay) and settle back to finish another of Jim Butcher's Dresden stories. (I'm reading Proven Guilty at the moment.)

Wednesday, September 16, 2009

Bolt Hole Report, September 16, 2009

I managed to get the painting done today. It took until nearly 10 AM before the temperature got to 50 degrees, though, and it was still under 60 as noon rolled around. Luckily the porch is on the south side of the house so every little bit of sunlight worked in my favor by warming the surface being painted.

The painted porch.

The color is Velvet Brown from Valspar at Lowe's and matches the old Charleston Brown that the rest of the house is painted with pretty well. The wing to the left is a slightly lighter shade than the CB. It's closer to what I have on the barn. So the house has about three or four shades of brown. Sue me.

I would have had the weather shield on the west end in place but was diverted by problems with the brush hog. I couldn't get it started last time I was here so, when Mark showed up to pick up some of his tools, I asked him to give it a try. He had no better luck than I did so we putzed around with it a little and found out 1) the spark plug wasn't sparking and 2) the gas was contaminated with water (effin' ethanol mix! and greenhouse garage!). When Mark left, I ran out to get a replacement spark plug and then spent an hour emptying the gas tank and pulling the starter cord while spraying starter fluid into the air intake to clear the water from the carburetor. It finally kicked over and kept running on non-ethanol gas that Mark had left. (There are three or four gas stations near his apartment in Amsterdam, NY that are selling non-ethanol gas. And he says all the town's fire trucks are there on a regular basis along with the other municipal vehicles.) After 10 minutes of running fine, I shut it down and filled the gas tank to the brim so condensation would not happen (I hope).

Then I was able to get back to the weather shield. I cut the boards for the frame and then cut the Tuftex PolyCarb sheets into four-foot lengths. It will take three of these pieces to cover the 64" wide end of the porch. Another two will be needed for the section of the porch near the front door. And two more for the end of the screened porch. In both of those last two places, water splashes into the porch from the roof due to the drip from the second story hitting the roof on the first level. I should be able to finish the weather shields tomorrow morning.

Morning wait at the Bolt Hole

I'm cooling my jets (literally) here at the Bolt Hole as I wait for the temperature to rise above 50 degrees. Can't really paint until it does. The mercury currently sits at 45 degrees UP from a low somewhere in the 38-40 range. But the sky is clear and the sun is bright so I shouldn't have to wait too long.

They've adjusted the forecast and essentially removed any shower activity from the outlook for today and tomorrow. (They set the odds at 10% and I hope they stay that way.) Today's high will be just around 60 degrees while tomorrow it may reach 65. Ideal for painting...not that I need two days. Two hours will more than suffice.

Once the painting is done, it will be time to build a Tuftex PolyCarb shield on the west end of the porch and a smaller one on the east end where the power meter is located. This stuff is supposed to be flexible enough to cut with snips yet able to withstand anything Mother Nature can throw at it. UV protection is built in, it's supposed to be able to handle snow loads (although, hanging it vertically, I shouldn't have to worry about that) and it is clear so light can come through. And it was only $20 for a 26" wide by 8' long sheet. What's not to like?

Time to finish my second mug of coffee and get my act together. Later.

Tuesday, September 15, 2009

Bolt Hole Report, September 15, 2009

I spent Sunday morning running down to Lowe's and Wal-Mart to do some shopping. I needed to go to Wally World for some groceries and Lowe's for building materials. The use of the utility trailer made hauling sheets of siding, 2"x 6"s, 2" x 4"s, and corrugated clear plastic sheets (actually Tuftex PolyCarb panels) a snap and I got back to the Bolt Hole in time to follow the J-E-T-S Jets! Jets! Jets! on the computer. (I couldn't find a radio station that had the game and...well, I've already told you about my lack of TV reception!) I followed that by listening to the Giants win on the radio. I did manage to cartch the first have of the Bears vs Packers but neither team seemed to want to win that one and, not wanting to be subjected to Kieth Overbearing during the halftime show, I turned it off and went to sleep. (NBC really needs to dump that jerk! IMHO) Just as well that it was a football kind of day. We had some pretty good showers in the middle of the afternoon and it poured during Sunday night.

Monday I was back at work on the porch. Mark was busy elsewhere prepping his place for the winter in case he finds himself staying here full time. First I hauled the 20 concrete blocks I bought earlier through the porch door and down into the basement. One at a time. Twenty trips up and down that short flight of steps had my heart pumping and my knees crackling. My kids may have brought the moose back to the Adirondacks by practicing their tuba on the deck upstairs, but if a buck shows up in my back yard it'll be because he thought I was rattling him in when in reality it was just my knees going snap, crackle and pop!

Once they were out of the way, I cracked open a can of tinted primer and painted the deck of the porch using a brush for the edge s and a roller for the bulk of the work. The Valspar primer I used was dry to the touch in no time at all.

After lunch I was able to cut all the pieces for the framework of the skirt of the porch and started to assemble the frame itself. And after dinner, I cut the siding that would be nailed to the frame. I even got two of the half sheets in place before dark.

Tuesday, on my own again, I installed the remainder of the siding, making cuts for the partial half sheets where necessary.

Siding in place on the porch.

The siding is four foot high. The top of the skirt--the rail is 40" above the surface of the porch floor and 5'10" above the ground. That sounds like a lot, but last year, what with the snow sliding being blown off the roof and drifting in front of the porch, it piled up higher than the old rail which was closer to 4'6" off the ground.

The siding actually overlaps the support structure I showed in a previous report, as you can see below. Call it added protection and added support.


Detail showing how the siding overlaps the sill and joists.

Once all the siding was in place, I applied a coat of primer to both surfaces of the new structure. The outside will get a coat of brown paint to match the house as soon as I get down to Lowe's to buy some. (There's always something you forget! Even when you've a list in hand.) The inside of the walls will remain the light gray you see here.

Primed and ready for a final coat of brown.

The last thing to do (besides the brown paint) will be to devise a means of hanging the Tuftex PolyCarb sheets that will serve as windows and to further prevent windblown rain and drifting snow from getting up on the porch.

Saturday, September 12, 2009

Bolt Hole Progress Report: September 12, 2009

Mark and I got the decking on the porch today and placed the two 6" x 6" posts despite a fairly steady misting rain that fell between 1 and 3 PM. I have to say that the porch looks great! And it is certainly much sturdier than it was. It even slopes away from the house with a pitch of about 1/2 an inch over the 80" width. That should help keep some water away from the house.
Porch deck and posts are in place.

Now it's time to construct a knee wall and enclose the bottom so the snow, when it slides off the roof or gets blown my machine or Mother Nature, will not end up on the porch. We'll also close in the top half of the west side of the porch (that would be the far end in the photo below) using corrugated plastic panels that will allow the light through but block the wind and snow. Most of the front's top half will have removable panels of either metal, plastic or plywood. Again, that's to prevent snow and such from getting in during the winter.

Finished decking and posts.


Some time in the near future I'll also have to think about putting in some steps but since the door on the porch isn't the main entrance, they can wait.

Friday, September 11, 2009

Progress report from the Bolt Hole

We got a late start this morning (9:30 AM) yet made good progress on the decking for the porch before the rains started. We got the 2" x 6" joists in place and shimmed up on the piers so the surface will slope away from the house, put some caulk under the wood where it meets the concrete and sprayed some Great Stuff into the gaps between the house sill and the deck joists. We're all set to lay the Advantech for the deck and install the two 6" x 6" posts. Tomorrow.

We built the joists as two boxes, each about 10' x 6', which were just small enough for the two of us to lift and put in place on the foundation and piers. Where they meet, we installed some blocking. One of the posts will be sitting on the front edge of this tripled up 2" x 6" joint. The other, more important post since it carries the major portion of the load of the roof, will sit in the corner to the left.

Joint between the two boxes.


Two boxes in place with the extra supports between the joists.

The decking actually is supported by the foundation and the piers. It is not attached to the house at all. There is a 2" x 8" ledger board attached to the house but only the edge of the Advantech will sit on that. The house has a habit of "breathing" and that ledger board moves with each breath.

******

As for the rains...this morning we saw conflicting weather reports. One said we should be rain free since it would stay south of the NYS Thruway while the other said to expect rain (up to an inch) starting in the late afternoon and continuing through tomorrow morning. The latter report turned out to be on the money. The early morning temperatures were in the low 40s. Fall is definitely right around the corner. I'll have to get a coat of paint on the deck of the porch before the weather gets too cold...meaning Monday or Tuesday at the latest.

Thursday, September 10, 2009

Back at the Bolt Hole

The trailer inspection was uneventful. It passed without a hitch. (No pun intended. It had a hitch, of course, or I wouldn't have gotten it to the guy who inspected it.)

The trip up to the Bolt Hole did take an hour longer than usual but that's to be expected when I had to stop for gas (twice) and lunch along the way.

I believe I surprised Mark by needing only one pass to back the barge...I mean trailer...into the barn. Sure, I needed to make one adjustment at the gate to the property but then--ZIP!-in she went. And it's not as easy as it sounds. Try running a trailer through a slalom course...backwards. The barn and the gate do NOT line up directly so it's a matter of backing through the gate, veering to the left (as you go backward), and then to the right to get the trailer lined up to the barn door. Trailer, hitch, and truck are about 48' long and the distance from the gate to the barn door is about 75' and the offset of the two is about 30' so it's a bit tricky. Mark's presence made it easier in that I didn't have to get out of the truck to see what my clearance was on the back wall of the barn now that there's a freezer, fridge and stove in there.

I found that Mark and his buddy had made some great progress in rebuilding the "foundation" to the porch. Using lots of concrete and mortar, a few sonotubes and some of the stones that were part of the old construction, they built a much more substantial wall than had been there before. There's still a section that needs to be leveled (ran out of mortar) before the porch itself can be constructed, but Mark should be ale to do that in no time at all...he's a professional. He's also still waiting for the union to find him a job that's more than one day in duration and is, therefore, still hanging around which means there'll be little rest for me on this tour at the Bolt Hole!

Newly reconstructed "foundation" for the porch.

The corner pier--the most important as far as bearing the weight of the porch and house roof-- seen to the left took nine (9!) bags of concrete and it doesn't even go more than three feet into the ground. But it does sit upon a big boulder that is at the base. The rest of the stones came from the original wall and all have at least one face that was flat enough to form the front. The other piers aren't nearly as important in regards to weight bearing and were created using tubes smaller in diameter.

In addition to leveling a portion of the wall between the two piers to the right, there's still the task of filling the void behind the wall. Some of the smaller debris from the old wall can be used to do that. It'll be my job this morning to sort out the smaller stuff and fill, fill, fill.

They also did some impressive shoring up of the floor in the basement. Photos of that later...maybe.

Tuesday, September 08, 2009

Heading back to the Bolt Hole
in the morning

The travel trailer is all hooked up and ready to go get inspected in the morning. Should be no problem at all passing. All the lights work and the tires have plenty of tread on them. As soon as the guy is finished, I'll be hauling it back to the Bolt Hole to put in the barn until next summer.

Terry and I took the opportunity to clean out all the mouse mess inside and wash the utensils that got peed and pooped on. They all got packed away in zipped plastic bags to protect them against future invasions. We had absolutely nothing that could be eaten by mice in there so it's a bit of a surprise they even bothered.

******

Speaking of tires...When I got the Tundra inspected I was told the tread on its tires were just barely above the legal limit and that I should consider getting some new ones. I stopped today at our local mechanic's and put a set of Cooper tires on order. They'll have them waiting for me on September 21 when I return from up north. I was thinking of waiting until spring but with the steepness of our road and the prospect of snow this winter, it's probably best to get them now. The original Goodyear tires on the truck have over 30K miles on them so I'm not too surprised that new ones are needed. The Cooper's have a 40K tread warranty on them so I should be ready for the next couple of years.

******

As for the Bolt Hole....Mark called last night to give me a progress report. He and Jim have been rebuilding the "foundation" wall to enclose and support the porch. They've also put in posts to attach the ledger board on since the sill just wouldn't hold the lag screws when they tried to bolt it on. Whatever they've been doing, they've used a lot of cement and mortar. Last count was 27 bags! (He said he might be able to send me some pictures later tonight. If I get them I'll see if any are worth posting.)

They erected some sort of support under te living room wood burner and found that the log floor joists that looked to be pretty punky actually weren't that bad. Only the outer layer was soft which left a fairly solid core 4-5 inches in diameter.

They also hauled an old refrigerator, a gas stove, and an ancient Sub Zero freezer out of the attached woodshed and put them in the barn until we can haul them to the recycling center/dump. Doesn't sound like much except each piece was too big to go out the woodshed's exterior door and had to go through the kitchen and out the front door. Jim said he might be interested in the old gas stove for use in an outdoor picnic area at his place. I told him to go for it!

I've no idea what I will find when I get there tomorrow afternoon. But I know I'll be the one to rebuild the porch now that all the prep work is nearing completion. Having rebuilt the screened porch on my own a few years ago, this should be nearly a duplicate. Unless I change my mind as to how I want to lay out the joists, I should have all the materials I need on site.

Mark also had bad things to say about our repair to the north sill. Seems the piers we put in sank in the earth a bit. We may have to dig deeper to reach more solid earth at basement floor level and build a sturdier pier support or even put in a footer and a block wall. If we can, I'd like to stick with the piers until 2011 when we can tear down the woodshed and do the block wall before rebuilding the woodshed. Hauling block into the basement via the stairs would be a PITA job.

Oh, and those basement stairs need to be rebuilt too.

******

Sounds like I'll be busy for the next week. With luck, Mark will have gotten a full time job and I'll be on my own. (He's a heck of a slave driver! ... Just kidding, Mark.)

I plan to be there until the 19th or 20th before returning to the Aerie.

Monday, September 07, 2009

Rest between labors

I'm biding my time here at the Aerie watching football and enjoying Terry's cooking before I have to head back to the Bolt Hole for a week or so. The travel trailer gets inspected Wednesday morning and immediately afterward I'll haul it north to put back into the barn.

Once at the Bolt Hole, I still have a porch to rebuild. Mark and a friend he hired (sorry, forgot his name) were going to do the work but "complications" arose...as usual. I swear, the motto of the Bolt Hole should be, "Expect the unexpected."

On 2 September, Mark went over to do some concrete work and level off the top of the "foundation" that rimmed the porch's south and west side. As he installed a jack post to support the porch roof, the entire southwest corner of the "foundation" rolled and collapsed. Yeah, nothing but loose stones with a mortar surface. He spent the rest of the day with a rented jack hammer breaking the remainder of the damn thing up.

Demolished porch "foundation"

The next day, when his buddy showed up, they moved rocks and prepared to set posts into the ground and see if they could attach a ledgerboard to the side of the cabin upon which a deck could be hung. That's the last I heard from him so I'm hoping everything went okay.

Compare the above photo with this one showing the "concrete" foundation of the west side of the porch. Alleged concrete foundation of porch

It's this corner that rolled on Mark as he was putting up a support post. Looks at least semi-solid, no? Like beauty, however, it's just skin deep.

Anyway, worst case scenario right now is that I will have to build the entire porch by myself after the guys have finished the prep work. Best case (for me) is that Mark still hasn't found a full time masonry job and I'll have help. (He's been turning down one day gigs as they would mess up his unemployment while providing no secure income and the one project they want him for has developed some serious problems that make mine look minuscule. It's repair to a spillway tunnel up north but as demolition progresses the damn thing is squirting water even though it's above reservoir water levels. Who says interior work can't get "rained out"?) Either way, that porch WILL get rebuilt before I leave to return to the Aerie on the 18th or 19th of September.

Sunday, August 30, 2009

Working in the coal mine!


Well, that's how it felt.

Alternatively, we can call this Reconstruction: The underground story!

Removing the front porch on the south side of the Bolt Hole exposed the lack of support for the sill. Something that was also obvious from the inside. someone way back had decided to dig out a portion of the crawl space under the kitchen. The sides began to collapse and they added some wide, rough cut barn board to hold back the earth. It didn't work. The boards either gave way when their support posts (nonpressure treated 4" x 4" rough cut) gave way or rotted out on their own.

We removed the rotted posts and boards on the south side, jacked up the sill, dug a hole for a pressure treated 6" x 6" which was to sit upon a concrete pad, and let the sill back down upon it. Then the boards got replaced and 6" x 6" posts put behind them to hold them in place. Next we back filled to within a few inches of the sill. (Insulative purpose. Less air behind the wall to be hung from the sill and under the porch.)
South side support post and back fill

South side retaining wall

On the north side we removed the boards to find there was even less support. What we initially thought was a concrete wall/ foundation holding up the sill was in actuality just a few loosely laid stones with mortar on the exterior. And the earth beneath those stones had collapsed into the hole.

Loose stones with mortar on the exterior...and nothing beneath them.


Further, one corner of the sill structure that once sat upon three large rocks no longer sat upon those rocks. This was the cause of the major sag in the kitchen. directly above joint.

Lack of support beneath the corner/joint.

The soil on the south side had been very loose and almost a sugar sand. That on the north side was much more solid. We dug back several feet toward the sill moving the soil to the south side and creating a nearly four foot high face to the soil on the north. In front of this face we erected a retaining wall of seven 6" x 6" timbers laid one atop the other and backed by two 6" x 6" posts and one 4" x 4" post. Atop the soil and beneath the sill we created several piers of concrete blocks. By using two 4" thick, 8" wide and 16" long blocks as the base to form a large concrete pad, even the pressure of the jacks against the sill did not press down very far before movement stopped. (In the front, we found the blocks kept sinking until we reached the level of the basement floor.)

With the aide of Mr. Gravity (he's a very serious worker),
the big rock in the corner was moved to a less obstructive position.


Retaining wall on the north side

We used these piers to jack the sill up, inserted a section of 6" x 6" beneath the joint and shimmed the hell out of the mess using pressure treated 2" x 6" and decking material (5/4" thickness). Once the pressure treated material was in place we let the jacks down and let the sill settle on the bracing.
Concrete piers and wooden shims support the joint

If it's not textbook construction or methods: it Good Enough Construction Company.

The air crackled electrically with forboding energy

A second project accomplished at the Bolt Hole was electrical in nature. Wires had to be moved and replaced the Lords of Watts and Ohms needed to be placated and appeased.

The floor joists being logs, it's very difficult to drill holes and run wires through them. Instead, the previous owners stapled the wires to the sides of the logs. Sounds okay except that the metal staples draw moisture in the cold, cold days of winter. They may even be coated in frost when it's 5 or 10 below. That moisture gets into the log and nourishes all manner of little beasties of both flora and fauna. Beasties which can weaken the log and turn it into so much powder. This is especially true if the log is a soft wood with its bark still attached--as most of the floor joists at the Bolt Hole are. (The bigger beams seem to have been either oak or chestnut--they ARE old enough--and while having some surface decay, are pretty damn sound.)

In preparation of possible jacking up of the main support beam, and possible replacement down the road of one or more of the floor joists, I needed to pull as many staples as possible without damaging the wires--especially the very old, canvas and tar covered wires that were probably constructed by Edison. I eventually decided to remove two of the longest canvas-and-tar wires that ran from the breaker box all the way across the basement to a junction box. One supplies power to the first floor and the other to the basement lights--one of which is also wired with the canvas-and-tar wire.

Lots and lots of wires

I left plenty of slack in the yellow 12-2 replacement wires since our plans for support of the central beam--the spine of the house--were not fully developed. The slack can be reomved once things have been finalized in the basement or it can just be coiled up near the junction box. I also left the shorter wires running to the basement light and its switch for a future replacement.

The Evil Breaker Box

Okay, it's not EVIL evil, but it still scares the bejeezus out of me to be working so close to so much voltage. Yeah, I got 'er done without any bodily harm or damage--this time. Still....

Farewell Old Man of the Chimney!

One of the tasks I undertook this past week was the removal of an old, unused brick chimney. It was just 20" square and extended 30 inches above the roof peak and, perhaps, just as much below into the attic where it was supported by some timber cribbing.
The Old Man of the Chimney

Well, that chimney had been crumbling for years and recently the water leaks around and through it were getting worse. It had to go. Taking a little four pound sledge and a four inch masonry chisel with me up the roof and down it came. The portion above the ridge line actually came down almost entirely by hand. The mortar had grown very, very week. I was able to throw the bricks to the ground one at a time.

Inside proved a bit more difficult. The mortar was stronger and the space in the attic was a little cramped. I needed to be aware of where my head and back were at all times or the point of a roofing nail would have perforated me. Plus, the bricks had to be carried out in 5-gallon buckets under low rafters and an even lower access door. I managed to avoid the rafters but the top of my head hit the top of the door--three times.

I eventually managed to get all the bricks out, the floor cleaned of dust, debris, mouse and squirrel droppings. I then added some 2" x 4" braces across the gap where the former chimney had been. I cut some metal from left over pieces from a demolished shed and, with generous application of roofing tar, nailed the metal and a ridge cap in place.

No more chimney

The ridge cap didn't match the one already in place and tar can only do so much. A little Great Stuff sprayed in the wider gaps on the ends of the patch's ridge cap and I'm satisfied that my Good Enough Construction Co. membership is intact.

Must have worked. There was no noticeable leak after the heavy, heavy rains of Friday night and Saturday.

Removing that small section of chimney (only about 5 feet total) means a lot less weight on the pones of this old house. Another good thing, the chimney went on my terms and not its. I semi-feared I would discover it had either blown over or totally collapsed every time I went up over the last year or two. Every spring there would be more brick pieces in the melting snow as the freeze-thaw cycle took its toll.

Saturday, August 29, 2009

Bolt Hole Report, August 29, 2009

Today is my final day at the Bolt Hole for a brief while. Terry's off to North Carolina on Monday with her Mom for an army reunion and I'll be taking up cat sitting duty as well as some more firewood cutting at the Aerie.

Mark and I finished our Good Enough Construction Co. project in the basement today. We installed a retaining wall of 6" x 6" timbers, jacked up the north side sill and installed a couple of concrete block piers beneath it. The jacking up of the sill went a long way toward correcting a major sag in the sill but there's still more that will need doing in the future. I've more support work to do down there in various places but nothing that can't wait for a week or two.

Jacking up the northern sill in just one place--directly beneath a joint--has resulted in things in the kitchen...well, changing. The door to the attached wood shed now closes pretty well for the first time since I've been here. The window I put in while the house was sagging is suddenly not level (but, at least, it still opens and closes easily) and the wooden interior shudders didn't latch properly. The stove looks to be tilted but that's probably because the legs on one side were extended to make it level when we put it in position. All those things are in or against the wall we just jacked up.

When we got done, we used some spare T-11 and closed in the huge hole in the south side that allowed us to get the timbers and block down there. That opening is going to be further hidden by the front porch. (Remember the porch? That's what started this whole sheebang. Was supposed to be a one or two day project to replace it.)

I'll be posting pictures Sunday or Monday when I get to the Aerie's high speed connection.

******

Once finished, I hitched up the travel trailer to the Tundra and hauled it out of the storage barn. It has to go back to PA for its annual inspection. This is the first time I've moved it since last September when it was inspected. We just never got around to doing any traveling because Terry's been so busy as national president of SAGA. That ends first week in October, however, and we are already talking about a major road trip next summer. Hitching up by myself went smoothly. I was pleased to see all the lights worked fine and that the tires needed only a little air. I had hauled the compressor up for just such a possibility.

The smaller utility trailer went into the barn for the time being. I'll swap again when the travel trailer is brought back to the Bolt Hole on September 8th or 9th.

I'm taking advantage of the enclosed travel trailer to transport some of the "stuff" that we left here when we moved out of NJ in '06. A couple of antique captain's chairs, a pair of old toy boxes, and a few boxes of magazines and cookbooks will make the trip to the Aerie.

******

It started raining about sundown on Friday and we had more than an inch overnight. Today we had some rather heavy showers off and on. Right now someone has turned the faucet to the on position.

I'm glad I spent some time yesterday creating trenches and swales to take water away from the foundation of this old house. Again, more needs to be done to channel the rain/snow melt away. At least, I'm getting an idea of the amount of digging/grading that needs to be done and I can see if what I've already done is doing any good.

The rain and chilly temperatures (it never got above 65 today) makes things a bit cool and raw inside as well as out. As a result, I've had to resort to lighting a fire in the kitchen wood burner. And it feels good!

******

I'll be up and Aerie bound before 0800 Sunday morning. Here's hoping it's an uneventful trip.


Thursday, August 27, 2009

Bolt Hole Report, August 27, 2009

Another couple of days working in the cal mine...I mean basement.

Yesterday, Mark and I wrestled a pair of 6" x 6" pressure treated timbers through the gaping hole in the front of the building and raised them on end putting three feet in the ground. (Clam-shell post hole diggers rock!) These and a 4" x 4" post form the rear support for 1-1/2" boards that will hold back the loose soil and fill that will be under the porch on the south side of the building...when we get back to rebuilding the original project.

Much of the soil came from the north side of the cellar hole which we enlarged slightly. Unlike the fine, loose, sandy fill under the porch, the stuff from the north side is pretty much virgin soil and quite compact. It holds its face well when we carve into it--which is a big plus when you're concerned about it caving in on you!

We also put in some temporary supports constructed from 4" thick solid concrete blocks on which to position our two hydrolic jacks. We're using these to lift the sill so we can get a vertical and a horizontal 6" x 6" under it where it has sagged. The cause of the sag is due to some water undermining, some critter digging and some aged half-lap joint in which the wooden pegs holding the joint together have long since rotted/disappeared. (If you want an idea of how this place was put together, think of a post and beam barn laid on its side with another post and beam barn built on top. Amazingly, there were no column supports under the joints--a definite no-no. The outer corners in this little ell of a former crawl space were propped up on large stones. The one in front is okay, the one on the north side had slid from under the corner and was supporting--well--nothing.

Today, my task, whether I wanted it or not (Mark had to be elsewhere) was to move that half ton boulder out of the way, reposition the temporary piers and the jacks and get ready to dig another post hole or two to support the rear wall.

Mission accomplished thanks to a little sweat, lots of gravity, some luck, and lots of concrete blocks. In fact, I like these 4" x 8" x 16" solid concrete blocks so much, I even took the time to go purchase another twenty. That makes nearly sixty of the things on site. Those we can pull out when we finish will make one heck of a patio!

******

Oh yeah, the weather. Beautiful! It got down to around 40 degrees last night and might be in that neighborhood again tonight. Perfect sleeping weather yet not so cold that I feel the need to start a fire. The sun shone all day and the temperature still didn't get above 70 at the Bolt Hole. It was up to 72 degrees when I went down into the valley to get the blocks at Lowe's. Tomorrow is supposed to be about the same but with clouds moving in in the afternoon and showers starting Friday night and continuing though Sunday. If it's raw and wet, I may have to build the first fire of the season. *sigh* It was a short summer. I think it happened last Tuesday through Friday.

As for the rain: What do you expect? The NY State Fair opened tonight in Syracuse.


Tuesday, August 25, 2009

Bolt Hole Report, August 25, 2009

Well, the chimney is down and out. The patch has been put into place and awaits the next rainstorm to see whether I did a good job or not.

Regardless of the weather tightness, the removal of the four feet of bricks will take a load off the two sills that HAVE NO FREAKIN' SUPPORT BENEATH THEM! Goes a long way to explaining the sag in the north kitchen wall, no?

The removal of the chimney was the last thing on my "honey do" list that my biddy Buddy Mark left.
Wires and plumbing moved? Check
Rear (north) wall exposed so we can asses the situation? Check
Lolly columns installed to support main beam and prevent further sag? Check
Remove old, unused chimney stump from roof and attic area? Check

Now comes the hard part. Figuring out how to shore up the two sills so as to prevent their further sagging. And seeing if we can get a leverage point so as to jack up the rear (north) wall which has sagged some two or three inches over the years.

Further reflection: The sags were here when I bought the place. If I had inspected more carefully, I might not have purchased the Bolt Hole but would have certainly negotiated a lower price. Even so, the location--adjacent to state "forever wild" lands--and the size of the land--34 acres--probably would have swayed me. This old place has its problems, but....

(I'm saving the pictures to upload at a future time. Dial-up and all that.)

******

The humidity disappeared today. Great weather to work outdoors or in the attic. The temperature rose to around 80 degrees but with the lack of humidity and the steady breeze that blew, I found myself quite comfortable. Aside from the tar all over my hands, one dinged up nail on my left index finger (another reason to use screws!), cuts from sharp metal edges on several fingers despite wearing gloves--most of the time, a couple of sharp dings on the noggin when I forgot just how low the rafters in the attic were, and all the dust from the old crumbling chimney, that is.

Tomorrow will be even cooler but there's a slight chance of showers late in the day.

If Mark shows (and he says he will), it will be time to move some of the 6" x 6" timbers into the basement to prevent further soil slides that caused the undermining of the sills. How many people can say they've had to build a retaining wall IN their basement?

To think, all this started when we decided to rebuild the front porch. A task that was projected to take half a day. HA! Nothing like working on a century-old house. I should have paid more attention to the original This Old House. Norm and Bob were always running into the unexpected.