Showing posts with label tutorial. Show all posts

September 12, 2016

Dog Days: Cloud 9 New Block Blog Hop


Hello and Welcome!! 

Hopefully you're stopping over from the 2016 New Block Blog Hop sponsored by Cloud 9 fabrics. If you already hang out around here stop by some other sites! Links are at the bottom of the page.  The hop will be happening over the next three days so keep an eye out for some new block creativity here in blogland. 

Summer in New England is officially over. The days are getting cooler and the nights are crisp. Fall clothing and warm coffee are now the trend. Although we are officially ready for Fall this block was thought up during those dog days of summer. In late August it was just to HOT to quilt. Instead I sat down with some graph paper and eventually this block was created. Rosa dog was lying next to me sweltering in the heat, hence the name.
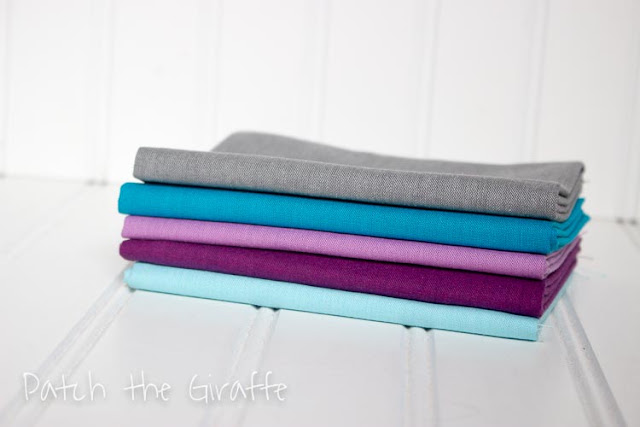

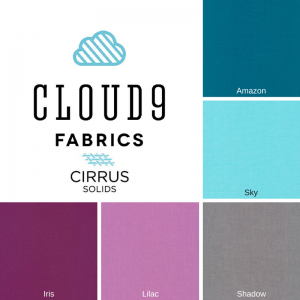
2016 Color Palette 

Directions: 

CUTTING: 


Background - Sky: (2) 5 inch squares, (2) 5 inch by 3 inch, (4) 2.5 inch x 4.5 inch
Color 1 - Iris: (2) 5 inch by 3 inch, (2) 3 inch squares
Color 2 - Lilac: (8) 2.5 inch squares, (2) 3 inch squares
Color 3 - Amazon: (2) 5 inch squares


BLOCK PIECES: Each piece will be 4.5 inches square, unfinished.


Corner Blocks: 
To create the four corner pieces. 


Take the (2) background and (2) color 3 - 5 inch squares. Draw a line diagonally down the back of the background fabric with a pencil. With fabrics right sides together, sew a scant quarter inch from either side of the line. Cut down the center and press open. Trim to 4.5 inch square. 

Take (4) of the color 2 - 2.5 inch squares and draw a line diagonally down the back of the fabric with a pencil. Sew on the line to create a triangle in the corner of color 3, as shown below. 


Pinwheel: 
To create the pinwheel center. 


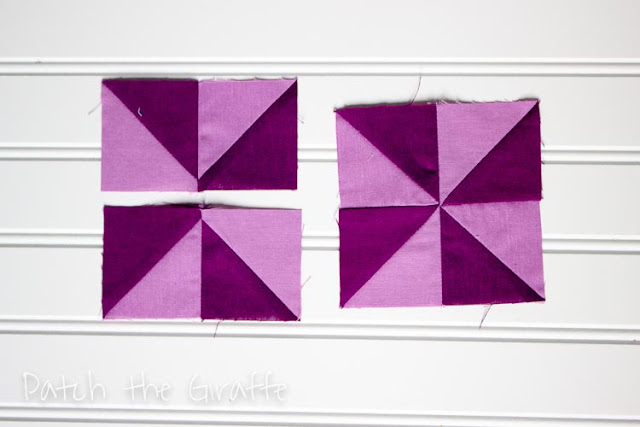
Take the (2) color 1 and (2) color 2 - 3 inch squares. Draw a line diagonally down the back of the color 1 fabric with a pencil. With fabrics right sides together, sew a scant quarter inch from either side of the line. Cut down the center and press open. Trim to 2.5 inch square. 

Lay out the 4 half square triangles, as shown below, and sew together.


Points: 
Left Side: 

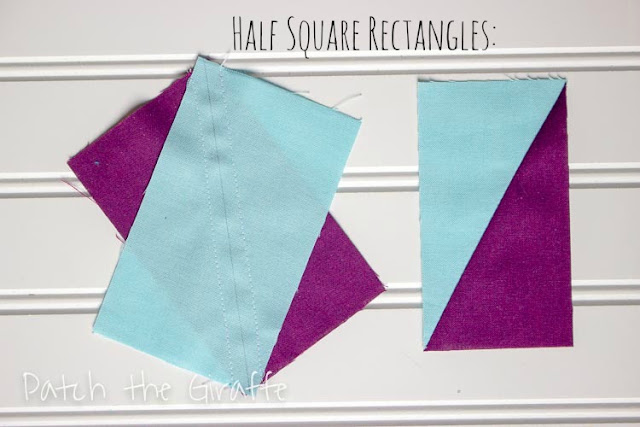
To create the 4 large points - half square rectangles. 

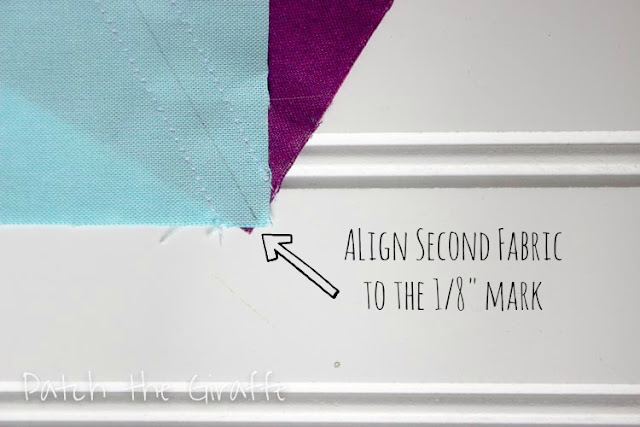
Take the (2) background and (2) color 1 - 3 inch x 5 inch pieces and mark the background pieces with a diagonal line that is 1/8 of an inch from either corner, as shown below. Align the fabric diagonally with right sides together leaving an 1/8 inch gap, sew a scant quarter inch from either side of the line. Trim to 2.5 inch by 4.5 inch.

Right Side: 

To create the 4 small points.

Take (4) of the color 2 - 2.5 inch squares and draw a line diagonally down the back of the fabric with a pencil. Sew on the line to create a triangle in the corner of the background rectangle, as shown below. **Be sure to sew in the opposite direction of the left side point.


To create the 4 point pieces.


Take one left side and one right side and sew together along the center, as shown below, four times.


ASSEMBLY: 

Lay the pieces out as shown to create a 9 patch. Sew blocks together to make rows, then sew the rows together. The block will be 12.5 inches square unfinished, and 12 inches square finished.


Check out all the new blocks being created throughout the week!

Monday, September 12th

Host: Yvonne @Quilting Jetgirl

Tuesday, September 13th

Host: Cheryl @Meadow Mist Designs

Wednesday, September 14th

Host: Stephanie @Late Night Quilter

June 18, 2016

Bedazzling Blogger: New Blogger Info Guide

Welcome those visiting from the 2016 New Bloggers Blog Hop!  

Once upon a time I was in your very shoes entering the blogging world. One thing I really wanted when I started blogging was to create an appealing look on my blog. So, here is my brain dump on how to up your blog's appearance. 

Disclaimer: 
Let's not pretend I am an expert on Blog design or dictating what makes one blog better than another. Here are just some things I have learned in the process of working on my own blog and my personal experience. 


Back when I started blogging I thought the only way I could be fabulous was to pay someone to overhaul my blog. Not true. One thing I have learned is my blog is free, that's right free. I do subscribe to software (Picmonkey.com and Adobe Lightroom) to improve my pictures but I haven't put money into my online space, with the exception of social media icons. You don't have to hire someone to look cool, with A LOT of time and some patience it will happen for you too! 

Why I Follow Blogs or Don't Follow Blogs  


Some blogs I love for the "visual candy", some I love for the content. The one thing I enjoy is a nice clean blog that reads quickly with great images. 

VISUAL CANDY: term made up by Patch the Giraffe to describe sweet images that spark a sense of creativity deep within the soul. After indulging in said sweet, visual treat you feel the same euphoric buzz as a sugar high. The visual appeal is stunning and yummy all at the same time.

I strive to provide my readers something yummy to look at and make sure they have something to interesting and sometimes snarky to read. 

If a blog offers a clean layout and lots of visual candy, you can bet I am in! 

Here are some links to things that can be changed easily that make a big impact 


BACKGROUNDS: How to insert a different background click here. Google "open source backgrounds" to find the image that works for your overall look. Here is my current image, I like to change mine frequently to make the blog more interesting to me. 


ADDING CODE: Learning how to center date and title on your post click here. You can easily drop code into your blog without playing with the main code for the blog. For example, I Google searched "Center Titles in Blogger" and a bunch of videos and tutorials popped up and link to cut and paste code. If this scares you at first, no worries it did to me too. The more I have played around with my site the more comfortable I feel with futzing with the code.

SIDEBAR SOCIAL MEDIA: To learn more about hyperlinked images for social media click here. One thing that quickly cleans up a blog is organizing the sidebar, get your social media under control! It also lets the followers know other places to look for you. Look at some of your favorite blogs and see how they order their information. I purchased my icons for couple dollars off Etsy to help me with the process.


IMAGE EDITING: Learn how to making great mosaic images click here. I use picmonkey.com for all of my collage making, buttons, headers, and any image that needs to be created or edited. The site is free, but some features need a subscription. (Not an affiliate, I just love their site. Yes, I do subscribe). Check out the following image. I also use this site to create images with text.


PHOTOS: Use a nice camera and get comfortable with it. Every time I use my camera it get's easier to take photos. I shoot with a Canon Rebel on the AP setting. Recently I took the Craftsy class "Product Photography at Home" to gain some tips about settings and setting up cool shots. They also have beginner classes as well, this does help! I am no pro, but I do make an effort to keep improving.

Adobe Lightroom has a LARGE learning curve and big price tag, but does a great job editing photos. If you are not ready to make that kind of purchase programs likes Picasa are free. Personally, I edit every image that goes on my site. It also doesn't hurt to watermark images (tag the pictures with the blog's name). People like to "pin" images and having the source visible is good for blog traffic.

PAGES: The tabs at the top of the site organize information. People (ok, me) love an "About Me" page to learn more about the person behind the blog. They also love a "Tutorials" page. It takes a lot of time to write a tutorial but it's worth it to build traffic. My most popular posts over time have been my tutorials. Also having an archive of finished quilts of the past and current projects or sew alongs isn't a bad idea either. Most times its just to keep me straight!

MY BEST ADVICE: Starting a blog is overwhelming! Setting up the blog, creating posts, pages, upping the photography, keeping it all going. It's exhausting. When I started, I worked on one thing at a time. Looking at an established blog made my head spin with all the things I wanted to do. Take your time! It won't happen in the first month, or year. Don't stress, just enjoy the process. When you have a couple hours (bahahaha) just sit down to tackle one improvement.

If you have any questions please feel free to email. Or, if see something on my site you desire but wasn't discussed I can try to walk you through any changes or send you the code.


Happy Blogging


June 06, 2016

Twisted Nines: Finished

Summer fever is in full swing for the students. The craziness that is happing in my classroom is insane. Just 10 more days! Not to mention my personal life has been non stop. Hopefully there will be updates on that front soon. Hint: I have been house hunting! (I could put in a 1,000 more ! points)

In the midst of all this crazy I did manage to whip up this baby quilt. If you don't remember I made the tutorial Twisted Nine's a couple weeks back. It uses two charm packs and a fat quarter for solid. 

It's a great little pattern if you need a baby quilt fast. 


To finish, I used a meandering stipple. This quilt finished up fast, only being 39 inches square. It's a nice baby quilt. The binding is a light mint color and the backing is bright pink polka dots. The colors ended up working out perfectly.


Fabric Used: - 1.5 yards
Net Loss: - 90.5 yards YTD

I cannot believe I have used almost a 100 yards of fabric AND still have so much around. It's been nice to see a "slight" decline in the stash. 

May 22, 2016

Twisted Nines: Tutorial


Twisted Nines is an easy baby quilt, perfect for beginners who want to take their quilting to the next step. The quilt finishes at 39 inches square.


Materials: 
To start you are going to need 2 charm packs (Dot. Dot. Dash-), and a quarter yard of solid fabric (Kona Midnight). I used fabric from yardage but if you can also use a fat quarter.
*Charm packs need to have 42 pieces of fabric each.

Disappearing 9 Patch Block: (Click the link if you are not familiar with this block)
To start sew the charm squares into a three by three block. You will use 9 charm squares for each block. Cut down the center vertically and horizontally to create four smaller blocks. Here is a visual. You will have 36 small blocks and 3 charm squares left over when finished.


The Twist: 
From the solid fabric cut three (if using yardage) 3 inch wide strips.  Subcut into 36 - 3 inch squares. Then mark a line diagonally across the square, sew along line. Trim excess a quarter inch from the sewn line. Press open. If you would like a shortcut, try the Frog Tape Trick.


Block:
Each block consists of 4 smaller blocks arranged the same way. Create 9 blocks in total. Then arrange them in a 3 by 3 layout. Sew the block together and you're finished!

Larger Size: 
Increase the size by using 3 charm packs. Sew the disappearing nine patch block, you will end up with 56 small blocks and no remaining charm squares. Cut your (1/2 yard) of solid fabric into 3 inch strips and subcut into 56 - 3 inch squares. Sew following the twist directions. Layout blocks in a 7 by 8 configuration.  Final quilt size will measure approximately, 45 inches by 52 inches.


Fabric Used: - 1.75 yards
Net Loss: - 72 yards YTD

October 25, 2015

Sew Your Scraps: Part III


Well, I am a little late on the peak foliage but you can still see all the essence and beauty of Fall in New England. These were actually photographed last week, so now most of the leaves have fallen and have been attacked and displaced by Dad's turbo rake. 


Dad actually has been very helpful with the quilt photoshoots, he actually came back from helping his friend wire a street lamp to help conquer the fall winds. So thanks Dad for your help! We had a few (so many!) snafus along the way. First off, my camera died after a couple pictures.  So Plan B, use the cell phone. These shots are not bad considering. Lesson learned, always bring an extra battery or charger.


We moved wood cages to new spots, those didn't work and with the phone for the camera I was limited in what I could overlook. Used clothes pins to pin the quilts to the wood cages those went flying in the wind with the quilts. Lets say nothing was right. Good thing the sky was super blue and everything was pretty so I can announce something did look good.

Then Dad brought out the old Jeep for me to display the quilts on. Well, we are now moving in the right direction. I can't drive it, but he will let me drape a couple quilts over it! 


This weekend I am actually enjoying some time away at quilt retreat with the New Hampshire Modern Quilt Guild. There will be more information to follow once I get some pictures taken and sort through all the shenanigans! 

Net Zero Update: 

Quilt One: One block is equal to one jelly roll strip x 64  - 4.5 yards, 0.5 for binding, and 3.5 yards for backing. Total of 8.5 yards. Quilt Two: The quilt top is 2.75 yards, 0.5 for the binding, and 3.5 yards for the pieced backing. Total 6.75 yards. Now I am at a monthly total of -34.75. I did purchase 4.5 yards of Cotton & Steel on sale at Fat Quarter Shop so that's a grand total of -30.25 yards!


Hope you enjoyed leaf peeping around my parent's house!  

- Patch & Chels

September 03, 2015

Picnic Pinwheels: Pattern


This news is super exciting I am releasing my very own pattern, it was part of the New Block Blog Hop called PICNIC PINWHEELS. This little guy is made with scraps, but there are directions to use both scraps and/or Jelly Roll strips. 


If you are interested in downloading a copy of this pattern head over to my Craftsy site. The quilt pattern is fun to make and a great way to get rid of some of those scraps laying around. I did make 4 extra blocks to get pieced into the backing as well! Clearly it was hard to stop.


Thanks for joining me in this exciting news. Hope you enjoy the pattern!

-Patch & Chels

August 31, 2015

2015 New Block Blog Hop: Picnic Pinwheel


Welcome to the 2015 New Block Blog Hop! If you're new to the blog my name is Chels and I've been  blogging for about a year and a half. I am a full time teacher, so today is officially my first day back. Summer went by too fast, but I am savoring every last minute of this beautiful sunshine starting with this delicious Watermelon Summer Palette from Fabri-Quilt. Look below for links to other quilters  sharing their tutorials today. Now introducing ... 

Picnic Pinwheel Tutorial

MATERIALS & CUTTING:


Blue/Background: 4 - 4.5 inches square, 8 - 2.5 inches square
Chartreuse/Color 1: 4 - 6.5 by 2.5 inches
Aqua/Color 2: 4 - 4.5 by 2.5 inches 
Coral/Color 3: 4 - 2.5 inches square
Chartreuse/Color 4: 4 - 2.5 inches square 
  
**For this tutorial: all seams are sewn at a scant quarter inch, seams are pressed open, and diagonals are sewn using the Frog Tape Trick. RST = right sides together, 

DIRECTIONS:


1. Start by taking the four 6.5 by 2.5 inch pieces and four 2.5 inch background squares. RST sew diagonally across the white square. Trim away extra fabric and press open. 
2. Next, take the four 4.5 by 2.5 inch pieces and four 2.5 inch background squares. RST sew the opposite direction you sewed the diagonal in step one. Trim away extra fabric and press open.


3. Use the 4.5 inch background squares and the 2.5 squares of color to make the corner piece. RST sew diagonally across the colored square. Trim away extra fabric and press open.
4. Using the last 2.5 inch color squares, repeat step 3 to the opposite corner. Trim away extra fabric and press open.


5. Putting RST sew together the 4.5 inch square and the 4.5 inch rectangle on all four pieces. Press open.
6. Next, RST sew the 6.5 inch rectangle on all four pieces. Press open. Now each quadrant of the design is completed.


7. Lay out the four quadrants, rotating as shown above.
8. RST sew together the top two quadrants and bottom two quadrants. Press open.


9. RST sew the two sides of the block together. Press open. 
10. Admire the finished block! 

The block will finish at 12 inches square, unfinished 12.5 inches square. If you have any questions or need clarification on a part please feel free to email or leave a comment below. 

Stay tuned on Thursday I am releasing my first quilt pattern using this block! Here is a little sneak peak. Being a first I am super excited to share with everyone. 


Until then check out these other bloggers who are releasing a new block tutorial today!