/** Google Analytics script below */ /** end Google Analytics script */
Showing posts with label classes. Show all posts

Tuesday, November 22, 2011

Another Little Something I Started...

With so few posts this year, it’s easy to find something to write about these days. When all else fails, talk about a project not previously shared!

This past spring, Jane Zimmerman offered her former seminar class project, A Garden of Babylon, as an online course with Shining Needle Society. I liked the design, but I was also intrigued by a line in Jane’s description, which states that the class “explores both historical techniques of silk and metal thread embroidery through the ages.”

Of course, I couldn’t just stitch the project using either colorway proposed by Jane. I wanted to soften it up a little, so I decided to go to silver threads rather than gold.

Here is the beginning of my A Garden of Babylon. It is stitched on gray 18-count canvas using a variety of silk threads and Kreinik braids.

GardenOfBabylon 22Nov2011

What do you think? I obviously still have a bit to go on this. Maybe I’ll be able to finish it up next year.

Friday, November 18, 2011

A Quick Peek at Another Upcoming Project

Okay, folks, NaBloPoMo is starting to take its toll. I actually had a pretty good topic for tonight’s post, but if I actually wrote that post tonight, it would be far less than stellar due to the author (a.k.a. me) falling asleep every other line.

I’ll leave you tonight with a brief look at an ANG correspondence course I’ll be starting on the first of the new year. This is Hiogi, a project designed by Kay Stanis to teach silk and metal thread techniques on Congress cloth.

image

Another beauty to look forward to!

Tuesday, November 15, 2011

A Couple Quick Progress Pics

In the interest of actually stitching a bit, tonight’s post will be short and sweet. I leave you with a couple of quick peeks at Magi #3 and his companions…

Magi3_15Nov2011

Magi 15Nov2011

Enjoy!

Saturday, November 5, 2011

Kimono Revisited

It should come as no surprise to most of you that I have a fairly extensive stash. Okay, a really extensive stash. I have project instructions that I’ve forgotten I’ve purchased. Every once in a while, I go through things and amaze myself with some of the stuff I’ve collected.

Then there are projects where I certainly remember that I have the instructions, but that project just hasn’t reached the top of the “STITCH ME!” pile. One such project is simply named Kimono. It was one of the first must-have counted canvas projects I can recall seeing when I purchased it perhaps ten years ago.

KimonoOriginal
The front cover shows Kimono stitched in shades of ecru. It’s pretty, but I likely wouldn’t have purchased it if I hadn’t seen a few others in progress in other colors. They were gorgeous. And huge.

Kimono already has an interesting history to it. It began life in Maggie Lane’s book Gold and Silver Needlepoint, published in 1983. Maggie came up with the outline and all of the division lines. In 1998, Ietje Jackovich published her version, which used Maggie’s outlines, but included all new filler stitches.

And now, nationally-known needlepoint instructor John Waddell has entered the picture. John has reimagined this project yet again. Rather than just three values of a single color family, all stitched in floss, John has introduced multiple colors, variegated threads, and metallics. It brings this slightly dated piece to a project for today’s stitcher.

KimonoNewIf the colors above aren’t your style, John has pulled together eleven different color combinations, or, of course, you can choose your own.

If you don’t want to stitch on 18-count canvas, don’t worry. Those eleven color combinations have also been pulled for congress cloth, with changes to the metallic sizes as needed.

To top it off, he’s teaching it as online class called Kimono Revisited through Shining Needle Society throughout 2012. If you already have the original book, you pay a discounted class fee (since you don’t need two books!).

Can you tell I’m excited about this class?

If you are too, just head over to the Yahoo! group for the “Home Room” of Shining Needle Society to read more about it, including the pricing information. If you’re not a member of Shining Needle Society yet, what are you waiting for? Membership is free, and you’ll have the opportunity to sign up for any one (or more!) of the seminar-quality online classes offered each year. All you need is a Yahoo! account (also free) to join the SNS_Home_Room group.

And yes, I’m completely unaffiliated with Shining Needle Society, other than being a very satisfied member, customer, and student! Thanks to Kate Gaunt of SNS and John Waddell for letting me post these photos here and go on and on about this upcoming class.

Is anybody joining me?

Thursday, July 14, 2011

The Magi Online Class

Several years ago a stitching friend went to a seminar and ended up with one of the most drool-worthy projects I’ve ever seen. That lovely creation was Dorothy Lesher’s The Magi.

Earlier this year, I was thrilled to find out that Dorothy was going to be offering The Magi as an online class through the Shining Needle Society. The class was fully kitted, complete with painstakingly hand-drawn canvas, several yummy silks, spools and spools of metallics, Swarovski crystals, and fabrics for applique. 

Don’t these colors just scream royalty?

And yes, I have started it. But that’s another post…

Tuesday, October 12, 2010

Mystique: Lesson 2 complete

When Carolyn Mitchell originally taught Mystique to stitchers in her local area, it was a mystery project. As a result, the instructions are broken up into several lessons.

The first lesson consisted of all of the borders, and we completed this as prework for the class.

Since the class, I’ve completed lesson 2.

This lesson included the long rectangles around the center (with a few blank spaces for future beadwork), the gold X’s in the corners of the large North, South, East, and West boxes, outlining the border regions of those same boxes, and filling this region in North and South.

As you can see, because this was a mystery sampler, the lessons skip around the project quite a bit. A few of my classmates have been trying to finish the North block, and have found that they have to diligently read through lots of instructions to locate all of the details of this block.

I decided I didn’t want to work that hard on this piece and would rather be stitching instead of hunting for “What stitch goes here?”. My stitching time is too limited right now to spend it that way, so I’m going with Carolyn’s recommendation that we just work through the project in the order listed in the instructions.

I’m curious. How would you do it? Would it drive you nuts to leave a block almost complete like the North block on my piece?

Friday, September 24, 2010

Mystique class with Carolyn Mitchell

Yesterday and today I had the privilege of taking another class with Carolyn Mitchell. As in my previous class with her, I found her teaching style quite enjoyable.

She was thorough in explaining the placement of easier stitches, and in specifying which threads were needed for each stitch being reviewed in class. This wasn’t completely an easy feat, since there were two completely different color schemes available to participants. For more challenging stitches, she demonstrated each stitch several times in small groups.

After discussing or watching a demonstration of a given stitch, we had plenty of time to try it out and ask questions, which she patiently answered (some multiple times!). In fact, I think I finished more in the past two days than I’ve ever managed to do in a class.

Carolyn’s method of designing, she explained, is to stitch first, and then write instructions and chart the project. When she first started designing, she’d try drawing up the chart first, and then stitching, but she ended up making changes while stitching, which resulted in recharting the design.

Due to the lag between actually stitching an area and writing the instructions, we did have a few differences between the original and the eventual written master thread list and descriptions of which threads were to be used in a given area. Because of this and changes in dye lots, it was necessary to make a few changes to the instructions. Fortunately, these were fairly few and far between, and were all corrected at the beginning of class.

All in all, another wonderful class, and I look forward to making more progress on this project!

Wednesday, September 22, 2010

Looking ahead

Having finished My Way last week, I now have no fewer than THREE large canvas projects on my near-term radar.

The first, of course, is Mystique, the project from my Carolyn Mitchell class over the next two days. We did have to stitch the borders for the project as pre-work for the class, but fortunately the most time consuming part of this was the counting. The stitch is a simple slanted gobelin stitch over two canvas intersections.

Unlike My Way, Carolyn strongly suggested that all students use one of her two color combinations, so there’s no chance for my progress to stall simply due to decision paralysis. I’m looking forward to this!

Also on the horizon is Jim Wurth’s Prelude to Peace, an online class through Shining Needle Society. This class is scheduled to start October 1st. I’ve chosen my colors – just slightly brighter versions of the original blues and browns, but haven’t actually purchased any of my threads yet. I guess I’d better get going on this! (Note, the picture in the link above is another stitcher’s, not Jim’s original. I couldn’t find a picture online of the original colors, except in the SNS Home Room. If you’re really curious, you can always join – it’s free!)

Finally, my local EGA chapter is doing the correspondence course Cleopatra’s Cat by Mary Long. Since I’m not a cat person, I’m taking some liberties with this project. I’m making a greyhound outline from a picture of my Sophie, and will be stitching it in shades of brown and black to match her brindle coloring.

I’ll try to post a bit more frequently to share how I’m approaching this. Yes, it means a lot of decisions, but since it’s mostly thread decisions rather than color decisions, it shouldn’t be too difficult, yet will still present an interesting challenge.

In the meantime, I’ve actually picked up one of my slow WIPs. Over the past week, I’ve made a bit of progress on the border of Rae Iverson’s Blackwork Band Sampler.

If I don’t actually finish a few things, I’m never going to meet my goal of ending the year with fewer WIPs than last year. But then again, I’m sure that’s not the only yearly goal that won’t be met! :-)

Friday, September 17, 2010

Friday Finish: My Way

Yes, it’s finally done!

Design: My Way

Designer: Carolyn Mitchell

Technique: counted canvas

Ground fabric: 18ct mono canvas

Threads: LOTS!

Stitches used: LOTS!

Stitching timeframe: Started borders October 16, 2008; class November 8-9, 2008; finished September 14, 2010

For more detail around the threads and stitches used in this project, see my previous posts about it. And no, I have no idea what I'm going to do with it. It won't really "go" with anything in my house, but I had fun stitching it and though the decisions frustrated me from time to time, I think I learned a lot from this challenging piece!

I finished just in time. My next class with Carolyn Mitchell (her gorgeous Mystique) starts next Thursday!

Tuesday, August 31, 2010

My Way progress: Block B completed

Yes, My Way is coming along. Here’s my completed block B. Unlike block A, I didn’t make very many changes to this one.

This block was a lot of fun. It used, among other stitches, the sprat’s head stitch, and two stitches designed by Jean Hilton: crescents and double fans. (And since I can’t find any instructions for a double fan online, that will undoubtedly be a future blog post!)

I used a variety of threads in the block. If you look closely, you may be able to spot:

  • Kreinik 1/16” ribbon
  • Caron Impressions and Watercolours
  • DMC floss, #8 and #5 pearl cotton
  • Rainbow Gallery’s Nordic Gold and Neon Rays
  • Gumnuts Blossoms
  • Trebizond from Access Commodities

Despite the variety of textures and stitches, this block isn’t too busy. I like how it turned out.

Friday, August 20, 2010

Friday Finish: Omega

Thanks for all of the great comments on my colors for Omega. Over two cards of Neon Rays and a whole bunch of crescents (and one Rhodes stitch) later, it’s done!

Design: Omega

Designer: Jean Hilton, for Rainbow Gallery

Technique: counted canvas

Ground fabric: 18ct mono canvas

Threads: Trio (a silk and wool mix) from brown paper packages, FyreWerks and Neon Rays from Rainbow Gallery, and just a touch of Kreinik braid

Stitches used: cross stitch, long stitches, plaited rays, backstitch, Rhodes stitch, and crescents

Stitching timeframe: August 2-8, 2010

********************

Thanks for all of the best wishes for E. We had a bit of a setback requiring recasting this week, but she seems to have adjusted quickly to the new cast.

Friday, July 30, 2010

Friday Finish: Jacqui's Choice

Since I'm back on a canvaswork kick, here's one of my early canvas projects.

Design: Jacqui's Choice

Designer: Nanette Costa

Technique: counted canvas

Ground fabric: 18ct mono canvas

Threads: cotton floss, metallic threads, seed and pearl beads

Stitches used: couching, beading, lots of Hilton stitches (jessicas, crescents, Amadeus)

Stitching timeframe: 2002-2003

This project was from my very first multiple-day class, taken with my local EGA chapter. Up until this, I had only taken classes through my local shop or 1 day classes at a stitching festival. Needless to say, I really enjoyed it.

I actually had it framed on point. Looking at it now, I like the diamond shape, but I’m not crazy about the rest of the framing choices, though I’m not sure what I would change if I were to have it reframed.

I’ve wondered whatever happened to Nanette Costa. She was a fabulous teacher. I’m saddened to find her listed on the “inactive or retired” list on the National Academy of Needlearts (NAN) website. Does anybody know what she’s up to now that she’s not teaching?

There are still a few of her commercial patterns in various online shops if you look hard enough.

Wednesday, July 28, 2010

Rediscovering my stitching (and blogging?) mojo

Do you ever hit a point where just about anything can distract you from stitching? I’ve been there for most of the past month.

Don’t get me wrong – I love stitching. It’s just that none of my projects has really been calling to me lately, and other silly things have distracted me in my leisure time. Yes, silly – like playing games or finding cool apps on my new iPod Touch, or surfing the web (sometimes on non-stitching sites, no less!).

It’s really pathetic that my stitching mojo just about completely stalled, considering that I’m almost done with the hardanger piece. Oh, well. It will be quick to finish when I get back to it.

I did start the sampler project that’s part of the Thistle Threads Gold Master Class, then found that since I joined the class on the last day of signups, several of my threads are backordered. On the first motif I stitched, I discovered that I’m missing two or three (out of six) colors. Not very inspiring.

Mojo returns!

All of a sudden, though, I’ve started stitching again! What changed?

It’s simple. I started my Friday Finish posts in part to inspire others, and ended up inspiring myself! My last posted finish, Silk Pageantry, reminded me how much I really enjoy canvaswork and hadn’t been doing much lately.

That’s how My Way found its way back onto my lap stand.

Finalizing decisions so I can just stitch

It’s been a while since I posted about this piece, so let me refresh your memory. I started this project in November 2008 in a class with Carolyn Mitchell.

My Way is a project similar to my more recent class, Potpourri with Margaret Bendig, in that each student chooses her own colors and threads and has a great deal of liberty about exactly how they’re placed.

Here’s what My Way looked like when I last posted about it in November. I’ve stitched on it a bit since then, so it was a bit further along when I picked it up last week.

I don’t know about you, but sometimes I want to just stitch. I don’t want to have to make decisions on every project I pick up. I think this was one of the reasons my stitching stalled. I was making decisions on Potpourri, and then on the hardanger piece.

When it came to the six blocks in My Way, I’d made all of the decisions on five. I only had to finalize the center area on Block A, and then I could just stitch.

Block A is the lower middle square in the photo above. I kept pondering this block for a while, because it seemed out of place. The rest of the block centers aren’t square. They extend a bit into the “arms” of their crosses. Can you see what I mean?

I wondered what would happen if I extended the waffle stitch in the middle of this block until it hit the corner areas of the block. So pulled the center out and tried it. Aha! That’s better.

Then I wanted something different than originally designed for the “arms” of this square. So I tried a few things:
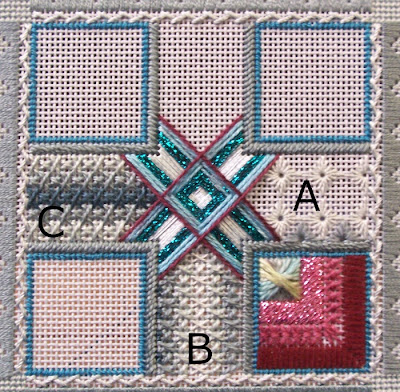
Section A is just some large eyelets in two colors. It didn’t get finished because I realized it looked too similar to the main borders of the project.

Sections B and C are actually the same stitch (alternating oblong and square crosses), in the same colors, but with the color gradations opposite each other. I took a vote with some stitching friends. Two liked B, and two liked C. Not much help there. I looked at it from across the room and decided I liked the dark in the middle.

Hooray! Now I can stitch away, with no decisions in sight until I finish all of the blocks and need to finalize a couple of things on the border.

Aaaaaahhhhh!

Oh. In case you’re curious, yes, I have finished this block. What do you think?

Sorry for the really long post. I guess I’ve been storing up blogging mojo, too. Now that I’m stitching again, there’s a chance that I’ll be posting more!

Friday, July 2, 2010

Friday Finish: Casalguidi and Lavender

Only I would propose a new series of going through past (and some current) finishes, post only two weeks on that series, and then neglect it for another two weeks. There’s no excuse, but here’s my attempt to resurrect the plan.

Here’s one that’s been done for quite a while.

Design: Casalguidi and Lavender (a retired EGA correspondence course)

Designer: Barbara Kershaw

Technique: Casalguidi (of course!)

Ground fabric: 28(?) ct linen

Threads: pearl cotton

Stitches used: Casalguidi stitch, italian four sided, detached buttonhole, needleweaving, and some neat wrapped stitch that looks like a REALLY long bullion knot (but I didn’t look up what it’s called)

Stitching timeframe: I don’t know. Finished sometime in 2006, I think.

Casalguidi is often stitched white on white or ecru on ecru, but the book Casalguidi Style Linen Embroidery by Effie Mitrofanis (now MUCH more expensive than when I purchased it) shows some antique pieces that are white or ecru on pink or light blue. These inspired me to use some pinkish linen in my stash with ecru threads.

Does the stitch used in the heavy diagonal bar in the middle of the piece look familiar? It’s the Casalguidi stitch, which I used as Santa’s walking stick on Celebration Santa.

Friday, June 11, 2010

Friday Finish: Plum Blossoms

Yes, you read that right. It’s really done! Endless background and all!

Design: Plum Blossoms (an EGA correspondence course)

Designer: Margaret Kinsey

Technique: Rozashi

Ground fabric: Ro (a Japanese fabric)

Threads: silk, metallic, and silk/metallic combo

Stitches used: All vertical stitches (which is the nature of Rozashi)

Stitching timeframe: I have no idea when this was started. I posted about it being in progress back in December 2007, so I’m guessing maybe 2005? Finished Wednesday, June 9, 2010. Pathetic.

But it’s done in time to send it in for evaluation! Hooray!

Friday, June 4, 2010

Friday Finish: How Great the Blessing

I can hear some of you thinking, “Didn’t she post about finishing that sampler a couple of months ago?”

Well, yes. I did.

But it wasn’t framed then.

Here you go.

Again, this is:

Design: How Great the Blessing (with a few minor changes)

Designer: Catherine Theron

Ground fabric: 36ct linen

Threads: silks, primarily from Hand-Dyed Fibers/Vikki Clayton

Stitches used: cross, smyrna, queen, oblong cross, chain, satin, slanted gobelin, tent, four-sided, leaf, lazy daisy, upright cross, long-arm cross, and cross over one. There may be one or two others, but that’s what I see right now.  :-)

Stitching timeframe: Started in a class April 2009, finished in February 2010.

The simple frame sets off the design. Nothing more was needed. Thanks to my LNS owner for great framing consultation, as usual!

Monday, April 26, 2010

Potpourri class with Margaret Bendig

I've been absent from blogging in recent days, but I have been stitching! One of the pieces I've been working on is Margaret Bendig's Potpourri on Canvas (which I'll just shorten to Potpourri in future writing).

Yes, the class was last week. Two great days with a delightful teacher. We somehow talked our way through 46 different block patterns with recommendations of threads for each, yet still had time to stitch. Along the way, Margaret taught us the basics of a variation of Chottie's plaid, convinced me that several backstitches over 1 thread really would hold a thread tail, and provided several patterns that will make great backgrounds for future projects.

Here's the beginning of my piece. You can see the start of the plaid, along with hints of several other boxes.


There were about 14 students in the class, and I snapped pictures of several pieces, all in different color schemes. With the stitchers' permission, here they are.


We had so much fun with Margaret that we're already talking about bringing her back for another class, even though we'll have cross-country airfares. I highly recommend her as a teacher - and her designs are gorgeous!

Wednesday, April 14, 2010

How many more stitches can I get out of this thread?

Don't you just hate when you're stitching away, nearing the end of a section/color/band/etc., and you notice that the thread left in your needle is growing short way too fast? Then you end up with something like this:

That thread couldn't stretch far enough to make three more lousy smyrna crosses. Bummer.

Another short length of thread later and the prework is done on Potpourri, in plenty of time for my class with Margaret Bendig next week.
The more I stitched, the more I liked my choice of outside border.

Now I'll put this aside until the class starts!

Monday, April 12, 2010

Border decisions

The prework for my Margaret Bendig class, Potpourri on Canvas, involves stitching the borders that divide the canvas into 46 blocks and the first row of the outer border.

I previously mentioned that I had picked up Caron's Impressions in Flame (#045) for the dividing borders. This color name is a bit misleading, because the thread ranges from a dark grape to deep mauve to an orange-red. Regardless of the name, it really works well with my chosen palette.


Knowing that a large portion of my threads are in the purple range, I thought that a dark lavender would work well for the outer smyrna cross border. To make the smyrnas have some dimension, I wanted to use a round thread as opposed to several strands of floss.

Well, I tried it, with DMC pearl cotton #8 in 3041. That's the darkest lavender easily accessible to me in this size. Unfortunately, it just got washed out. It wasn't dark enough!

In an attempt to save the idea of a purple border, I decided to try stitching the smyrnas in two colors, with the pearl cotton on bottom and a darker purple metallic on top. I even tried two different metallics as options. Nothing worked. It just looked awkward with the metallic on top of the pearl cotton. What do you think?
I went back to the stash, but didn't find anything that worked. Darn. I needed to go shopping. (Don't you feel sorry for me?) I ended up buying four different colors in pearl 8, all of which worked with my colors. Only one of these was dark enough for the border, but any might be usable for the inner blocks.

So what did I choose? A dark burgundy, DMC 902. You might agree that it's a much better choice.
I should be done with all of the borders very soon. Stay tuned for the completion of the prework!

Friday, April 9, 2010

Stash diving to match my color palette

In my last post (way too long ago!), I showed my color palette for an upcoming Margaret Bendig class.

With my Antelope Canyon pictures in mind, my first task was to find an overdyed thread for the dividing bands between the many blocks in the project. In Margaret's original, she used three strands of a floss-weight thread. I decided to take the easy (lazy?) way out, and instead looked for a heavier-weight thread. With a larger thread, I could use just one strand, and wouldn't have to lay miles of long-arm cross. In this search, I felt a bit like Goldilocks:

With my border color in hand, I checked out available canvas colors. While there isn't much bare canvas in the project, some does peek through in areas, so I wanted a canvas color that would go with my palette. A floss toss (with only my border color) led me to buy a very large square of lavender canvas.

At this point, I hadn't found any other threads. Once home, I headed for my stash. I discovered that I have a LOT of lavender threads, but had a few in other colors. Here's what I came up with:
Perhaps it's not the best practice to go about making major color decisions like border and canvas colors (and actually starting to stitch with them!) before finding the rest of your threads. Maybe I'm deluding myself, but I like to think that doing things like this will help challenge my color and design sense. Time will tell if some of this has been a colossal mistake, but it will be a fun mistake!

As you can see, I'd already started the borders when the picture above was taken, but I'll save the pictures of border progress for another post!