Showing posts with label Cookies/Bars. Show all posts

10 June 2009

Fresh Strawberry Bars


Hi hi! More strawberry goodness, this time on top of a lovely, soft-yet-hefty peanut butter base. From Better Homes and Gardens, of all places.


Now, some people thought it was funny that I get Better Homes and Gardens magazine, but to them I just want to say: dudes, you're missing out. Yeah, it has a faint whiff of 90s outdated dork-fest, but I seriously would not have the faintest idea how to take care of a yard/garden without it. Great magazine for beginners! It tells you what to focus on every month, what plants/flowers work well together, how to landscape, etc. etc. I have actual container gardens and cute hanging planters thanks to that magazine, and Hubs' garden is doing pretty darn good, too (although I think that's due more to his farming ancestory than my new favorite-ish magazine).


Usually the recipes in there aren't my style, but they had these strawberry bars on the cover and I couldn't resist. They were really, really good, too - I usually don't pair my strawberries with peanut butter. I'm more for strawberries and cream, or strawberries and berries, or strawberries and chocolate, or balsamic, or... well, anything but peanut butter. It is amazing, though, how well they work together! Like a really fresh-tasting PB&J sandwich :)


Fresh Strawberry Bars
(from Better Homes and Gardens, May 2009)


Ingredients:
3/4 c. unsalted butter, softened
3/4 c. peanut butter
1 c. packed brown sugar
1/2 c. granulated sugar
2 tsp. baking powder
1/4 tsp. salt
2 large eggs, room temperature
1 tsp. vanilla extract
2 1/4 c. AP flour
1/2 c. strawberry preserves
4 c. small whole strawberries, halved or quartered

Preheat oven to 350 F. Line a 9X13 pan with foil, extending foil beyond edges. Set aside.

In a large mixing bowl, beat the butter and peanut butter on medium to high for 30 seconds, until well blended. Beat in the sugars, baking powder, and salt until combined. Add eggs and vanilla; beat until combined. Beat in as much flour as you can with mixer. Stir in remaining flour.

Spread dough in prepared pan. Bake 25 minutes or until top is lightly browned and toothpick inserted near center comes out clean.

Cool completely on a cooling rack. Remove from the pan by lifting out by the foil edges. Spread preserves on top, then top with berries. Cut into bars. Serve at once or refrigerate up to 6 hours.

07 June 2009

Tart Lime Bars


This one is on honor of the Hubs, whose insatiable lime addiction overtook me during this pregnancy thing. Along with key lime pie, this was one of the rare recipes that was able to tame my cravings. At least for a little while.

Originally an Ina Garten recipe, Deb upped the salt and concentrated the filling, making for a more even crust:filling ratio. Of course, on top of this I wanted a much more tart filling, so I changed the flavor to lime (yummy!) and upped the zest content even more than she did. I would say that the normal, non-hormonal person would probably appreciate a less tart lime bar, but I made these for a book club meeting and everybody seemed to dig them. So I kept my proportions in the recipe below.

Tart Lime Bars
(adapted from Smitten Kitchen)


Ingredients:
1/2 lb. unsalted butter, at room temperature
1/2 c. granulated sugar
2 c. flour
1/8 tsp. kosher salt
4 extra-large eggs, at room temperature
1 2/3 c, granulated sugar
2 Tbsp. lime zest (4-5 limes)
2/3 c. freshly squeezed lime juice
2/3 c. flour

Confectioners’ sugar, for dusting

Preheat the oven to 350 F and grease a 9X13 baking sheet.

For the crust: cream the butter and sugar until light in the bowl of an electric mixer fitted with the paddle attachment. Combine the flour and salt and, with the mixer on low, add to the butter until just mixed. Dump the dough onto a well-floured board and gather into a ball. Flatten the dough with floured hands and press it into the greased baking sheet, building up a 1/2-inch edge on all sides. Chill.

Bake the crust for 15 to 20 minutes, until very lightly browned. Let cool on a wire rack. Leave the oven on.

For the lime layer: whisk together the eggs, sugar, lime zest, lime juice, and flour. Pour over the crust and bake for 30 to 35 minutes (less if you are using the thinner topping), or about five minutes beyond the point where the filling is set. Let cool to room temperature.

Cut into squares and dust with confectioners’ sugar.

21 March 2009

Homemade Oreos


Sorry for all those delays! The Hubs now works from home (thank you, Hub's employer! You are saving us lots of commuting $$$ a year...). But: our home computer is kinda therefore busy when he's working, which means I can't get online at home until 7pm or so. And lately, it tends to crap out when I log on. The Internet provider is promising no more problems so: for now, the blog is back!

I made these a few weeks ago, and they were a HIT - tastes just like the real thing. My cookies were a little poofier than necessary (I didn't use Dutch process cocoa, probably the culprit), but they were still great. Crunchy, slightly salty, deep-chocolate cookies with a creamy (lard-filled!) cream center. Mmmm. Thankfully I took these to a potluck, so we didn't have them hanging around the house. That could have been dangerous. For my already-expanding waistline.

Homemade Oreos


For the chocolate wafers:
1 1/4 cups all-purpose flour
1/2 cup unsweetened Dutch process cocoa
1 teaspoon baking soda
1/4 teaspoon baking powder
1/4 teaspoon salt
1 to 1 1/2 cups sugar [see recipe note]
1/2 cup plus 2 tablespoons (1 1/4 sticks) room-temperature, unsalted butter
1 large egg

For the filling:
1/4 cup (1/2 stick) room-temperature, unsalted butter
1/4 cup vegetable shortening
2 cups sifted confectioners’ sugar
2 teaspoons vanilla extract

Set two racks in the middle of the oven. Preheat to 375 F.

In a food processor, or bowl of an electric mixer, thoroughly mix the flour, cocoa, baking soda and powder, salt, and sugar. While pulsing, or on low speed, add the butter, and then the egg. Continue processing or mixing until dough comes together in a mass.

Take rounded teaspoons of batter and place on a parchment paper-lined baking sheet approximately two inches apart. With moistened hands, slightly flatten the dough. Bake for 9 minutes, rotating once for even baking. Set baking sheets on a rack to cool.

To make the cream, place butter and shortening in a mixing bowl, and at low speed, gradually beat in the sugar and vanilla. Turn the mixer on high and beat for 2 to 3 minutes until filling is light and fluffy.

To assemble the cookies, in a pastry bag with a 1/2 inch, round tip, pipe teaspoon-size blobs of cream into the center of one cookie. Place another cookie, equal in size to the first, on top of the cream. Lightly press, to work the filling evenly to the outsides of the cookie. Continue this process until all the cookies have been sandwiched with cream. Dunk generously in a large glass of milk.

05 March 2009

Peanut Butter Cup Cookies


You know how the best part of a chocolate chip cookie is the texture? That whole crisp-yet-soft combo they have going on? Well, I was totally in the mood for that kind of cookie, but didn't want it from a chocolate chip cookie. I wanted a peanut-butter cookie with that sort of texture instead.

Problem is: most peanut butter cookies are either soft throughout, or crunchy. At least those I've encountered. Hmm. So I did what any girl would do - I went to see what Queen Dorie would say. Wouldn't you know it, she gives a variation of her chocolate chip to do just such a thing. Sah-weet.


These cookies turned out exactly as I wanted: a nice crispy outside with a soft, gooey interior. These are best warm, just like that perfect chocolate chip cookie (a few seconds in the microwave will help for those past the out-of-the-oven point). I was smart enough to send these away as a hostess gift and office offerings, otherwise I could have easily porked out on the entire 4 dozen of them...

Peanut Butter Cup Cookies


Ingredients:
2 c. all purpose flour
1 tsp. salt
3/4 tsp. baking soda
1 1/2 sticks unsalted butter, at room temperature
1/2 c. peanut butter
1 c. granulated sugar
2/3 c. packed light brown sugar
2 tsp. vanilla extract
2 large eggs

Center a rack in the oven and preheat the oven to 375 F. Line 2 baking sheets with parchment or silicone mats.

Sift together the flour, salt, and baking soda. Set aside.

Working with a stand mixer, preferably fitted with a paddle attachment, or with a hand mixer in a large bowl, beat the butter and peanut butter together on medium speed for about 1 minute, until smooth.

Add the sugars and beat for another 2 minutes or so, until well blended and fluffy. Beat in the vanilla. Add the eggs one at a time, beating for 1 minute after each egg goes in.

Reduce the mixer speed to low and add the dry ingredients in 3 portions, mixing only until each addition is incorporated. On low speed, or by hand with a rubber spatula, mix in the mini cups.

Spoon out rounded tablespoons of dough and roll between your palms, to make a ball. Roll in sugar and place onto the baking sheets, leaving about 2 inches between spoonfuls. Flatten balls slightly with a fork or decorative press.

Bake the cookies – one sheet at a time and rotating the sheets at the midway point – for 10 to 12 minutes, or until they are brown at the edges and golden in the center; they may be still a little soft in the middle, and that’s just fine.

Pull the sheet from the oven and allow the cookies to rest for 1 minute, then carefully using a wide metal spatula, transfer them to racks to cool to room temperature.

03 March 2009

Blueberry Crumb Bars


I've been a bit of a late bloomer in life, it's true. It took me a little while to get into things, take fashion for example. But! When I did, I did so with a vengeance, I assure you. Hence the Prada and Jimmy Choo dust bags littering my closet along with about 70 back issues of Vogue and a catalog of models' stats in my noodly little brain.

Well, there is sadly still a bit of this in me today. Like, can you believe I had never really read Smitten Kitchen until just a few weeks ago? Oh, yeah. Like, for real. I mean, I had heard of the blog and a few people spoke of the gorgeous photography on the blog, but I just never made my way over there. I even made a recipe from the site once, but I must have been in a hurry and didn't look up at all.

Well, whew! That was a mistake. I was just bee-bopping around on the Internet the other day and fell into one of Jen's posts, and my goodness - sucked right in. And as per my usual personality, I gobbled up her posts with a vengeance, like sat there oogling the photos and reading posts for at least a good few hours. And I copied like a million recipes. So be forewarned, there will be lots of Smitten Kitchen goodies probably posted on here in the future. I'll try to contain myself and spread them out a bit if that helps.


And on to the first of many I'm sure :) First up: Blueberry Bars. I wanted to make a bar recipe to take to my last book club meeting, but couldn't decide what to make. I didn't want anything too chocolatey, I had had my fill of peanut butter treats for awhile... And then, these screamed up at me to make them. Perfect! Especially in the winter, when you're starting to crave some fruit again. They were tart-ish but sweet, definitely buttery, and that crumbly topping is just to die for. Great recipe!

These bars will be my go-to fruit bar recipe from here on out, as I can see them in a million different incarnations, with peaches or cherries or strawberries or cranberries...

Blueberry Crumb Bars
(from allrecipes.com, by way of Smitten Kitchen)


Ingredients:
1 c. white sugar
1 tsp. baking powder
3 c. all-purpose flour
1 c. cold butter (2 sticks)
1 egg
1/4 tsp. salt
Zest and juice of one lemon
4 c. fresh blueberries
1/2 c. white sugar
4 tsp. cornstarch
Preheat the oven to 375 F. Grease a 9×13 inch pan.

In a medium bowl, stir together 1 cup sugar, 3 cups flour, and baking powder. Mix in salt and lemon zest. Use a fork or pastry cutter to blend in the butter and egg. Dough will be crumbly. Pat half of dough into the prepared pan.

In another bowl, stir together the sugar, cornstarch and lemon juice. Gently mix in the blueberries. Sprinkle the blueberry mixture evenly over the crust. Crumble remaining dough.

Bake in preheated oven for 45 minutes, or until top is slightly brown. Cool completely before cutting into squares.

29 January 2009

Tuiles


This month's challenge is brought to us by Karen of Baking Soda and Zorra of 1x umruehren bitte aka Kochtopf. They have chosen Tuiles from The Chocolate Book by Angélique Schmeink and Nougatine and Chocolate Tuiles from Michel Roux. I was a wee bit sad at first, knowing the baking reputations these two lovely Europeans have, but was happy nonetheless to tackle the recipe, as I had never tried tuiles before :)

The whole bit of choosing this recipe for January was to help those who need some waistline mending following the December holidays. Amen! I personally can't actually diet, but eating healthy is very important these days, so I was glad to take on the challenge. We were asked to make our tuiles in any shape we desired, and pair with a light, healthy filling.


I made small baskets out of mine, simply pushing the hot round cookies into my tiny brioche molds to set. Taking advantage of the fact that the grocer actually had some plump tasty strawberries in the dead of winter, I used these tuile cups to serve up one of my favorite combos - fresh strawberries with a reduced balsamic vinegar.

Oh, mmmm - the tart and sweet and yet Terribly Healthy in a crisp cookie was just perfect. The balsamic reduction was compliments of Trader Joe's (one of several foodie Christmas gifts from my amazing sis Anne), so no recipe to follow unfortunately. Sorry for that. You can surf the Interwebs to find many a recipe though, I am sure.


Thanks to both Karen and Zorra for the recipe - I rather liked it, and will probably give these little light cookies a go again (and probably again). And as always - be sure to check out those other Daring Baker creations out there!

Tuiles
(from The Chocolate Book by Angélique Schmeinck, 1993)


Ingredients:
1/4 c.softened butter (not melted but soft)
1/2 c. sifted confectioner’s sugar
Dash of vanilla extract
2 large egg whites (slightly whisked with a fork)
1/2 c. sifted all purpose flour
1 Tbsp. cocoa powder
Butter or spray to grease baking sheet

Preheat the oven to 350 F. Using a hand whisk or a stand mixer fitted with the paddle (low speed) and cream butter, sugar and vanilla to a paste. Keep stirring while you gradually add the egg whites. Continue to add the flour in small batches and stir to achieve a homogeneous and smooth batter/paste. Be careful to not overmix.

Cover the bowl with plastic wrap and chill in the fridge for at least 30 minutes to firm up. (This batter will keep in the fridge for up to a week, take it out 30 minutes before you plan to use it).

Line a baking sheet with parchment paper or grease with either butter/spray and chill in the fridge for at least 15 minutes. This will help spread the batter more easily if using a stencil/cardboard template such as the butterfly. Press the stencil on the baking sheet and use an offset spatula to spread batter. Leave some room in between your shapes. Mix a small part of the batter with the cocoa and a few drops of warm water until evenly colored. Use this colored batter in a paper piping bag and proceed to pipe decorations on the wings and body of the butterfly (I totally skipped the cocoa-colored decorative bit myself).

Bake butterflies in a preheated oven (350 F) for about 5-10 minutes or until the edges turn golden brown. Immediately release from baking sheet and proceed to shape/bend the cookies in the desired shape. These cookies have to be shaped when still warm, you might want to bake a small amount at a time or maybe put them in the oven to warm them up again.

Or: place a baking sheet toward the front of the warm oven, leaving the door half open. The warmth will keep the cookies malleable.

If you don’t want to do stencil shapes, you might want to transfer the batter into a piping bag fitted with a small plain tip. Pipe the desired shapes and bake. Shape immediately after baking using for instance a rolling pin, a broom handle, cups, cones….

14 January 2009

Orange Chocolate Shortbreads


I originally planned on taking these to a Christmas cookie exchange, but sadly I was much to exhausted and sick at the time to attend that (drats, but that was a bummer). So sadly, the dough went in the freezer and I figured that some day, another chance to use it would come around.

Enter: yet another office potluck. And thank goodness for frozen dough! I am not sure how much of an effect the freezing had on it, but the shortbreads didn't spread much in the oven, which was lovely.

I took 2 different Dorie Greenspan recipes and used a bit from each to come up with these, and it seemed to work quite well. I didn't want boring old regular shortbreads, I wanted something a little more interesting than that. I added some orange zest which gave them a nice orange undertone, and the tiny chunks of bittersweet chocolate gave the cookies just enough umph to shake things up a bit. All in all a very good side-of-the-saucer cookie!

Orange Chocolate Shortbreads
(adapted from Dorie's recipe)


Ingredients:
1 1/2 c. all-purpose flour
1/4 c. cornstarch
1/4 tsp. salt
2 sticks unsalted butter, at room temperature
3/4 c. light brown sugar
2 Tbsp. orange juice or 1 tsp. orange zest
1/2 c. finely chopped bittersweet chocolate

Sift together the flour, cornstarch, and salt. Set aside.

Working with a stand mixer, beat the butter and brown sugar together on medium speed for about 3 minutes, until the mixture is very smooth. Add the orange juice (or zest). Reduce the mixer to low and add the dry ingredients, mixing only until the flour is incorporated.

Add the chocolate and give the mixture a few turns, just to get the chocolate incorporated into the dough. Roll dough into a tube (log) shape, and wrap in plastic wrap.

Refrigerate the dough at least 2 hours, or up to 2 days. The dough also freezes well (for up to 3 months). To bake: preheat your oven to 350 F and line 2 baking sheets with parchment paper. Slice the dough into 1 1/2-inch slices, and transfer to baking sheets.

Bake for 18-20 minutes, rotating the sheets from top to bo0ttom and front to back at the midway point. The shortbreads will be pale - they shouldn't take on much color. Transfer the cookies to a rack. Cool to room temperature before serving.


13 December 2008

Blackberry Breakfast Bars


Mmmm. These are good. I could eat them for breakfast every day of my life.

I can see why these might be considered more of a "breakfast bar" than "dessert/coffee bar". There's the oats, for one, and these bars are pretty darn crunchy/crumbly (more like a granola bar). Plus, not as sugary as your usual after-dinner treat. But oh, they are tart and still a tad sweet and absolutely fantastic with your morning coffee/tea/giant glass of milk. And have that faint whiff of "healthy breakfast eats", so I am definitely sold :)

Blackberry Breakfast Bars
(adapted from SmittenKitten)


Ingredients:
For the crust and crumb:
1 1/2 cu.all-purpose flour
1 c. firmly packed dark brown sugar
1 1/4 c. rolled oats
3/4 tsp. salt
3/4 tsp. baking powder
1/2 tsp. baking soda
1/2 tsp. cinnamon
3/4 c. (1 1/2 sticks) unsalted butter, cut into 1-inch pieces
For the blackberry filling:
1/4 c. firmly packed dark brown sugar
1 Tbsp. grated lemon zest
1/2 tsp. cinnamon
2 tsp. all-purpose flour
1 lb. blackberries, fresh or frozen (thaw frozen in the fridge before using)
1/4 c. fresh lemon juice
2 Tbsp. unsalted butter, melted and cooled

Make the crust and crumb: Preheat the oven to 350 F. Butter the bottom and sides of a 9-by-13-inch glass or light-colored metal baking pan. Put a long piece of parchment paper in the bottom of the pan, letting the parchment extend up the two short sides of the pan and overhang slightly on both ends. Butter the parchment.

Put the flour, brown sugar, oats, salt, baking powder, baking soda, and cinnamon in a food processor. Pulse in short bursts until combined. Add the butter and pulse until loose crumbs form.

Reserve 1 1/2 cup of the mixture and set aside. Pour the rest of the mixture into the prepared pan and use your hans or the back of a large wooden spoon to push the crust into an even layer at the bottom of the pan. The crust should touch the sides of the pan. Bake until golden brown, 12 to 15 minutes. Transfer to a wire rack and let the crust cool. Keep the oven on while you make the blackberry filling.

Make the blackberry filling: In a medium bowl, whisk the sugar, lemon zest, cinnamon and flour together. Add the blackberries, lemon juice and butter and use your hands to toss gently until the blackberries are evenly coated.

Assemble and bake the bars: Spread the blackberry filling evenly on top of the cooled crust. Sprinkle the reserved crust mixture evenly on top of the filling.

Bake for 35 to 45 minutes, rotating the pan every 15 minutes, until the top is golden brown and the filling starts to bubble around the edges.

Transfer to a wire rack to cool completely, then cut into squares and serve. The bars can be stored in the refrigerator in an airtight container for up to 2 days (she lies: mine were still yummy after 4 days. So there; just be sure to keep them refrigerated).

26 November 2008

Pumpkin Whoopie Pies


Did you know that Dean & DeLuca are selling these puppies for $55 a dozen? I could make a killing! Because they are so easy to make, seriously. And fun to assemble too.


The flavor is out of this world - Hubs took them to his office "Thanksgiving Potluck", and there were several requests for the recipe. They are sweet, spicy, deeply pumkin, and full of a soft, creamy cinnamon filling. Mmmmm. Take it from Peabody, who said she couldn't stop eating them (and she's one to give all her treats away) - these are well worth making.

Pumpkin Whoopie Pies


Ingredients:
3 c. all-purpose flour
1 tsp. salt
1 tsp. baking soda
1 tsp. baking powder
2 Tbsp. cinnamon
1 tsp. ground ginger
1/2 tsp. ground fresh nutmeg
1 c. granulated sugar
1 c. dark brown sugar, firmly packed
1 c. canola oil
3 c. chilled pumpkin puree
2 large eggs
1 tsp. vanilla extract
3 c. powdered sugar
1/2 c. unsalted butter, at room temperature
8 oz. cream cheese, at room temperature
1 Tbsp. cinnamon
1 tsp. vanilla

Preheat oven to 350F. Prepare to baking sheets lined with parchment paper.

In a large bowl, whisk together the flour, salt, baking soda, baking powder, and spices. Set aside.In a separate bowl, whisk to sugars and oil together. Add the pumpkin puree and whisk to combine thoroughly. Add the eggs and vanilla and whisk until combined.

Sprinkle the flour mixture over the pumpkin mixture and whisk until completely combined.Use a small ice cream scoop with a release mechanism to drop healing TBSP of the dough onto the prepared baking sheets, about 1 inch apart.

Bake for 10-12 minutes, until the cookies are just starting to crack on top and a toothpick inserted into the center of a cookie comes out clean. Remove from the oven and let the cookies cool completely on the pan while you make the filling. They will look more like mini cakes then cookies, so don’t panic about that.

For the filling: In the bowl of an electric mixer fitted with a paddle attachment, beat the butter until smooth with no visible lumps. Add the cream cheese an beat until combined.Add the powdered sugar, maple syrup and vanilla and beat until smooth. Be careful no to overbeat the filling, or it will lose structure.

To assemble: Turn half the cooled cookies upside down. Pipe filling (about a TBSP) onto that half. Place another cookie, flat side down, on top of the filling. Press down slightly so that the filling spread to the edges of the cookie. Repeat until all the cookies are used. Put the whoppie pies in the refrigerator for about 30 minutes to firm before serving.

03 November 2008

Dorie's Snickery Squares


Every single food blogger on the planet with a copy of Dorie Greenspan's beloved Baking book has made these bars, so it was only appropriate that I caught up and made them myself....

Dorie likens these bars to Snickers candy bars, but they actually don't taste like Snickers bars. They are decidedly better - the shortbread crust is fantastic, in fact I'll probably use it as a base for other desserts in the future. The center is sweet, dense, with candied peanuts that are to die for. And the chocolate crust, of course, is much better than the cheap milk-crud they dip those candy bars in! I can now see why these are so popular in the Dorie-obsessed blogosphere.
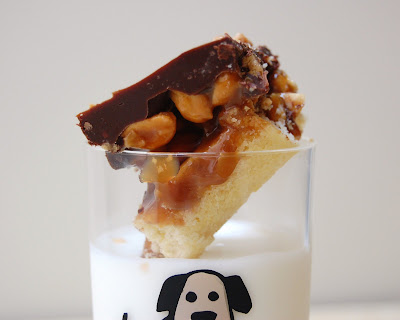

They are also terribly rich, so keep in mind that a batch of these will last you a long time (or will feed many, at least).

Snickery Squares
(from Dorie's Baking: From My Home To Yours, 2006)


Ingredients:

For the Crust:
1 c. all-purpose flour
¼ c. sugar
¼ tsp. salt
1 stick unsalted butter, cut into small pieces and chilled
1 large egg yolk, lightly beaten

For the Filling:
½ c. sugar
3 Tbsp. water
1 ½ c. salted peanuts
About 1 ½ c. store-bought dulce de leche

For the Topping:
7 oz. bittersweet, coarsely chopped
½ stick unsalted butter, cut into 8 pieces, at room temperature

Getting Ready:
Preheat oven to 350 F. Butter a 8-inch square pan and put it on a baking sheet.

To Make the Crust:
Toss the flour, sugar, powdered sugar and salt into a food processor and pulse a few times to combine. Toss in the pieces of cold butter and pulse about 12 times, until the mixture looks like coarse meal. Pour the yolk over the ingredients and pulse until the dough forms clumps and curds-stop before the dough comes together in a ball.
Turn the dough into the buttered pan and gently press it evenly across the bottom of the pan. Prick the dough with a fork and slide the sheet into the oven.Bake the crust for 15-20 minutes, or until it takes on just a little color around the edges. Transfer the pan to a rack and cool to room temperature before filling.

To Make the Filling:
Have a parchment or silicone mat-lined baking sheet at the ready, as well as a long-handled wooden spoon and a medium heavy bottomed saucepan.

Put the sugar and water in the saucepan and cook over medium-high heat, stirring, until the sugar dissolves. Keeping the heat fairly high, continue to cook the sugar, without stirring, until it just starts to color. Toss the peanuts and immediately start stirring. Keep stirring, to coat the peanuts with sugar. Within a few minutes, they will be covered with sugar and turn white—keep stirring until the sugar turns back into caramel. When the peanuts are coated with a nice deep amber caramel, remove the pan from the heat and turn the nuts out onto the baking sheet, using the wooden spoon to spread them out as best you can. Cool the nuts to room temperature.

When they are cool enough to handle, separate the nuts or break them into small pieces. Divide the nuts in half. Keep half of the nuts whole or in biggish pieces for the filling, and finely chop the other half for the topping.

Spread the dulce de leche over the shortbread base and sprinkle over the whole candied nuts.
To Make the Topping:
Melt the chocolate in a heatproof bowl set over a saucepan of barely simmering water. Remove chocolate from the heat and gently stir in the butter, stirring until it is fully blended into the chocolate.

Pour the chocolate over the dulce de leche, smoothing it with a long metal icing spatula, then sprinkle over the rest of the peanuts. Slide the pan into the fridge to set the topping, about 20 minutes; if you’d like to serve the squares cold, keep them refrigerated for at least 3 hours before cutting.

Cut into 16 bars.

25 October 2008

Spicy Cocoa Gingersnaps


I wanted some molasses cookies, badly. I also wanted that spicy chocolate gingerbread cake. So, I decided to try to come up with my own little concoction...

There isn't much 'snap' in these gingersnaps - they are a bit more on the soft side, with crispy outsides. Just flat with a few roadbumps from the bittersweet chocolate; next time I'll try to get them a bit poofier.
These little suckers will curb many a craving, though - chocolate? Yup. Spicy? You got it. And sweet and warm with spices? Bingo :) These babies are a triple threat.

Spicy Cocoa Gingersnaps
(recipe by Nemmie)


Ingredients:
2 c. all-purpose flour
1/3 c. cocoa powder
2 tsp. baking soda
½ tsp. salt
1 ½ tsp. cinnamon
1 ½ tsp. ginger
1 tsp. chili powder
¾ tsp. ground cloves
¼ tsp. allspice
¾ c. shortening
½ c. dark brown sugar
½ c. granulated sugar
1 large egg
1 tsp. vanilla
1/3 c. molasses
1 c. bittersweet chocolate, cut into chunks

Preheat oven to 375 F. Line cookie sheets with parchment paper.

In a medium bowl, sift and mix together the flour, cocoa powder, baking soda, salt, cinnamon, ginger, chili powder, cloves, and allspice. Set aside.

In a large bowl, cream together the shortening and sugars, until fluffy (about 2 minutes). Add the egg, vanilla, and molasses. Beat until combined, about 30 seconds.

Add dry ingredients and mix until just incorporated. Stir in bittersweet chocolate bits.

Roll dough into small balls, and flatten ever-so-slightly with the palm of your hand. Place on cookie sheets, about 2 inches apart. Bake 11-13 minutes, then cool on racks.


13 October 2008

Pumpkin Spice Cookies


...Or, as I prefer to call them: super lazy cheater cookies. I reserve these goodies for when I'm in a terrible hurry (or have greatly procrastinated) and can barely prop my eyelids open with toothpicks. They are super-quick, quite possibly the quickest cookie recipe prep ever.


The taste is pretty good for how easy they are - I like to add a few extras to bring out the pumpkin flavor, and love to add chips as well for some texture difference. The cookies are VERY cakey, usually not a big fan but hey - I can deal when it's this easy!


Pumpkin Spice Cookies
(adapted from here)


Ingredients:
1 (18.25 oz.) package spice cake mix
1 (15 oz.) can solid pack pumpkin
3/4 tsp. pumpkin pie spice
1/2 tsp. vanilla
1 c. bittersweet chocolate chunks

Preheat oven to 350 F. Grease cookie sheets.

In a large bowl, stir together the cake mix, pumpkin, spice, and vanilla until well blended. Stirn in chips. Drop by rounded spoonfuls onto the prepared cookie sheet.

Bake for 8 to 10 minutes in the preheated oven. Allow cookies to cool on baking sheet for 5 minutes before removing to a wire rack to cool completely.

11 October 2008

Orange Rosemary Madeleines


Let's talk about my mother-in-law.

Well, let's not call her by that name, which gives some readers shutters and bad connotations. Let's call her K. I did not meet my future mother-in-law right away when Hubs and I started dating; in fact, it took almost a year, not until his college graduation, for me to finally meet her. *

* In his defense, his parents lived about 200 miles from the college we both attended; not to mention, Hubs is quiet and private to almost a fault. Don't get me wrong, it's a valuable trait for a person to have (and one I share with him), but it is also somewhat of a curse.


Even now, we live a 3-hour drive from my in-laws. They are wonderful people, but because of the distance we don't get to see them as often as we (or they) would like. Even with the distance, though, I've been able to connect with that smart, sweet, soft-spoken woman who is my mother-in-law.

She's the one who immediately gives me a tight hug at the start and end of every visit to see them. The one who sits by me at family gatherings, fills me in on their family history, tells me how things are going around the town they live in. When we got married, the only time I almost cried was right before the ceremony, when she came over to calm me and tell me how beautiful I looked. And on a superficial note, I wanted a KitchenAid Mixer, bad. Have for awhile now. She wanted to get me one, and after seeing our new home, surprised me with the perfect one: almond in color, to match all our other appliances. What would I do without that woman, I tell you ;)


Most importantly, though, she really listens to me and understands me. We may not spend a lot of face-time together, but I feel very close to K. One time (once!) I mentioned that I needed a Madeleine pan, in passing. K. is the one who found this pan, scoured and cleaned it into pristine condition, and gave it to me as a "just because" gift.

So, K.'s the one who I thought of the entire time I made these little confections, and the one I think of every time I bust out the KitchenAid mixer (which, as my fellow bakers can agree, is done pretty darn often). Thanks K. for everything you've done for me :) It's warming and comforting to know you're thinking of me, too, in those odd moments of any day.

On to the Madeleine recipe: these suckers were good, the rosemary flavor was faint and blended so well with the orange. The recipe is a keeper, and for sure I'll make these cookies again and again.


Orange Rosemary Madeleines
(from Dorie's Baking: From My Home To Yours, 2006)


Ingredients:
5 Tbsp. unsalted butter
1 1/2 Tbsp. rosemary; keep on the stem (2-3 stems)
3/4 c. flour
1/2 tsp. baking powder
Pinch of salt
1/3 c. sugar
Grated zest of half an orange
2 large eggs
2 Tbsp.. honey
2 tsp. vanilla extract

Preheat oven at 400 F.

Melt the butter with the rosemary in a small saucepan, remove from heat, and let sit for 15 minutes to infuse. Strain/discard the rosemary stems from the butter.

Combine the flour, baking powder and salt. Set aside.

Working with a stand mixer and whisk attachment, beat the eggs, sugar, and orange zest until pale and thick, about 3 minutes. (NOTE: I like to rub the orange zest into the sugar before adding the eggs, to better capture the flavor.) Add the honey and vanilla and beat for one minute more. Switch to a rubber spatula and incorporate the dry ingredients. Fold in the rosemary butter. Refrigerate the batter at least 2 hours or up to 3 days. (helps to create the bumps characteristic of madeleines).

Butter and flour your madeleines molds and divide the batter evenly. My molds are larger than the average molds, so I got 6 big cookies.

Bake 12-14 minutes, until they are golden brown.

07 October 2008

Hershey's Candy Corn Cookies


Ah, candy corn. I absolutely love the stuff. Not sure why, but it's one of those things I just must have every year in the fall. You know how to make candy corn extra yummy, by the way? Mix in equal amounts cashews or peanuts. Mmmmmmmm. Best stuff ever.

So, Hershey has had this thing the past few years for making gimmicky, flavored Kisses. I've tried a few and they were good - the cherry cordial, the toffee, etc. (oh man, while we're on topic: check out Zoe's awesomely cute Kiss Site, it is too ridiculously adorable for words).
Anyway. Where was I? Oh, yes - this season, Hershey came out with a Candy Corn Kiss, so um, yeah. Straight into the grocery cart, two bags in fact (hey, if they're good I don't want them to be sold out later). They don't taste exactly like real candy corn - that signature honey/caramelized sugar taste is more buttery, maybe because it's really white candy stuff we're dealing with (not white chocolate, but white stuff. Whatever, I'm trying not to think too hard about it). Still fantastic, a great showing by the Hershey company.


This recipe came off the back of the bag, and make for a nice way to get rid of a whole bag of these goodies so that I don't gorge myself :) The cookies are basically peanut butter with oatmeal in them, and a nice drizzle (as well as whole Kiss) of their candy corn goodness. Mmmm. Very cute presentation, and perfect for the autumn time!

Hershey's Candy Corn Cookies
(from the back of the bag, baby)


Ingredients:
3/4 c. creamy peanut butter
1/2 c. shortening
1/3 c. granulated sugar
1/3 c. light brown sugar, packed
1 egg
2 Tbsp. milk
1 tsp. vanilla extract
1 1/3 c. quick-cooking oats, divided
1 c. all-purpose flour
1 tsp. baking soda
1/2 tsp. salt
66 Hershey candy corn kisses (pretty much the whole bag)

Heat oven to 350°F Beat peanut butter and shortening in large bowl until well blended. Add granulated sugar and brown sugar; beat until fluffy. Add egg, milk and vanilla; beat well. Stir together 1/2 cup oats, flour, baking soda and salt; gradually beat into peanut butter mixture.

Shape dough into 1-inch balls. Roll in remaining oats; place on ungreased cookie sheet. Flatten cookies with tines of fork to form a crisscross pattern.

Bake 10 to 12 minutes or until lightly browned. Cool slightly; remove from cookie sheet to wire rack. Cool completely.

Remove wrappers from candies. Place 18 candies in heavy-duty resealable plastic food storage bag. Microwave at MEDIUM (50%) 30 seconds; knead bag and candies. If necessary, microwave at MEDIUM an additional 15 seconds at a time, kneading after each heating, until candies are melted and color is uniform. Cool slightly. Cut off corner of bag about 1/8 inch from point. Lightly drizzle cookies. Before drizzle sets, place candy piece in center of each cookie.

01 October 2008

Cappuccino Crunch Bars


Recently, my company had a charity Bake Sale. Sadly I didn't make anything for it - a different department hosted and pulled off the event, so I just felt like I was intruding if I brought over half a dozen baked goods. Instead, I decided to go down to the break room with my hard-earned dollars and contribute in a monetary fashion. I grabbed some Rice Krispie Treats, and also some yummy-looking, cocoa-hued cookies. They looked very soft and cakey, and like they had peanut-butter chips inside. Yum!

Um, no. These puppies were NOT good. Sorry if the baker is reading this (although I doubt it, because work folks don't really know about my blog), but: they were pretty much infused with about every baking ingredient known to man. The cookie base was chocolate, with both a strong vanilla as well as almond flavoring taste. Rather than cakey, they were very hard and crunchy. And no wonder: they were chock full of butterscotch chips, peanut butter chips, nuts, raisins, and dried cherries, cinnamon and nutmeg... Frankly, there could have been more things in there but there was only so much assault that my taste buds could handle. Pretty much a cookie flavor free-for-all.

Now, why would I bring up those terrible cookies as a lead-in to this recipe? Well, you see, I decided to make this recipe soon after that Yucky Cookie fiasco. A friend made them, and they sounded so so so good. Only: after starting in, I realized that these bars might have much the same problem. They contained so many different flavors: cinnamon, orange, white chocolate, coffee, chocolate-covered toffee bits... Uh oh. Not a good sign.

Thankfully, these bars were nothing like those awful cookies: soft interior with a crispy crust, the flavors went soo well together. The toffee and the orange dominate the most, with a warm, cinnamon-white-chocolate aftertaste. Mmm. So fear not, dear readers! These bars most definitely will not make you run for the nearest garbage can :)


Cappuccino Crunch Bars
(from Stacey at Simply Tasty)


Ingredients:
1 3/4 c. all purpose flour, sifted
1 tsp. baking soda
1 tsp. salt
1/2 tsp. ground cinnamon
1 cup butter (2 sticks) softened
1 1/2 c. firmly packed brown sugar
1/2 c. granulated sugar
2 eggs
2 tsp. instant coffee granules dissolved in 1 Tbsp. hot water, cooled to room temp
2 tsp. vanilla
1 tsp. grated orange peel
1 c. white chocolate chips
1 c. chocolate covered toffee bits

Preheat oven to 350 F. Grease 10X15 jelly roll pan

Combine flour, baking soda, salt & cinnamon in large bowl; set aside. Beat butter and sugars with mixer at medium speed until fluffy. Add eggs, one at a time, beating well. Add coffee mixture, vanilla, and orange peel; beat well. Stir in chocolate chips and toffee.

Pour batter into pan. Bake 30-40 minutes or until golden brown. Cool completely in pan on wire rack. Cut into bars.