Doing some organizing in my D&D folder on my computer today I came across this incredible megadungeon map drawn by Giambattista Nolli in 1748. I think I came across this one day while Google image searching for floorplans and recognized it for the masterpiece in dungeon construction that it is. You can visit an interactive zoomable navigable version of the map here (thanks UO!).
I am going to use portions of this for the ruins of ancient Abolon that my 5e Waterdeep campaign players are likely going to be discovering soon under the sewers.
This is just a snippet - the full map is way too big to paste here.
Showing posts with label map. Show all posts
Wednesday, June 29, 2016
Tuesday, June 28, 2016
As promised, more maps - Blue Opal House
I promised my 5e Waterdeep Campaign group that I would post the above-ground, more-or-less public levels of the Blue Opal House before our next session.
One of these days soon I will finish up the recaps of session 1 and 2 and that will included some backstory on the Blue Opal House. Until then no further explanation of these scribbles will be posted here besides a note that the stairs between levels 2 and 3 were accidentally drawn in reversed direction (they should be leading down from level 3 to level 2, and likewise up from level 2 to level 3).
Blue Opal House Roof
Blue Opal House 4th floor
Blue Opal House - 3rd floor
Blue Opal House - 2nd floor
Blue Opal House - Ground Level
Sunday, June 26, 2016
As promised, some maps
We just had the 2nd session of my new Waterdeep campaign yesterday. I promised the group I would post some maps for them to reference.
During our first session the group had scraped together and paid a rush fee (50gp) to the Surveyors, Map & Chart-Makers' Guild for a copy of a map of the city sewers. Although rush jobs typically take two days, the guild had extra copies of the sewer map as they are under contract with the Cellarers and Plumbers' Guild to maintain and supply up-to-date maps of the sewers.
The group also asked the Steward (and current employer of the PCs) of House Adalbrant (known for patronage of map & chart-makers in pursuit of their expansionist trade dreams) if there happened to be any maps of the city sewers in the house library. There was indeed an older map, drawn before the construction of many of the sewer mains which now connect the sewers of the different wards. This older map shows 3 sinkholes that drained out the sewers (down into subterranean levels unknown) of the North Ward, Trades Ward and parts of Castle and Dock Ward. There are some other differences between the two maps, and anywhere a passage shown on the old map bisects one of the new sewer lines, there is a bricked over passage. The party already knew that there were many old tunnels that were walled off in the sewer (thanks to the late great Marco, contact of party murder-hobo Lochelech. Poor Marco met an extremely bitter fate in last night's session, but that is a story for another post).
Current Sewer Map (from Waterdeep and the North by Ed Greenwood)
During our first session the group had scraped together and paid a rush fee (50gp) to the Surveyors, Map & Chart-Makers' Guild for a copy of a map of the city sewers. Although rush jobs typically take two days, the guild had extra copies of the sewer map as they are under contract with the Cellarers and Plumbers' Guild to maintain and supply up-to-date maps of the sewers.
The group also asked the Steward (and current employer of the PCs) of House Adalbrant (known for patronage of map & chart-makers in pursuit of their expansionist trade dreams) if there happened to be any maps of the city sewers in the house library. There was indeed an older map, drawn before the construction of many of the sewer mains which now connect the sewers of the different wards. This older map shows 3 sinkholes that drained out the sewers (down into subterranean levels unknown) of the North Ward, Trades Ward and parts of Castle and Dock Ward. There are some other differences between the two maps, and anywhere a passage shown on the old map bisects one of the new sewer lines, there is a bricked over passage. The party already knew that there were many old tunnels that were walled off in the sewer (thanks to the late great Marco, contact of party murder-hobo Lochelech. Poor Marco met an extremely bitter fate in last night's session, but that is a story for another post).
Current Sewer Map (from Waterdeep and the North by Ed Greenwood)
Old Sewer Map showing 3 drain sinkholes
Friday, March 27, 2015
Temple of the Dragocroc - Isometric Graphing
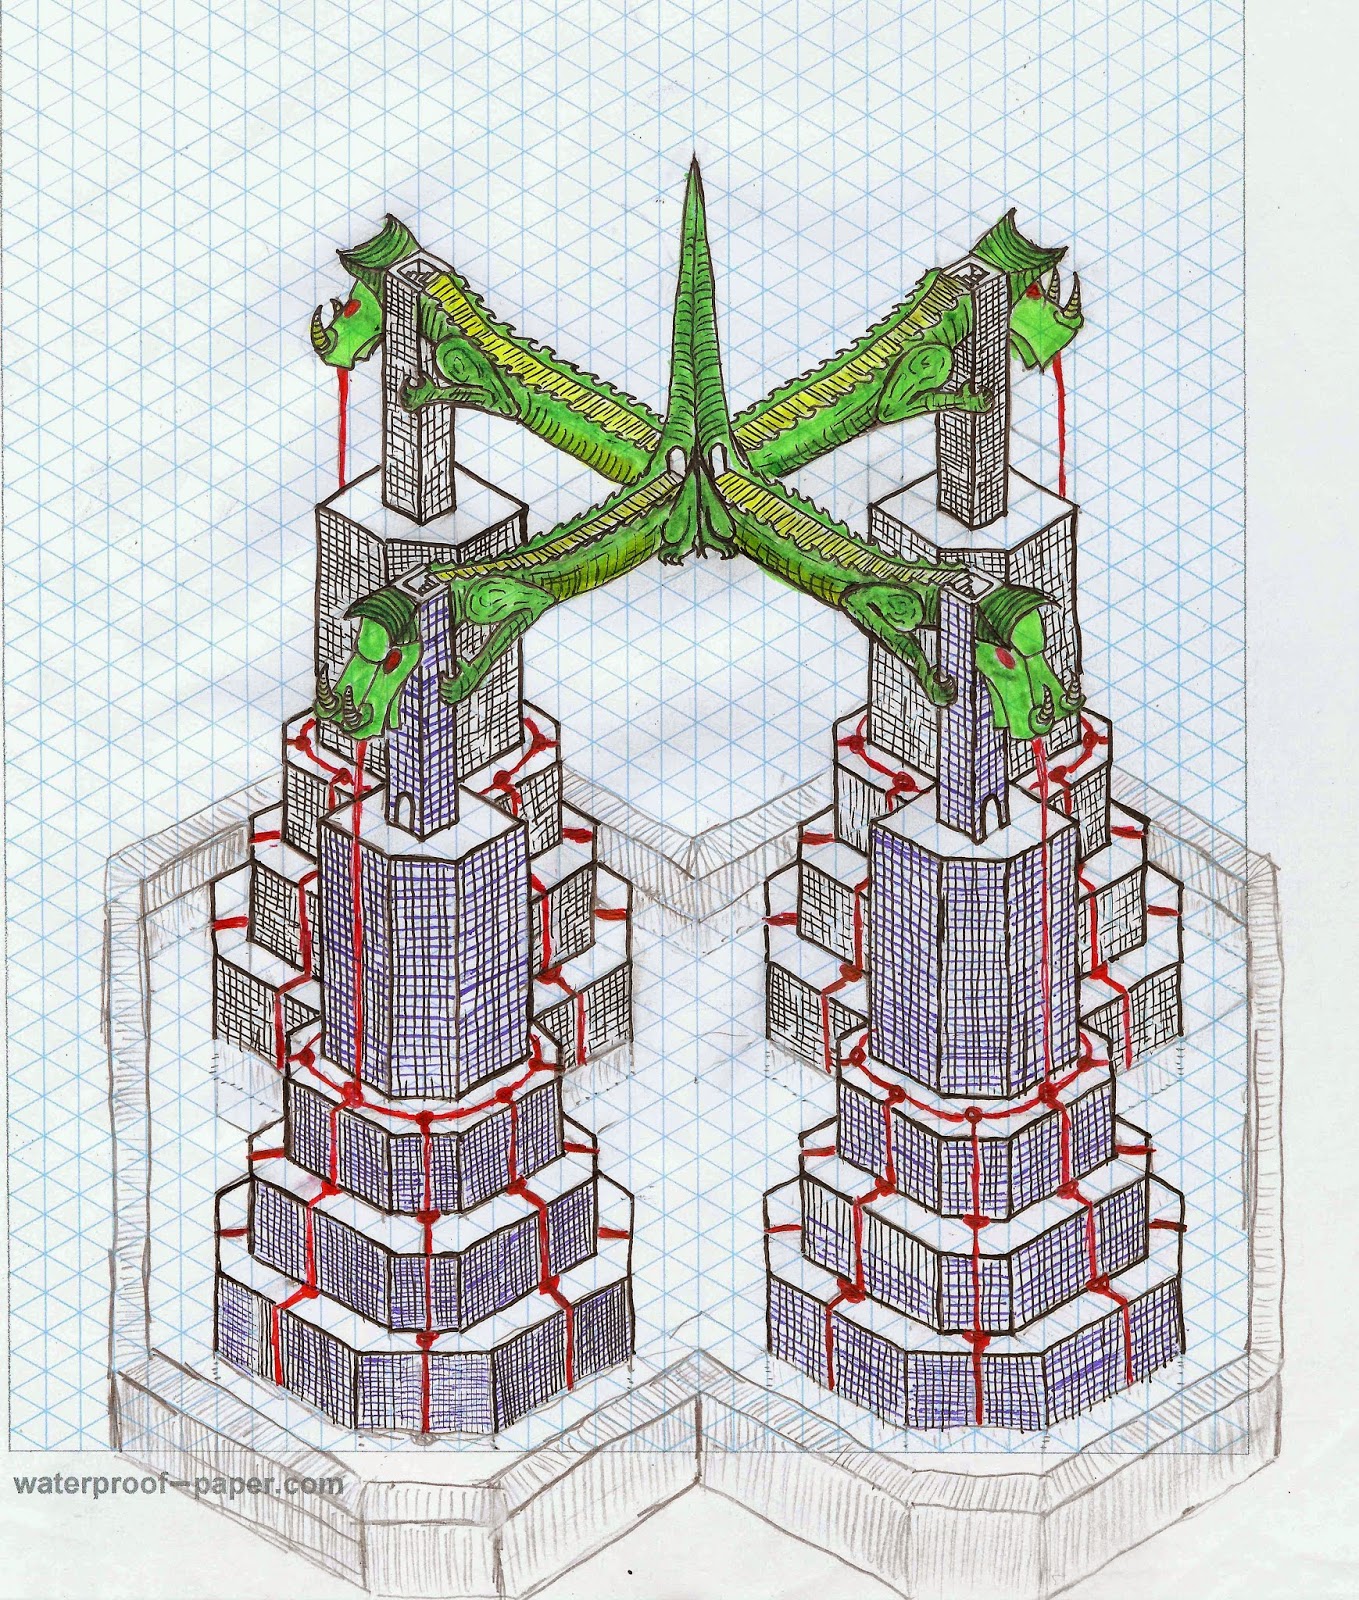
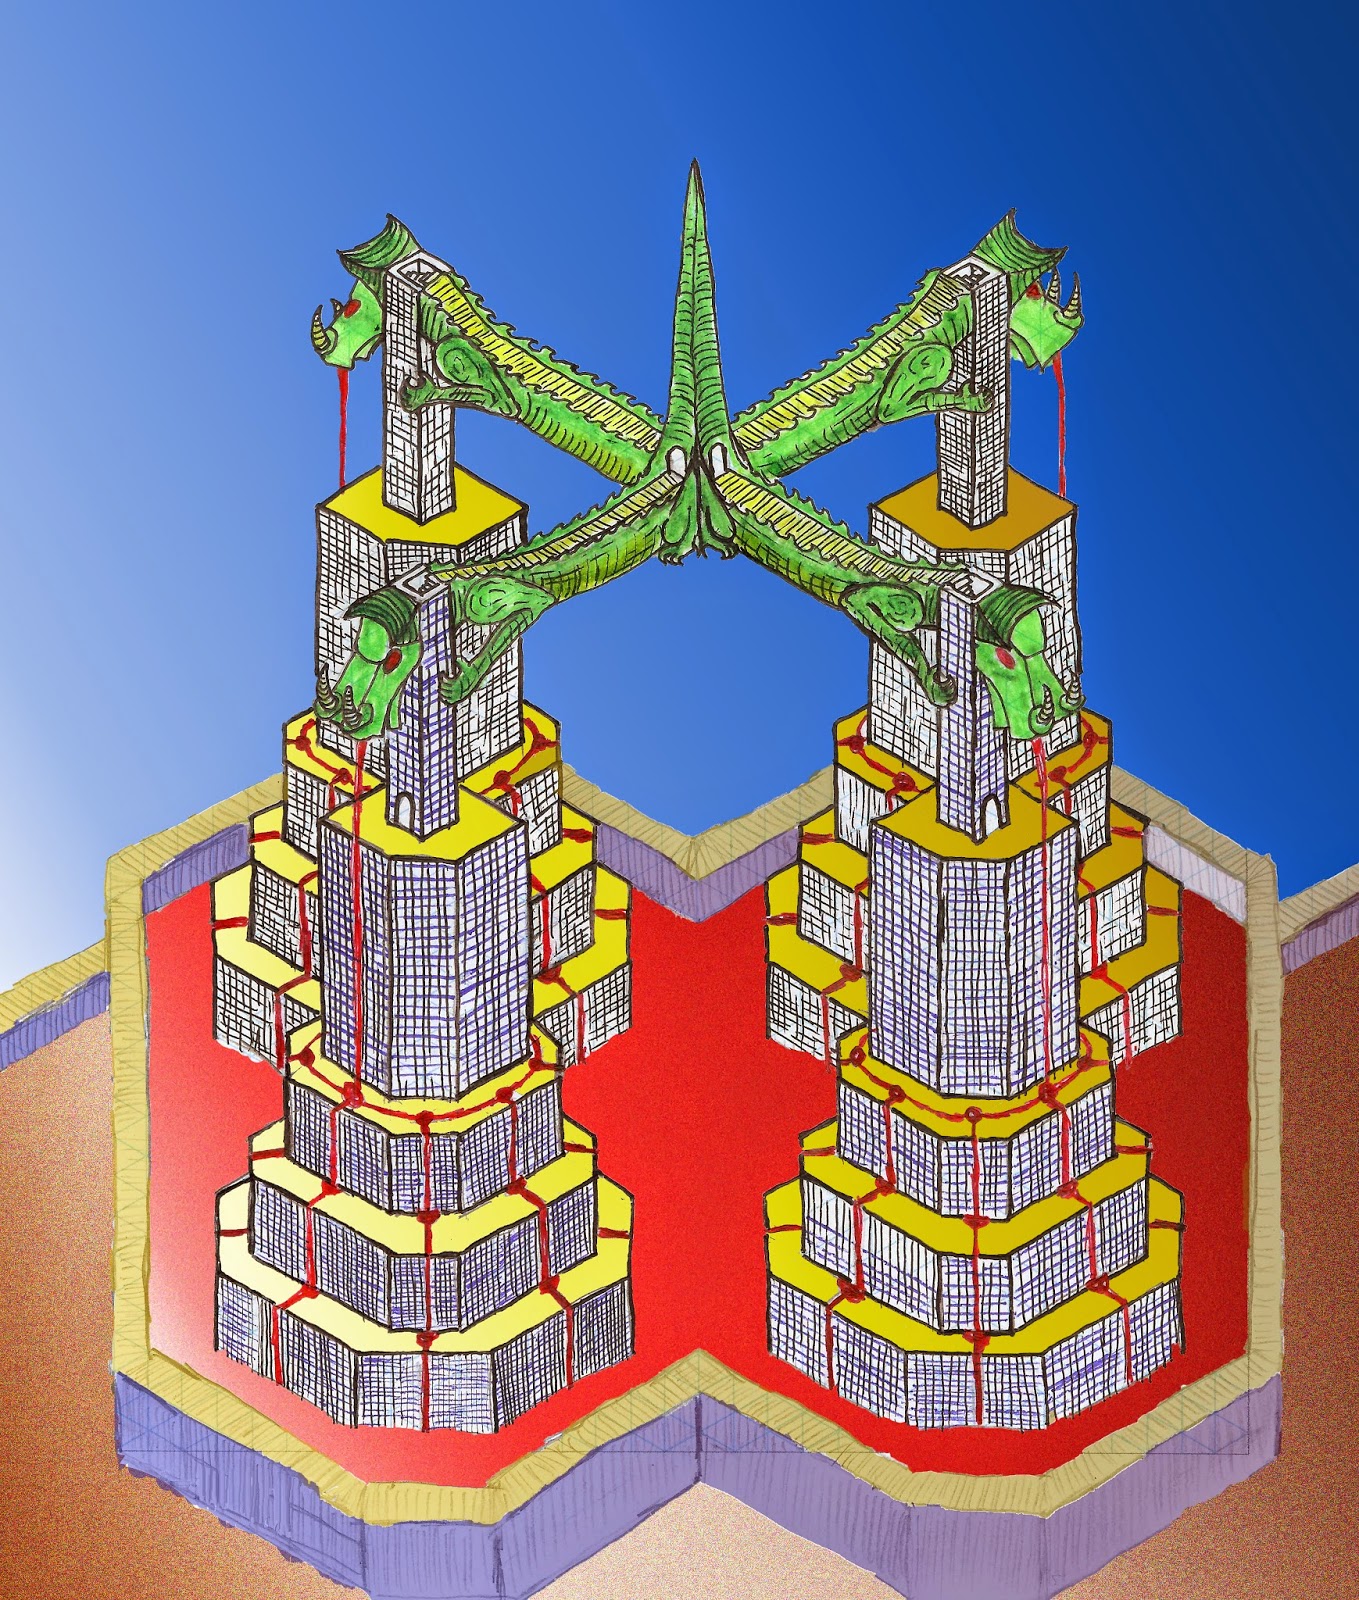
All hail Dragocroc! I hadn't been exposed to isometric graph paper until I saw some Dyson Logos posts that inspired me to check it out. I found a website with printable isometric graph paper and printed some out. I present the Temple of the Dragocroc in isometric pseudo-3D view. This started out as doodling without a plan, and as consequence I have gone past the edge of the graph grid in a few places. I am going to keep working on the original drawing but I also scanned it in and messed around with it a bit in Photoshop just for kicks (Photoshopped scans at bottom of post, unaltered scan of work in progress immediately below).
The only entrances to the structure are on the fourth and fifth tiers. Archways open into the tower face on the fourth tier below each Dragocroc mouth. Each archway leads to a staircase that ascends the inside wall of the tower, giving access to the fifth tier and the walkways on top of the Dragrocroc statues. Open archways at the base of the tail-spire give access to an empty stone room with a sacrificial alter in the center and an engraved circular trench around its perimeter, the Blood Circle. The blood of approximately 20 human sacrifices is required to fill the circle. If the sacrifices are performed under the light of a full moon, the Blood Circle can be used as a powerful summoning and binding focus and a teleportation circle (giving access to the dungeon levels inside the blood-drained and bound Dragocroc demon imprisoned below). 20 ritual spellcasters are required to use the circle for summoning and binding, and 20 sacrifices is the minimum needed for this use. Every multiple of 20 sacrifices beyond the first 20 increases the power of the circle when used for summoning and binding. Priests of Dragocroc carry amulets which are linked to the Blood Circle. Chaotic individuals who hold an Amulet of Dragocroc can sacrifice 1d8 HP of blood to the medallion to teleport without error (including all personal gear and up to two other individuals, unwilling individuals can save to resist) from unlimited range to the circle on the 5th tier. There is a 1 in 6 chance every time anyone who is not a Priest of Dragocroc picks up an Amulet of Dragocroc that the amulet attacks as an 8HD monster for 1d8 damage and teleports the victim to the circle (save to resist).
![]() |
| Work in progress - this is what I have done with pencil, pen and marker so far (no Photoshop) |
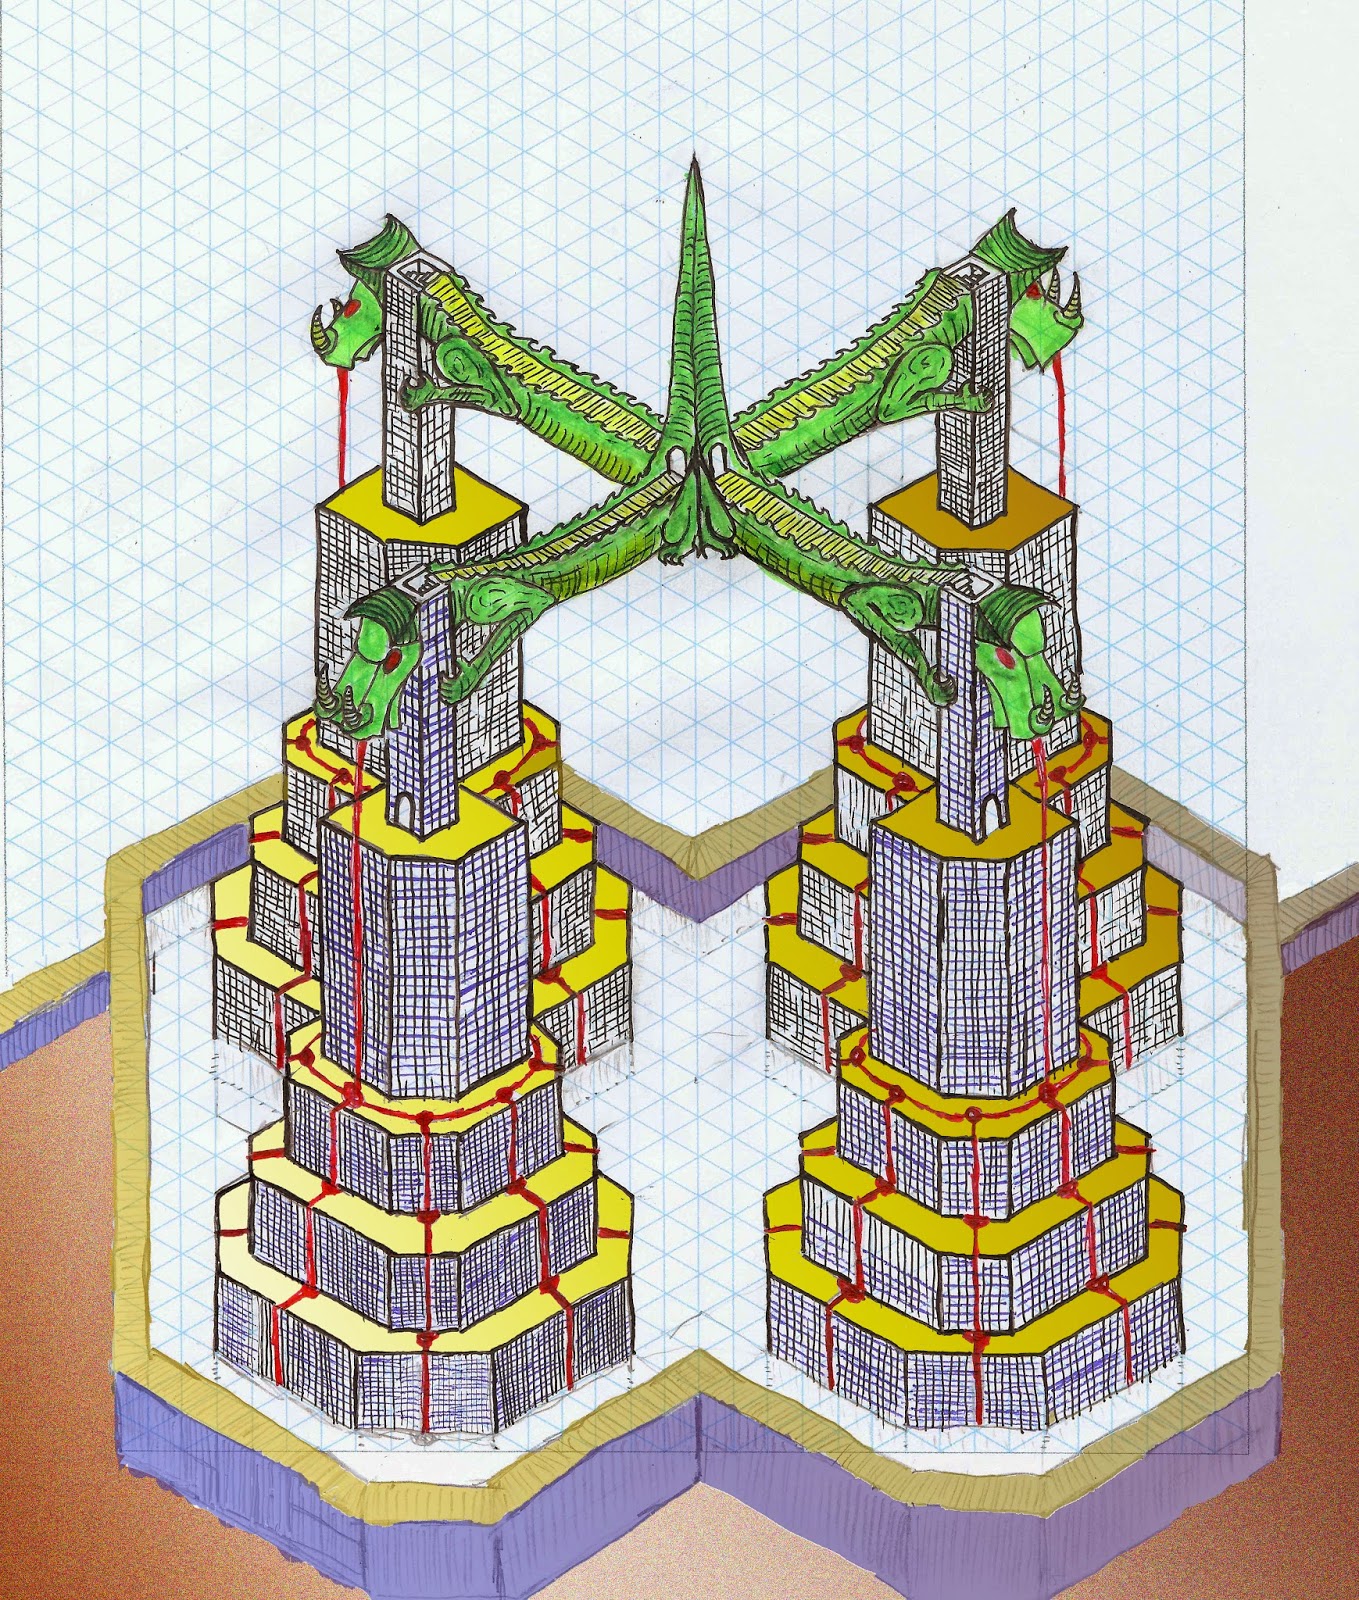
There is 10' of liquid demonblood flooding the inside of the walled structure. I hinted at the towers and walls extending down past the interior surface area to suggest that it was a liquid surface, but this will be more obvious when I finish up the outer walls and color in the surface of the blood. I am thinking of using colored pencil for the demonblood surface to get some good color swirls going on. The blood spills out of the mouth of each of the Dragocroc statues down past the tower level immediately below them, landing on the third level up from the bottom, flowing through a channel system to waterfalls that cascade down each face of the tower.
The four Dragocrocs that make up part of the 5th tier of the temples are stone statues inlaid with jade mosaic. The red eyes are unnaturally large glowing rubies (single rubies each ~10' long, each 1/8 of the heart of the real Dragocroc (powerful demon bound below). If the ruby eyes are replaced in the heart of the real Dragocroc, the demon will arise, drink its stolen blood to restore its power and utterly destroy the entire structure and surrounding countryside before embarking on a murderous rampage.)
The only entrances to the structure are on the fourth and fifth tiers. Archways open into the tower face on the fourth tier below each Dragocroc mouth. Each archway leads to a staircase that ascends the inside wall of the tower, giving access to the fifth tier and the walkways on top of the Dragrocroc statues. Open archways at the base of the tail-spire give access to an empty stone room with a sacrificial alter in the center and an engraved circular trench around its perimeter, the Blood Circle. The blood of approximately 20 human sacrifices is required to fill the circle. If the sacrifices are performed under the light of a full moon, the Blood Circle can be used as a powerful summoning and binding focus and a teleportation circle (giving access to the dungeon levels inside the blood-drained and bound Dragocroc demon imprisoned below). 20 ritual spellcasters are required to use the circle for summoning and binding, and 20 sacrifices is the minimum needed for this use. Every multiple of 20 sacrifices beyond the first 20 increases the power of the circle when used for summoning and binding. Priests of Dragocroc carry amulets which are linked to the Blood Circle. Chaotic individuals who hold an Amulet of Dragocroc can sacrifice 1d8 HP of blood to the medallion to teleport without error (including all personal gear and up to two other individuals, unwilling individuals can save to resist) from unlimited range to the circle on the 5th tier. There is a 1 in 6 chance every time anyone who is not a Priest of Dragocroc picks up an Amulet of Dragocroc that the amulet attacks as an 8HD monster for 1d8 damage and teleports the victim to the circle (save to resist).
The real Dragocroc is a powerful demon, summoned and bound by a cult which stole its blood to power their magic. Priests of Dragocroc draw their spellcasting ability from the stolen blood. They must drink fresh Dragocroc blood once between full moons (at the full moon) or permanently lose all spellcasting ability and go insane (1 in 6 chance of also becoming a were-dragocroc, transforming into a humanoid dragocroc under the light of the full moon, filled with a burning desire to destroy the Priests of Dragocroc). Any Priest of Dragocroc who suffers this fate will be killed on sight by the priesthood. Only fresh blood spilling directly out of a Dragocroc statue mouth works, so every full moon every Priest of Dragocroc returns to the temple to drink from the waterfalls. The potent demon blood provides two extra benefits to the priesthood while powering magic; all damaging spells do an extra 1d8 damage and all undead under the control of a Priest of Dragocroc have +1d8 HP, +1 to initiative and +1 to hit and damage.
Here are two stages of me messing around with this in Photoshop - I don't like the effect and will finish the piece with pen, markers and colored pencil.
Friday, September 5, 2014
The Saint's Shrine - Map
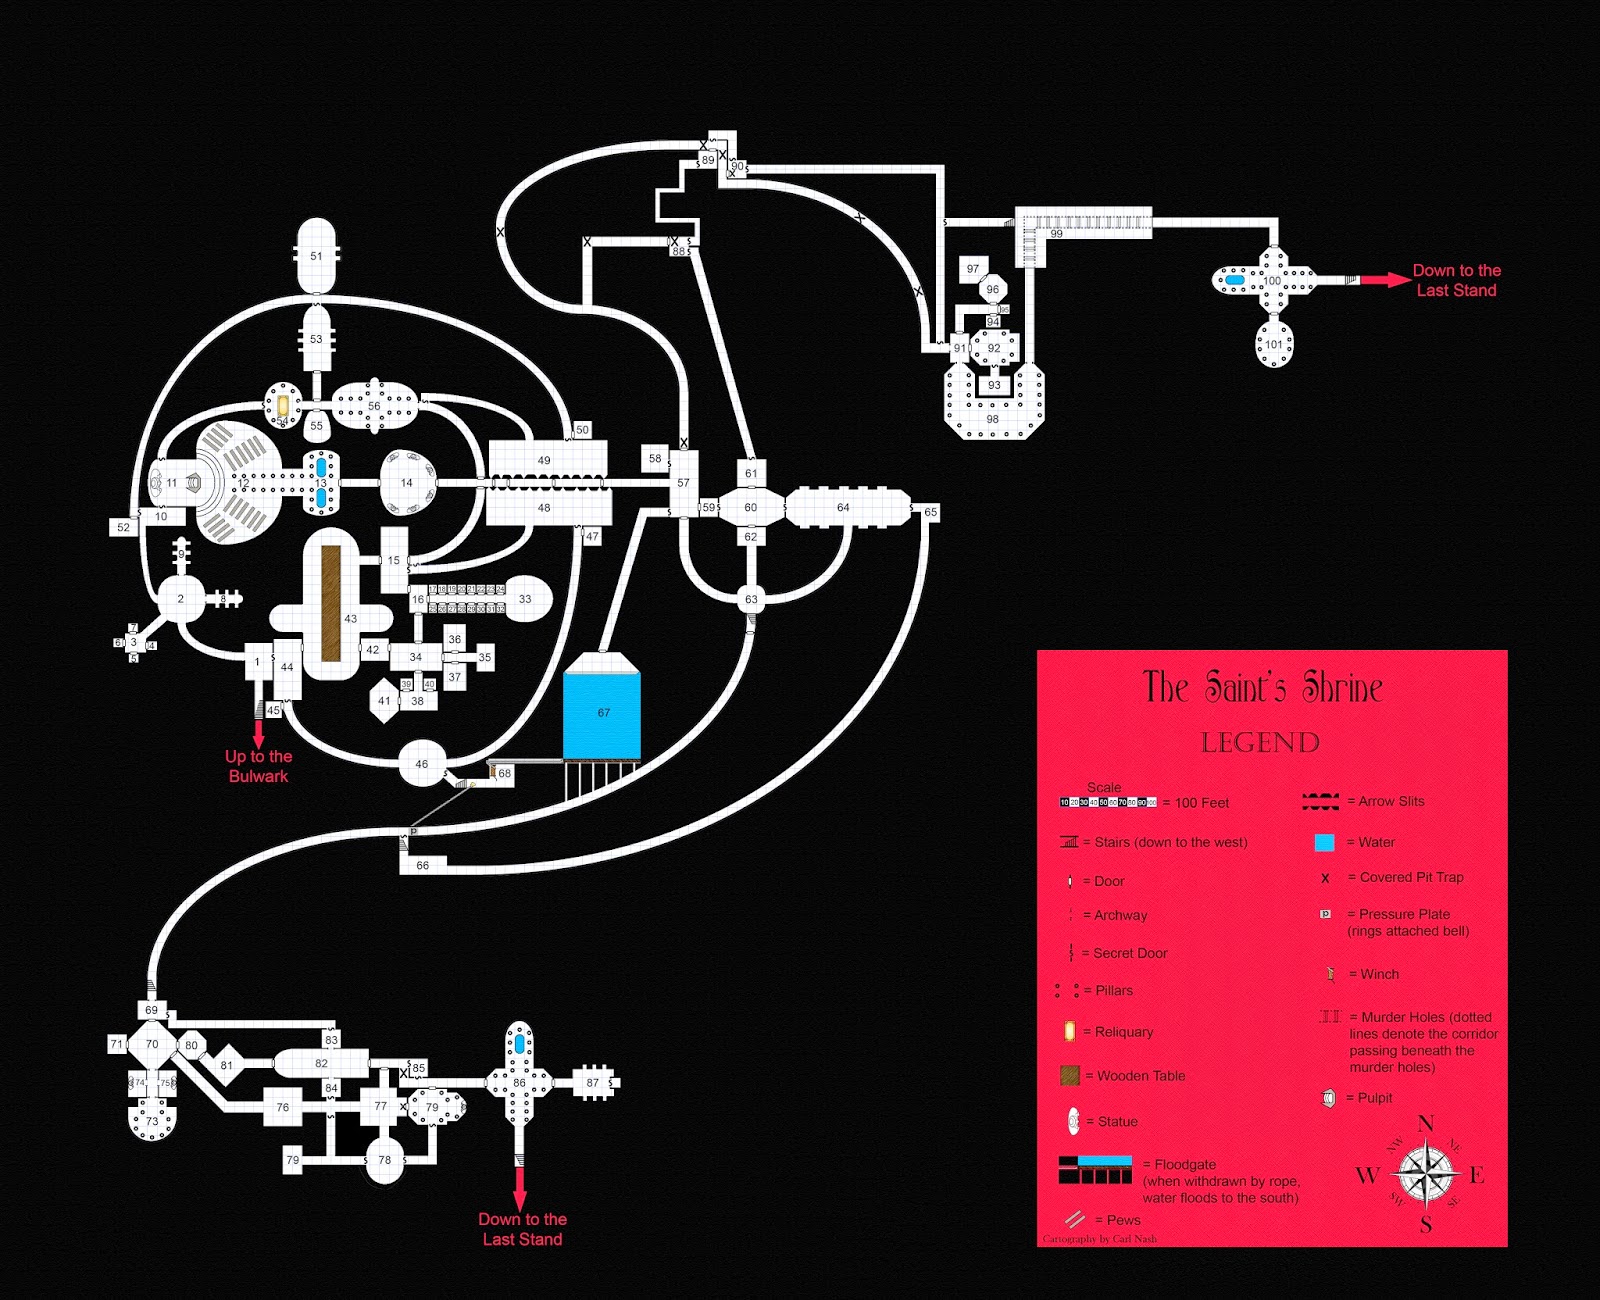
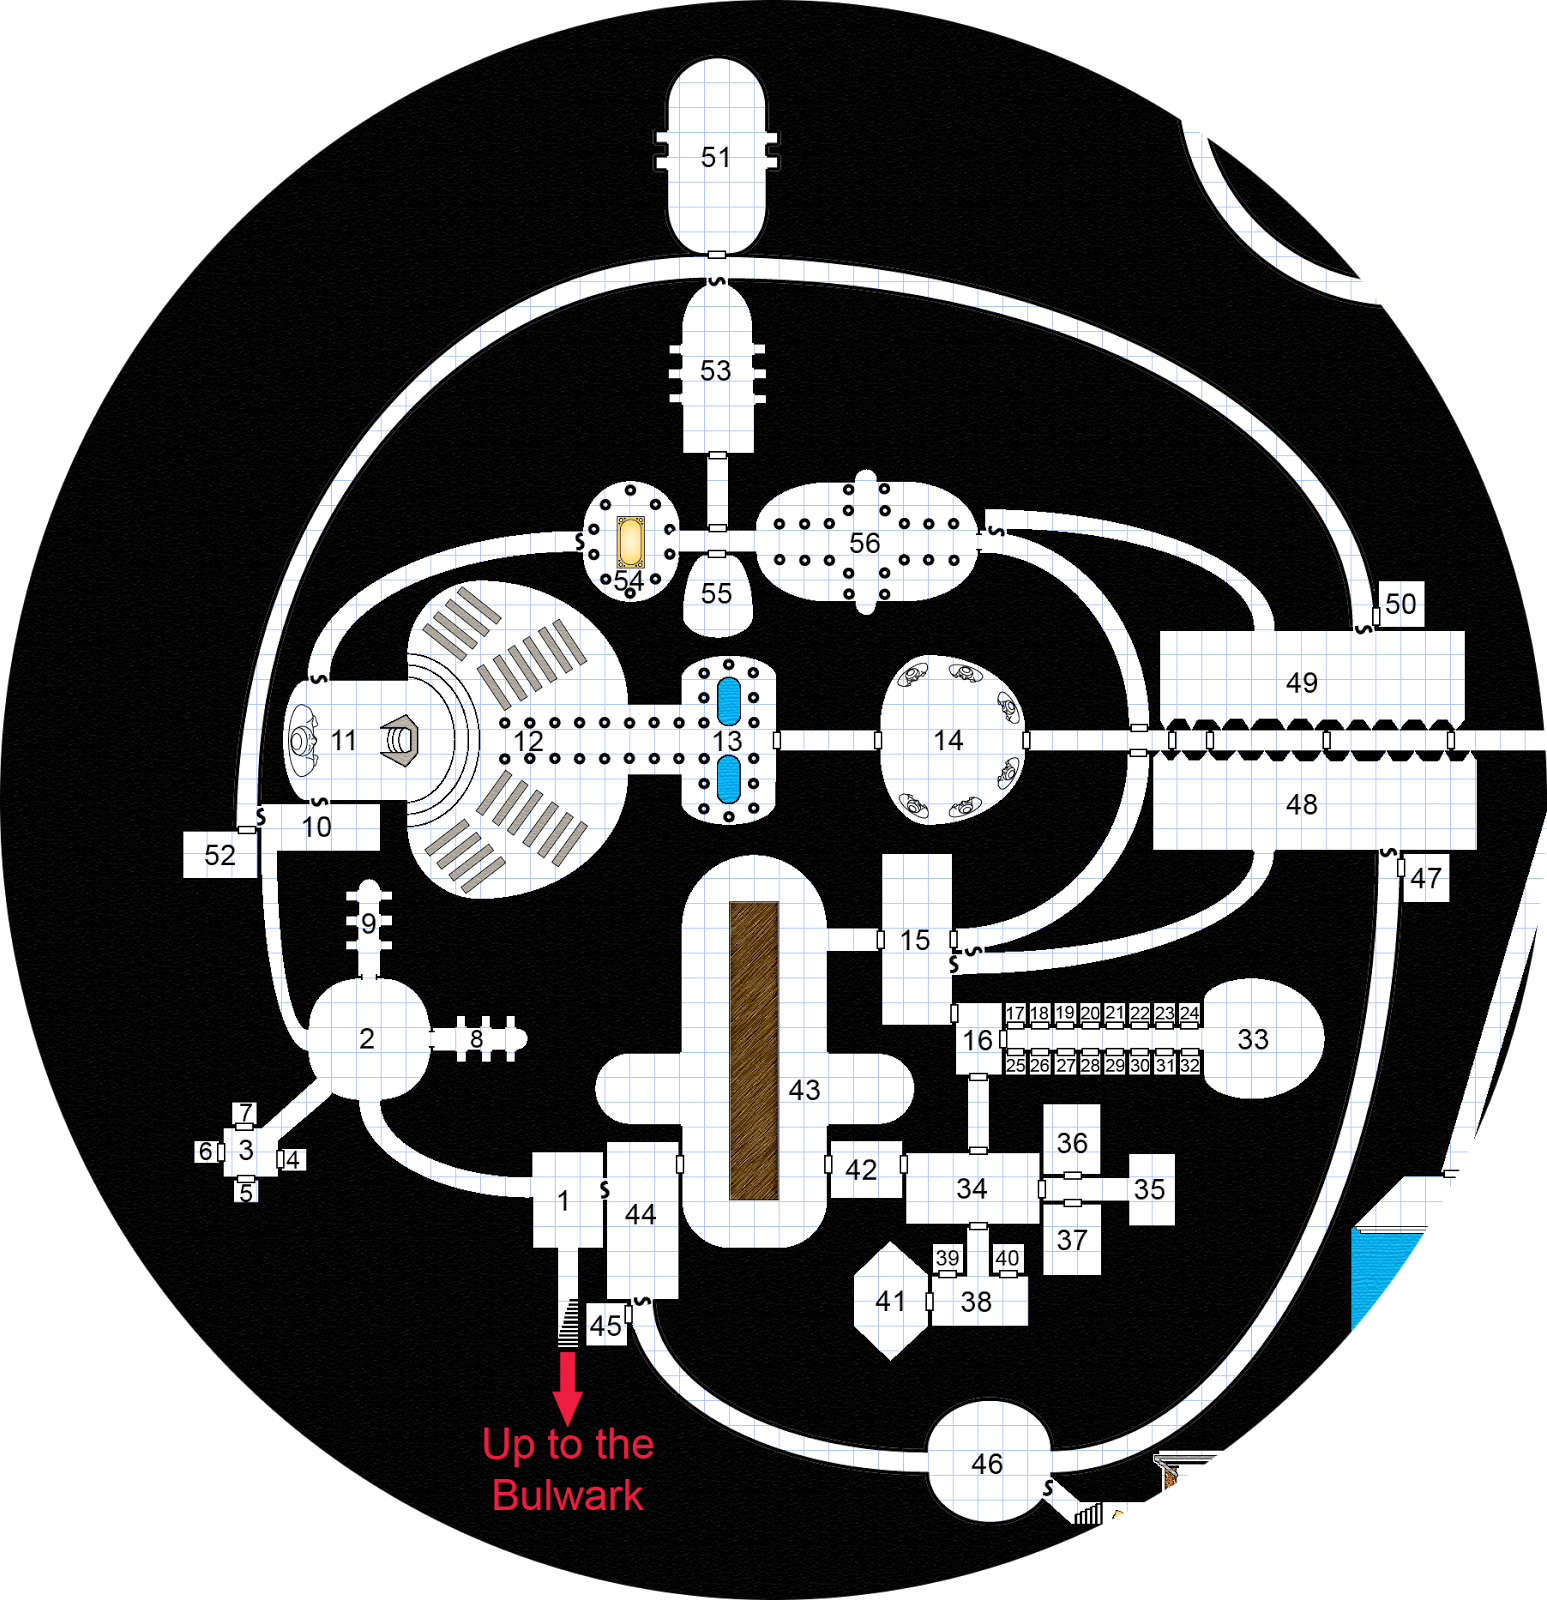
Another old map. This is one of two maps that I made back in May of 2009 for the now defunct megadungeon.net project that James M. had going on. I don't think this one ever was keyed, or if it was the key never was put on the website before it was taken down and James never forwarded it to me. Click this link for the full size image in a new tab.
Here are the original instructions from James M. that I worked off of to make this map:
"Let's go with the Saint's Shrine, which is wholly man-made level without any cavern areas. There's one connection to the Bulwark above it and two to the Last Stand below. As I envisage it, the highlight of the level is the Shrine of St. Gaxyg, which is a large, temple-like structure at the heart of the level. All the other rooms should be arranged in a defensible fashion around it, providing fall back positions the monks could use if creatures from the lower levels invaded. There should be lots of secret doors, hidden rooms, twisting corridors, and the like."
After I finished the map, I gave a brief explanation of the map to James to pass on to whomever he had lined up to key the level:
" I designed the level with the idea of the monks' defense foremost in my mind, so in some places it might be a little more linear than I might have otherwise done. The central shrine itself I made fairly interconnected, but there is only one exit (strafed by arrow slits) to the rest of the level from the shrine. A few notes to pass on to the person keying the level: I imagine that the secret doors in rooms 10 and 1 would be relatively easy to find from the inside, as they were designed to conceal the way up from outside, not to prevent people from coming down from above. However, if a party does not find them they might wrongly conclude that this is only a small sub-level and that might be interesting as well. The large pool of water in chamber 67 held back by the floodgate is ten feet deep. At ten feet deep it contains exactly enough water to fill the passageway it floods into from floor to ceiling assuming a ten foot ceiling for the passageway. The staircases down to that passageway should drop at least ten feet of elevation so that the water would be contained in that passage. I envisioned that the flooded passage would slowly drain out over the course of several days through small cracks where the wall joins the floor, and the pool will refill slowly from an enchanted basin affixed to the bottom of the pool (of course the level keyer could change any of that). The floodgate itself gets pulled up a slight incline to open it, so if the winch is released the floodgate would slide back down to its closed position. The many pit traps throughout the level could be relatively deadly to a party (depending on their depth, spiked nature, etc) as several are in positions where you might not expect one (directly in front of a door, for instance); I envisioned these pits as part of the defenses of the level as the monks could easily avoid them through the many secret passages. Of course, I could remove any or all of the pit traps as requested. The eastern exit to the Last Stand is guarded by a stretch of passageway with murder holes in the ceiling; room 99 is above that stretch of passageway, I tried to make that clear on the map but it may look a little confusing; the passageway from room 98 to 100 goes underneath room 99. Once again, I went a little over the suggested room count at 101 numbered chambers"
Below is a detail of the shrine of St. Gaxyg:
Tuesday, August 26, 2014
Dungeon in a Cave
I was just poking around in the D&D folder on my computer and found a map I had completely forgotten about. I created this five years ago for no particular reason besides messing around with mapping in Photoshop. It doesn't look like I finished putting doors everywhere I wanted doors, and I definitely never keyed this or had any real back story in mind when I was creating it. The entrance is a stair coming down from a above and there is only one exit on the map, a stair heading down farther below.
I remember that I drew the cave layer first and then drew a dungeon inside the caves. This definitely led to some interesting and organic dungeon design. The dungeon walls are relatively thin, just over 1' thick according to the scale. I was picturing stone and mortar construction for the dungeon. The way it is laid out, if you never detect a secret door you would never see the natural cave system and would assume the entire dungeon was a constructed space (instead of a construction in a natural space). There are numerous secret doors (red rectangles according to my key, I honestly have no idea why I wasn't using the tried and true "S" for secret doors) which give access to the caves outside the dungeon. Most of the larger caves have high vaulted ceilings, with 10-20' or more of space above the roof of the dungeon to the ceiling of the cave. Many sections of caverns that appear to be completely blocked off by the dungeon construction could be accessed from outside the dungeon rooms by climbing up onto the roof of the dungeon and dropping down into the "blocked off" section of caves (e.g. the caves at the very top left of the map)
Click this link to see the full size image
Friday, April 18, 2014
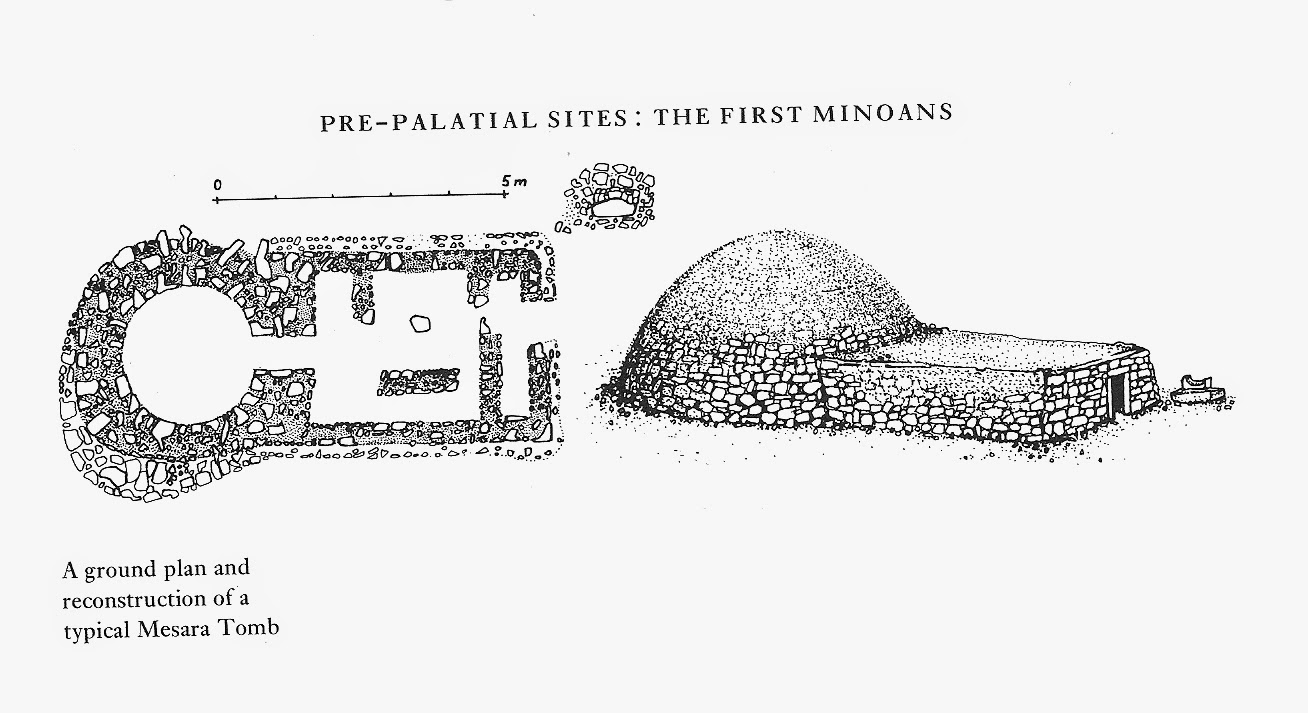
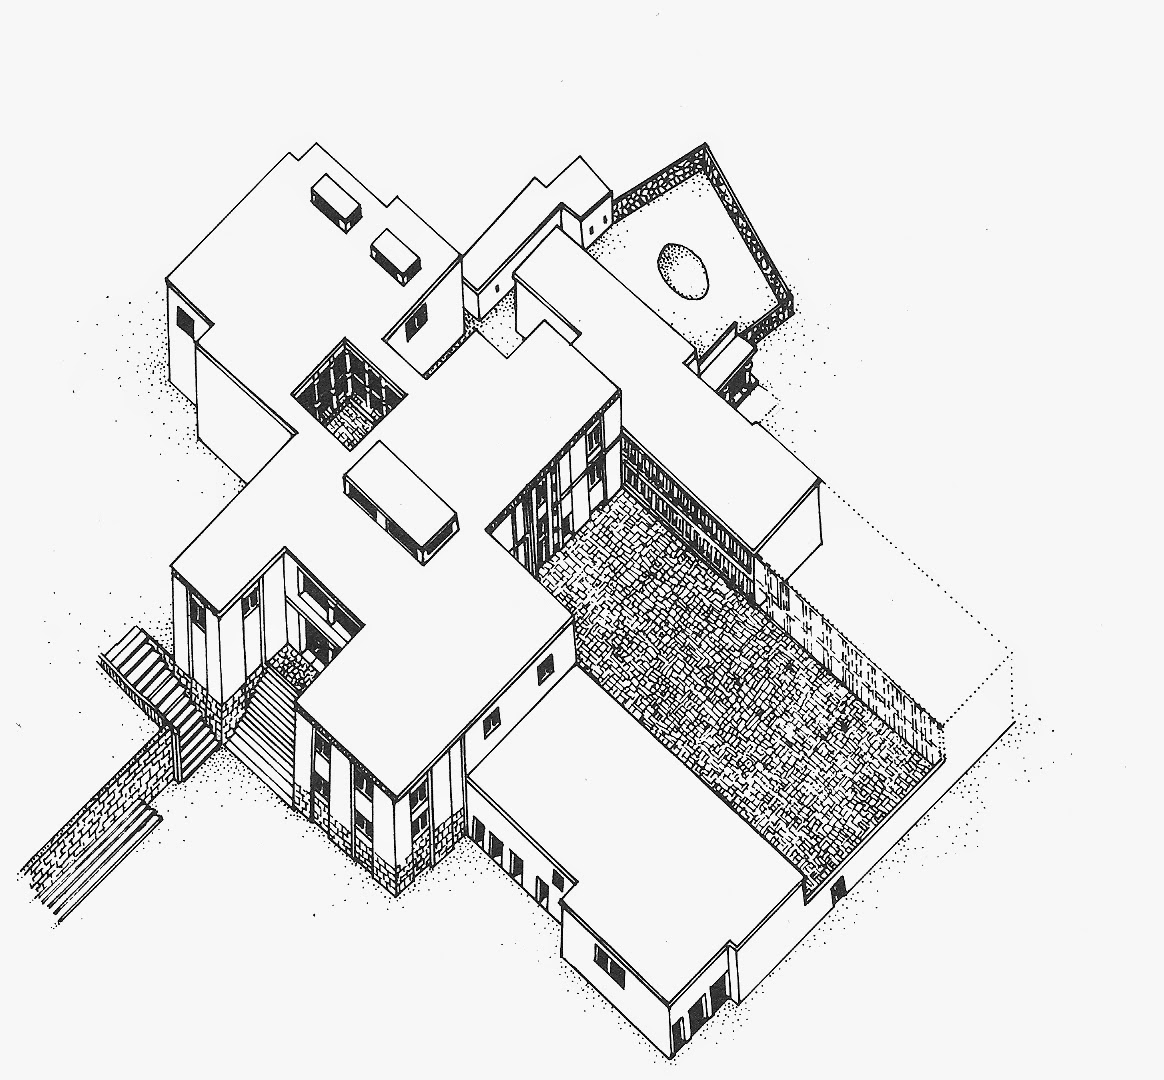
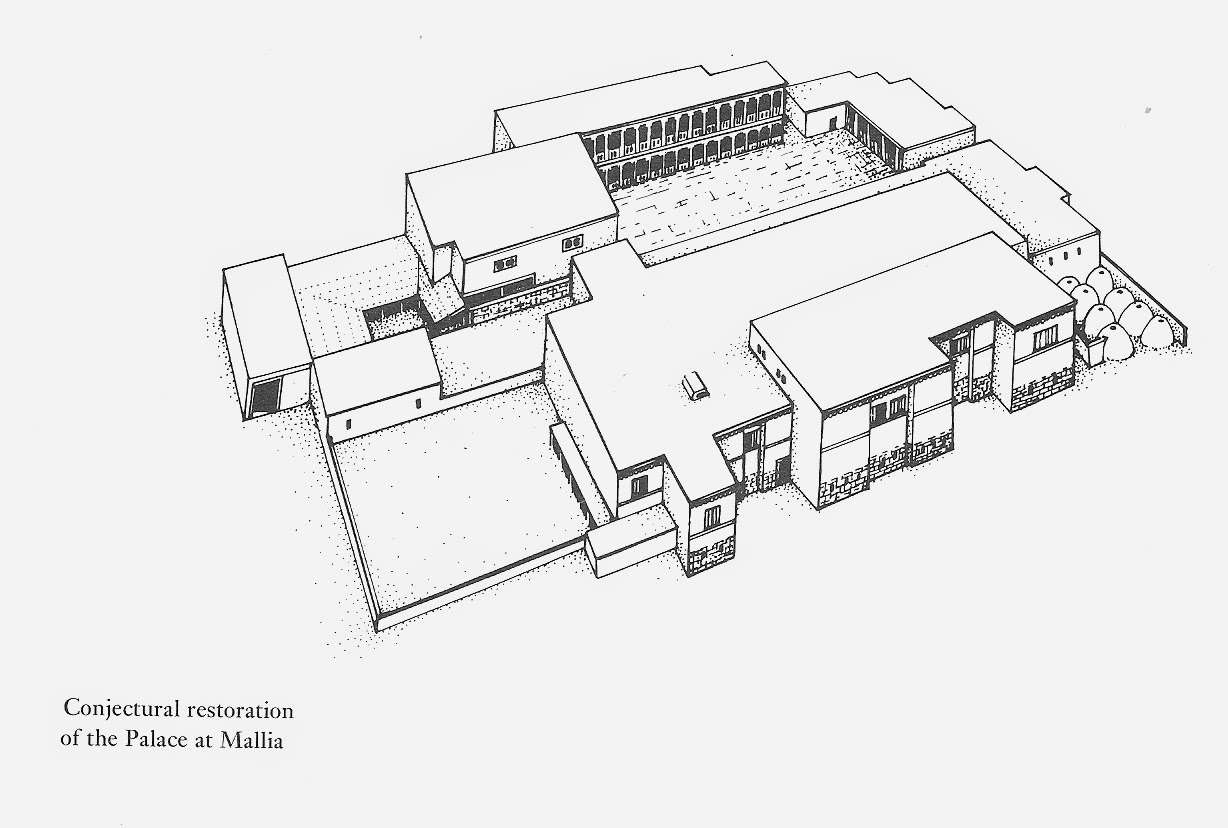
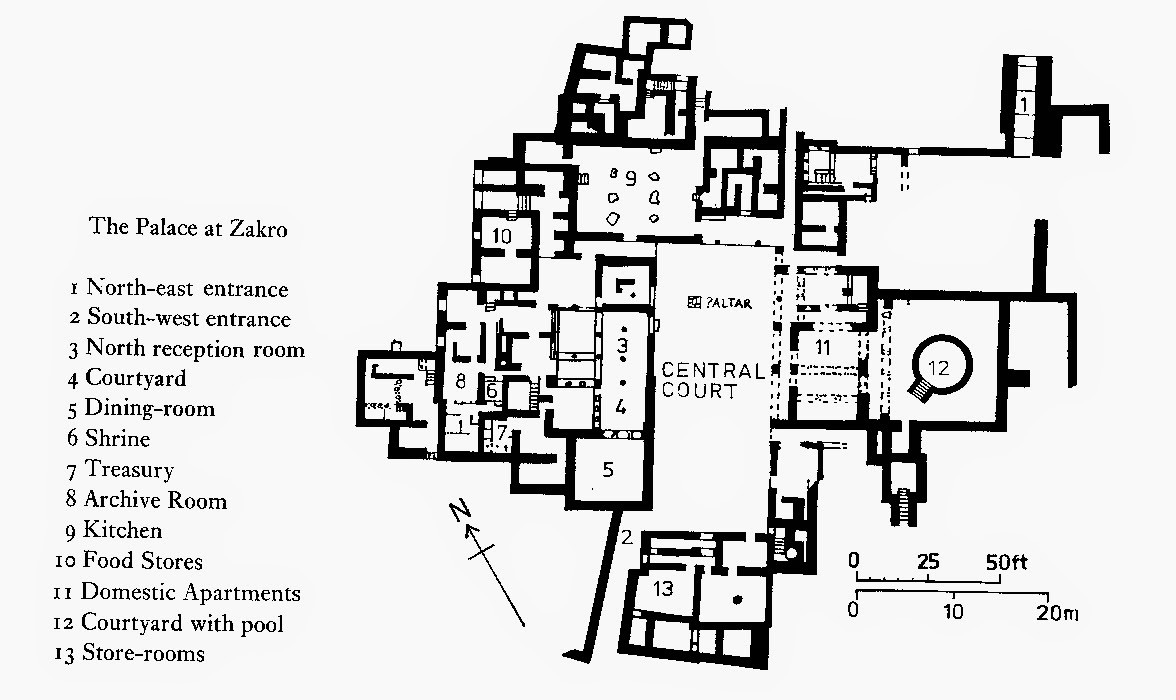
The Archaeology of Minoan Crete (Maps + d87 Random Runes Chart!)
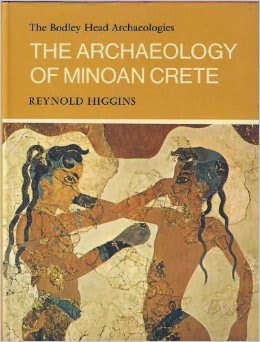
The Archaeology of Minoan Crete
by Reynold Higgins
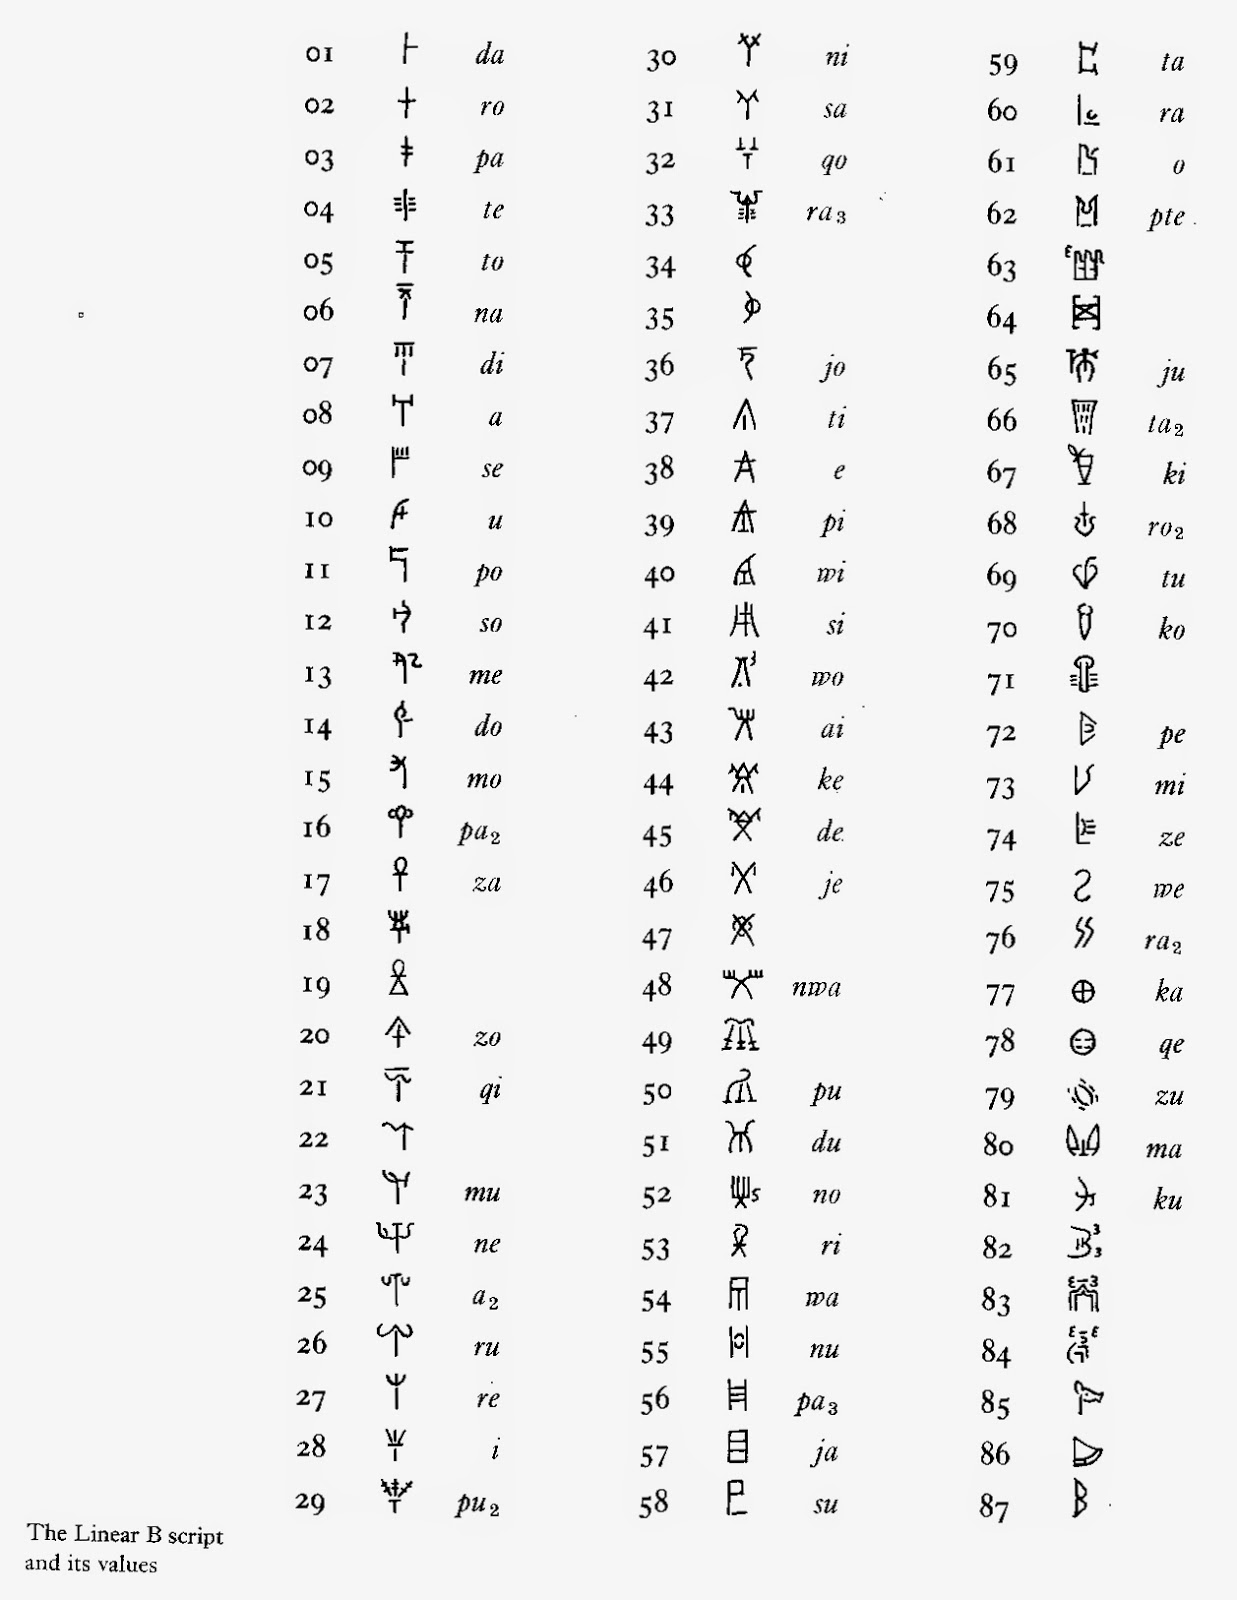
I bought this $2.25 hardcover at the St. Vincent's thrift store and this bad boy is a treasure trove. It could be shipped to you by the wizards at Amazon for around $5.50 total. There is a short summary of what has been learned through archaeological excavations at each site, but the floorplans and reconstruction views are the real gems. 87 characters in Linear B script are also given with their phonetic values where known, so if you have a d87 time to break it out (scroll to the bottom for the d87 random runes chart). The book also had an interesting but much too short section on the sacred caves of Crete (no maps / surveys there unfortunately). I would just go to Wikipedia for each of the site names listed below for more up to date information than the book can provide, but it is extremely difficult to find quality high-res floorplans let alone isometric restoration views online. Enjoy some scans!
Early Tomb (floor plan, front view, overhead side reconstruction view)
Palace at Phaestos (overhead reconstruction view)
Palace at Phaestos Floorplan
Palace at Knossos (artist's reconstruction)
Palace at Knossos Floorplan
Villa and Village at Ayia Triada
Palace at Mallia (overhead reconstruction view)
Palace at Mallia Floorplan
Palace at Zakro Floorplan
Linear B Script (d87 Random Rune Chart)
Tuesday, April 1, 2014
Cave Maps
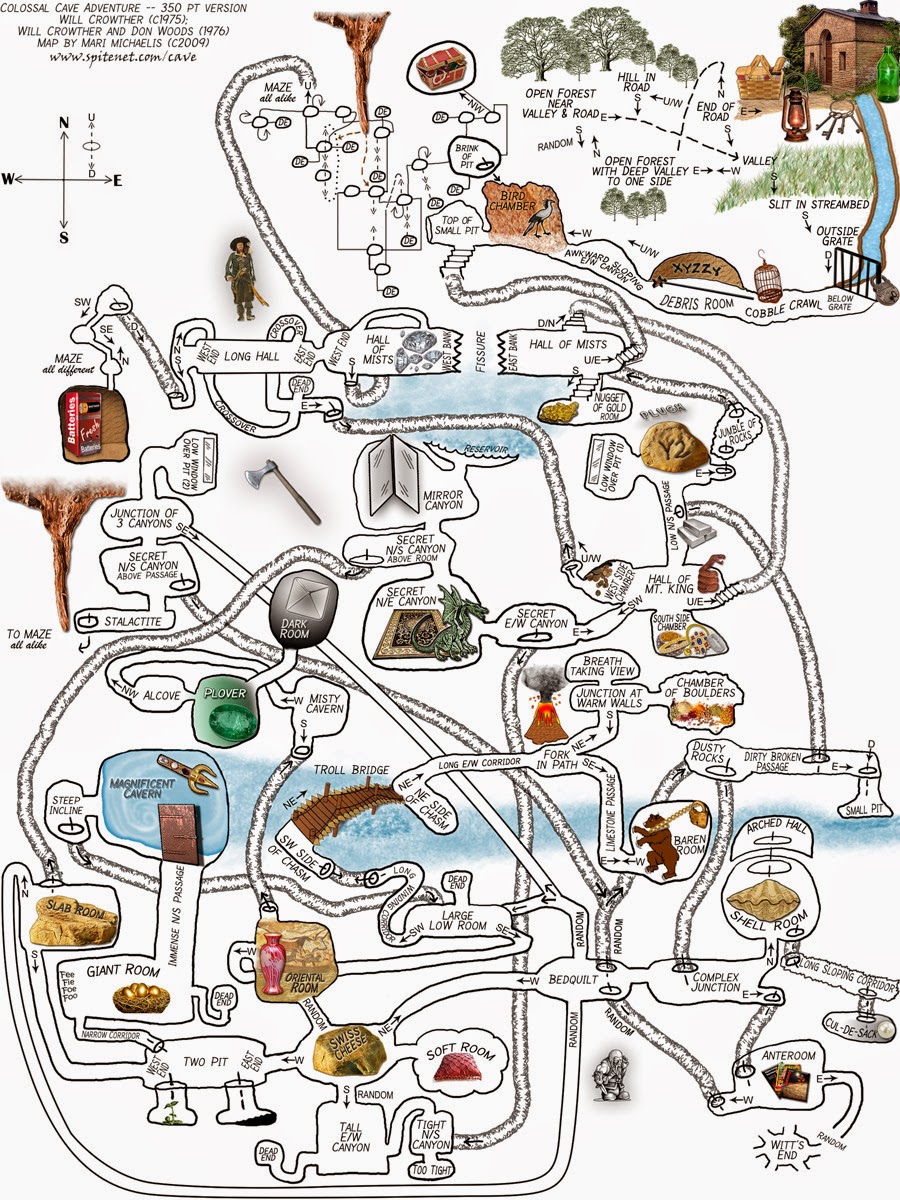
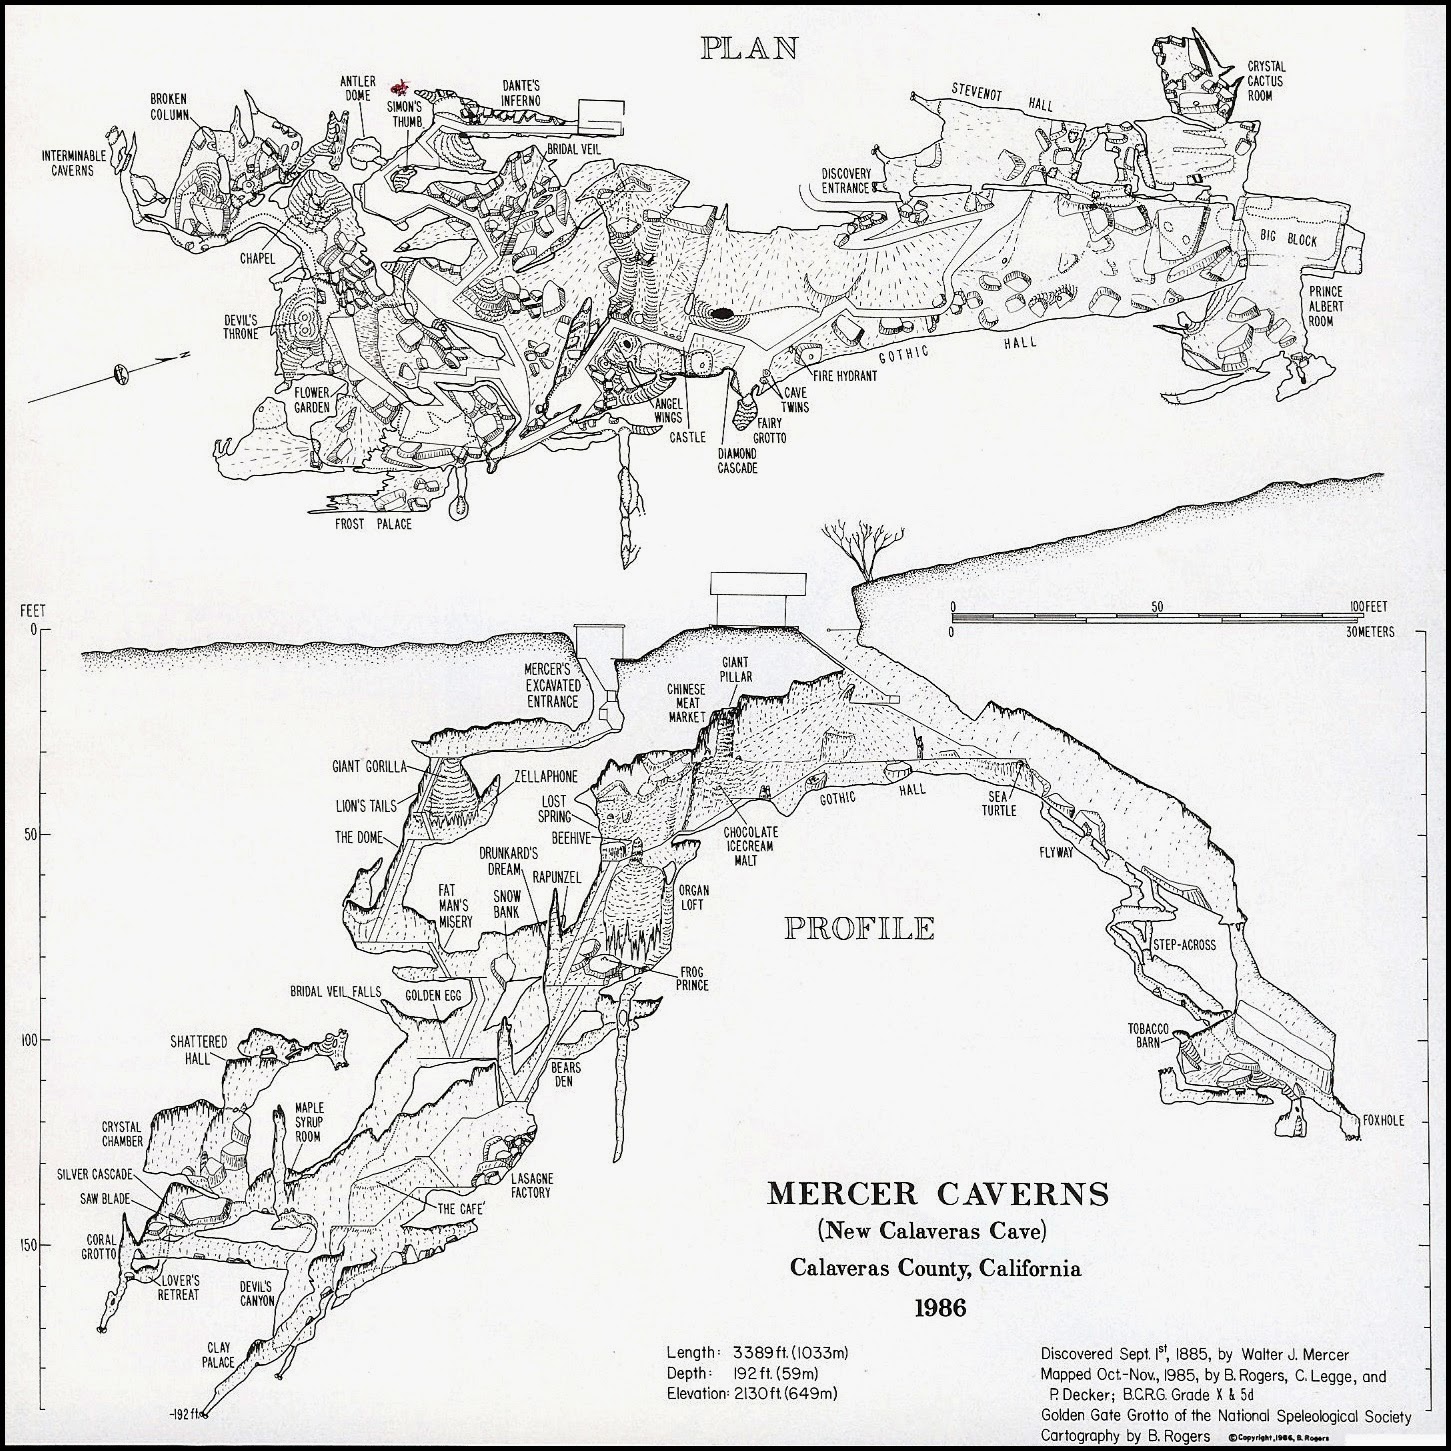
I usually just steal maps from other sources and repurpose them when I am doing DM prepwork. I do enjoy drawing my own maps but it is relatively time consuming and I honestly don't have enough time as it is to prepare for my biweekly session, and what time I do have I don't want to spend mapping. I found some nice cave maps today on the interwebs. One is an awesome hand drawn map of the Colossal Cave Adventure (Adventure), a text-based cave exploration game that was one of the first computer games I ever played, on a Kaypro computer no less :) This map brought back some memories of my own attempts to map out the collosal cave. I never did finish the adventure myself, but I used my incomplete maps when I was a teenage DM. This is a great map for RPG purposes because it has a name for every room and often some images associated with it, so you could pretty much wing an adventure with this map. The second map is a two part map of Mercer Caverns in California. It shows an overhead view of the cavern and a side view, and it is a great reminder of how caverns are three dimensional spaces.
Colossal Cave Adventure Map
Mercer Caverns Map
Tuesday, August 27, 2013
Flying Saucer Deck Plans
There is the off chance that the players in my 4e game might end up exploring a high-tech spacecraft today of the flying saucer variety so I was Googling "flying saucer deck plans". This old web page has the complete blue prints of a Constitution class Starfleet vessel, the top portion of which is basically a flying saucer (deck plans for this portion below). The page also includes the contents of each level and a key for all the abbreviations. The full ship is a mega-dungeon all gift-wrapped and ready to go :) http://www.oocities.org/thinkexperiment/shiptour.html
Flying Saucer Deck Plans:
Friday, October 12, 2012
Five Minute Friday Map
This is my first Five Minute Friday Map, inspired by this meme on Google+.
It is a cross section of a spherical mini-dungeon. The PCs start in the center, teleporting or gating or dimensional shifting or somesuch to arrive there in the first place. There is a large window that looks out over a gap to a much larger window opening into a lush garden chamber lit from above. The light that comes out the window of the garden room is the only illumination inside the structure, providing indirect lighting all around the central opening. The only door out of the start room opens onto a log bridge over a gap. A demon beast of some variety is lurking below out of sight. Roll 1d6 1: Giant Demon Porcupine 2: Two Headed Demon Wolf with Human Hands 3: Demon Bear 4: Giant Demon Spider 5: Giant Demon Toad with Toothed Tongue 6: Demon Minotaur with Battle Axe from Hell
The light source is a miniature sun that hangs in the air in the middle of the room above the Garden Room. It does not produce heat but inflicts 2d6 damage per round to anything inserted into it, melting metal in 2d6 rounds.
All of the plants, bushes and trees in the Garden are contained in large ceramic pots glazed with magical symbols. They are a rare mixture of medicinal and poisonous herbs, trees bearing magical fruit and bushes with shadow berries useful for summoning dark creatures. Both the pots and the plants radiate magic.
Defeating the Demon Beast causes a portal to open up in the Start chamber that leads back to wherever the PCs came from. This portal will remain open for 2d20+4 rounds. It will begin flickering with blue light when 5 rounds remain.
The chambers directly above the start chamber are a wizard's comfortably furnished living room appointed with indestructible lounge couches and low tables (lower chamber with two doors and a ladder to a trapdoor above)
and a wizard's mostly looted and totally ransacked laboratory/library with a secret door to the wizard's back door, a teleportation chamber.
The secret chamber below the demon beast contains the magical machinery that generates the light source, controls the humidity of the garden chamber and links with the magical pots to keep the plants in perfect health, and summons a new beast automatically 1d4 days after the death of the last
It is a cross section of a spherical mini-dungeon. The PCs start in the center, teleporting or gating or dimensional shifting or somesuch to arrive there in the first place. There is a large window that looks out over a gap to a much larger window opening into a lush garden chamber lit from above. The light that comes out the window of the garden room is the only illumination inside the structure, providing indirect lighting all around the central opening. The only door out of the start room opens onto a log bridge over a gap. A demon beast of some variety is lurking below out of sight. Roll 1d6 1: Giant Demon Porcupine 2: Two Headed Demon Wolf with Human Hands 3: Demon Bear 4: Giant Demon Spider 5: Giant Demon Toad with Toothed Tongue 6: Demon Minotaur with Battle Axe from Hell
The light source is a miniature sun that hangs in the air in the middle of the room above the Garden Room. It does not produce heat but inflicts 2d6 damage per round to anything inserted into it, melting metal in 2d6 rounds.
All of the plants, bushes and trees in the Garden are contained in large ceramic pots glazed with magical symbols. They are a rare mixture of medicinal and poisonous herbs, trees bearing magical fruit and bushes with shadow berries useful for summoning dark creatures. Both the pots and the plants radiate magic.
Defeating the Demon Beast causes a portal to open up in the Start chamber that leads back to wherever the PCs came from. This portal will remain open for 2d20+4 rounds. It will begin flickering with blue light when 5 rounds remain.
The chambers directly above the start chamber are a wizard's comfortably furnished living room appointed with indestructible lounge couches and low tables (lower chamber with two doors and a ladder to a trapdoor above)
and a wizard's mostly looted and totally ransacked laboratory/library with a secret door to the wizard's back door, a teleportation chamber.
The secret chamber below the demon beast contains the magical machinery that generates the light source, controls the humidity of the garden chamber and links with the magical pots to keep the plants in perfect health, and summons a new beast automatically 1d4 days after the death of the last
Labels:
#FiveMinuteFridayMap,
demons,
map,
minidungeon,
plants,
RPG
Thursday, October 4, 2012
Tour of the Universe - Tombworld
A friend of mine just lent me a book called "Tour of the Universe" by Robert Holdstock and Malcolm Edwards. It is presented as the scrapbook of a lucky human couple in the future who win a lottery and receive tickets to a tour of the universe. The book is lavishly illustrated and includes ticket stubs, hotel brochures, starliner publications and all the ephemera collected on your average tour of the universe.
I intend to scan in several of the illustrations, but let me start off with a cross-sectional map of one small part of Tombworld, a tourist destination planet that was used for millions of years in the past by spacefaring species from many different planets to inter the remains of powerful individuals. The surface of the planet is hidden beneath kilometers of ruins, but recent award winning work by a corporation holding tourism rights showed that sunshafts designed to bring sunlight down onto the masks of the sleeping kings from the earliest levels were incorporated into the designs of later tomb builders and provide uninterrupted vertical access; hundreds of sunshafts have been identified granting access to all layers of the mausoleums.
I am totally stealing this map:
I intend to scan in several of the illustrations, but let me start off with a cross-sectional map of one small part of Tombworld, a tourist destination planet that was used for millions of years in the past by spacefaring species from many different planets to inter the remains of powerful individuals. The surface of the planet is hidden beneath kilometers of ruins, but recent award winning work by a corporation holding tourism rights showed that sunshafts designed to bring sunlight down onto the masks of the sleeping kings from the earliest levels were incorporated into the designs of later tomb builders and provide uninterrupted vertical access; hundreds of sunshafts have been identified granting access to all layers of the mausoleums.
I am totally stealing this map:
Tuesday, September 4, 2012
Halbritter's Armory
Halbritter's Armory
by Kurt Halbritter
First published in Germany 1977
English Translation 1978 - Jamie Muir
A friend lent me this curious volume and I have derived a fair amount of amusement from its pages. It purports to be an "Introduction to the Secret Weapons of History". It is a farce, poking fun at war and instruments of war with one ridiculous, improbable and often immoral "weapon" after another. My friend told me an amusing anecdote about lending this book to a fencing student of his, whose strict fundamentalist Christian parents were horrified at many of the illustrations. First, a more typical example of the tone of this book:
Breastworks
And now a couple of illustrations that I think could be horked for your fantasy RPG setting:
Rad Maze to the Citadel
Cool Crescent Clifftop Castle
Three Illustrations pertaining to the land of Bolt
Tuesday, August 28, 2012
The Islets of Langerhans
A location for fantasy role playing found in the pancreas :)
I ended up wondering about insulin production and was reading about the endocrine system tonight on good old Wikipedia. As it turns out, insulin and several other hormones are produced in the pancreas in special nodes called islets of Langerhans. I found myself looking at this visually appealing image of the difference between a rat islet of Langerhans and a human islet of Langerhans when it struck me that it would make for a beautiful city map.
I present the duchy of Langerhans, the walled city, the sinking city, the city of canals:
Originally a city built on rocky outcroppings emerging from a coastal swamp, the land slowly sank and the sea encroached until many of the lower lying sections of the city were underwater. A wall was built around the city in an unsuccessful attempt to keep the sea out. Roads became canals and the inhabitants simply filled in old stone houses as they became submerged and built new ones on top. This resulted in the famously confusing "floating neighborhoods" of Langerhans, houses built on top of rock pillars and often connected with rope bridges at the 2nd or 3rd story.
I see the white areas as canals, with the main gates opening into major East-West canals interrupted by large walled structures (cathedral and castle?) and two diagonal North-West and South-West canals leading to the other gates. Other than that, the duchy is a chaotic sprawl of densely packed houses on rock pillars (blue) with some solid ground in the form of rocky islets taken up by markets (brown), public squares/civic structures (purple) and spectacular hanging gardens (green). All of the white areas circled by brown are large walled structures built on craggy rock outcroppings, some private castles, others religious or military structures.
I am seeing all kinds of adventure potential in the now flooded and mostly filled in houses that support the current dwellings, like a submerged Tekumel underworld. Obviously there has to be an Esoteric Order of Dagon here as well, with fish-men and dark temples not far below the placid surface of the canals - there is a Shadow over Langerhans...
I ended up wondering about insulin production and was reading about the endocrine system tonight on good old Wikipedia. As it turns out, insulin and several other hormones are produced in the pancreas in special nodes called islets of Langerhans. I found myself looking at this visually appealing image of the difference between a rat islet of Langerhans and a human islet of Langerhans when it struck me that it would make for a beautiful city map.
I present the duchy of Langerhans, the walled city, the sinking city, the city of canals:
Originally a city built on rocky outcroppings emerging from a coastal swamp, the land slowly sank and the sea encroached until many of the lower lying sections of the city were underwater. A wall was built around the city in an unsuccessful attempt to keep the sea out. Roads became canals and the inhabitants simply filled in old stone houses as they became submerged and built new ones on top. This resulted in the famously confusing "floating neighborhoods" of Langerhans, houses built on top of rock pillars and often connected with rope bridges at the 2nd or 3rd story.
I see the white areas as canals, with the main gates opening into major East-West canals interrupted by large walled structures (cathedral and castle?) and two diagonal North-West and South-West canals leading to the other gates. Other than that, the duchy is a chaotic sprawl of densely packed houses on rock pillars (blue) with some solid ground in the form of rocky islets taken up by markets (brown), public squares/civic structures (purple) and spectacular hanging gardens (green). All of the white areas circled by brown are large walled structures built on craggy rock outcroppings, some private castles, others religious or military structures.
I am seeing all kinds of adventure potential in the now flooded and mostly filled in houses that support the current dwellings, like a submerged Tekumel underworld. Obviously there has to be an Esoteric Order of Dagon here as well, with fish-men and dark temples not far below the placid surface of the canals - there is a Shadow over Langerhans...
Tuesday, February 21, 2012
Opal Island
This is a relic from the fall of 1998, my first semester at college (Tulane University). I was not actively gaming at the time but I still created game material as if I was. I recently found a notepad from back then that had a two page write up of the Opal House, and I think it is a pretty cool little locale. I have transcribed the text below, but I have also included the original two pages at the end of this post for shits and giggles. I left the text unedited with the exception of fixing a "they're - their" goof.
West Riverside, Opal House
Built on the muddy banks of the Chala River, dozens of ramshackle huts are home to Chala's poorer residents. Severe storms sometimes push the muddy river water up into this tangle of humanity, but there are always desperate people more than willing to throw up new shacks and call Chala home. The Opal House is the most infamous of the areas many bars / brothels / smokehouses. Built on the only permanent island among the myriad shifting sandbars of the Chala River, it is a three story structure built on a massive rock that juts out of the water. There are ferries that run on a cable between the isle and the mainland - the cost is 1 GP to go over to the island, but that fee includes free drinks and a bunk in one of the small bunkhouses if so desired.
[2012 Annotation: I am pretty sure the "small bunkhouses" I refer to are the 5 large one story buildings with a single door. There must have been a disconnect between the map drawing and the writing. One can only imagine the conditions inside those flop houses.]
The first floor of the Opal House is a bar with seating and tables. The air is smokey and music drifts in circles around the naked women dancing on platforms around the walls. Up one flight of stairs is a cushioned room. Silver hookahs snake their arms through a haze of sharta smoke to the mouths of the semi-conscious lying on the couches. Access to this upper level - another two gold coins paid to the slim, dark men standing in front of the stairway. Ten private rooms adjoin the main smoke room - tapestried and curtained off for privacy, more than a few deals and murders have occurred in their confines. One more flight of stairs leads to the brothel - drugged out men and women stumble up the velvet covered stairs and emerge into a blue dream. Rustling blue silk lines the floors, ceiling, and walls. An unseen and unfelt force moves the silk in gentle swaying motions, and blue-green light flickers out of silver balls that float in mid air. Passing out in this maze of hallucinations can be deadly - people have disappeared, and there is always a demand for drugged human bodies.Three gold at the door, and you can have a night of delirium on the third floor of the Opal House. Ferries back to the mainland leave every half hour - 12 person capacity, 1 SP each.
Opal Island is riddled with caves formed when limestone intrusions in the granite rock dissolved in the river water. Several of these caves have been linked together by Sama Shadow and serve as store rooms and secret meeting halls for the mysterious man. These caves and store rooms are usually empty - occasionally, hired hands will be loading or unloading boxes of wine, black lotus, sharta and lak. These boxes are marked with Sama Shadows emblem, a black orb in front of crossed silver scimitars. The northern store room has a wooden shield bearing Sama's standard - the orb and scimitars over a field of gold. It hangs on the east wall, and pressing on the orb opens the sliding panel. The lower levels are very damp and seldom used for anything other than holding drugged bodies.
The lowest levels are home to Sama Shadows "servants". In the first cave a horrific snake demon coils and flexes in the dark devouring virgin sacrifices and waiting for Sama Shadow to summon its services. The lower cave swarms with larva, twisted yellow worms with human faces. Sam Shadow uses these monstrosities as currency in many of his dealings.
Sam Shadow keeps beautiful women in the upper cells - their noses are plugged and a pipe inserted into their mouths. With every breath in and out they inhale a blend of sharta and black lotus. After weeks of this, they are beautiful compliant puppets. In the large cage, men and women who ended up in Shadow's care huddle terrified in their own feces awaiting their fate - there is always a market for deaf and dumb slaves, their will broken by Sama Khadoum... Two skeletons guard the long hall, terrifyingly resilient and resistant to damage. A ladder in the corner of the first room leads up to a small cave with a submerged tunnel leading into the river, close to the main dock.
West Riverside, Opal House
Built on the muddy banks of the Chala River, dozens of ramshackle huts are home to Chala's poorer residents. Severe storms sometimes push the muddy river water up into this tangle of humanity, but there are always desperate people more than willing to throw up new shacks and call Chala home. The Opal House is the most infamous of the areas many bars / brothels / smokehouses. Built on the only permanent island among the myriad shifting sandbars of the Chala River, it is a three story structure built on a massive rock that juts out of the water. There are ferries that run on a cable between the isle and the mainland - the cost is 1 GP to go over to the island, but that fee includes free drinks and a bunk in one of the small bunkhouses if so desired.
[2012 Annotation: I am pretty sure the "small bunkhouses" I refer to are the 5 large one story buildings with a single door. There must have been a disconnect between the map drawing and the writing. One can only imagine the conditions inside those flop houses.]
The first floor of the Opal House is a bar with seating and tables. The air is smokey and music drifts in circles around the naked women dancing on platforms around the walls. Up one flight of stairs is a cushioned room. Silver hookahs snake their arms through a haze of sharta smoke to the mouths of the semi-conscious lying on the couches. Access to this upper level - another two gold coins paid to the slim, dark men standing in front of the stairway. Ten private rooms adjoin the main smoke room - tapestried and curtained off for privacy, more than a few deals and murders have occurred in their confines. One more flight of stairs leads to the brothel - drugged out men and women stumble up the velvet covered stairs and emerge into a blue dream. Rustling blue silk lines the floors, ceiling, and walls. An unseen and unfelt force moves the silk in gentle swaying motions, and blue-green light flickers out of silver balls that float in mid air. Passing out in this maze of hallucinations can be deadly - people have disappeared, and there is always a demand for drugged human bodies.Three gold at the door, and you can have a night of delirium on the third floor of the Opal House. Ferries back to the mainland leave every half hour - 12 person capacity, 1 SP each.
Opal Island is riddled with caves formed when limestone intrusions in the granite rock dissolved in the river water. Several of these caves have been linked together by Sama Shadow and serve as store rooms and secret meeting halls for the mysterious man. These caves and store rooms are usually empty - occasionally, hired hands will be loading or unloading boxes of wine, black lotus, sharta and lak. These boxes are marked with Sama Shadows emblem, a black orb in front of crossed silver scimitars. The northern store room has a wooden shield bearing Sama's standard - the orb and scimitars over a field of gold. It hangs on the east wall, and pressing on the orb opens the sliding panel. The lower levels are very damp and seldom used for anything other than holding drugged bodies.
The lowest levels are home to Sama Shadows "servants". In the first cave a horrific snake demon coils and flexes in the dark devouring virgin sacrifices and waiting for Sama Shadow to summon its services. The lower cave swarms with larva, twisted yellow worms with human faces. Sam Shadow uses these monstrosities as currency in many of his dealings.
Sam Shadow keeps beautiful women in the upper cells - their noses are plugged and a pipe inserted into their mouths. With every breath in and out they inhale a blend of sharta and black lotus. After weeks of this, they are beautiful compliant puppets. In the large cage, men and women who ended up in Shadow's care huddle terrified in their own feces awaiting their fate - there is always a market for deaf and dumb slaves, their will broken by Sama Khadoum... Two skeletons guard the long hall, terrifyingly resilient and resistant to damage. A ladder in the corner of the first room leads up to a small cave with a submerged tunnel leading into the river, close to the main dock.
Subscribe to:
Posts (Atom)